Updated July 5, 2023

Introduction to MVC DropDownList
When we have to get a dropdown list on a particular form in an MVC ASP.Net project or application then we can use the HtmlHelper class. The HtmlHelper class helps us by providing two methods namely DropDownList() and DropDownListFor() to create the <select> element in razor view. In this article, we will learn first how we can create a static drop-down list and then further we will have an example where we will be using the entities and will generate the drop-down list for the same.
Syntax
Below is the syntax for MVC DropDownList:
MvcHtmlString Html.DropDownList(string name, IEnumerable<SelectLestItem> selectList, string optionLabel, object HTML attributes)Parameters
- MvcHtmlString: It is the HTML code string that is returned by the DropDownList method and represents the select element code in HTML.
- string name: It is the string parameter passed to this method which is the name of the dropDownList.
- IEnumerable<SelectListItem> select list: It is the list of SelectListItem objects which is the basic object specifying the name of the option and its identifier value with optionally taking selected parameter which mentions which option is to be shown selected by default.
- String optionLabel: It is the optional parameter that helps to specify the first label on the dropdown list.
- Object HTML attributes: This is generally a collection of HTML attributes that helps in specifying different things related to the dropdown list.
Now, We will take one simple example which is for payroll application’s registration form for employees which will accept two fields namely Employee Name and Role of that employee. We will collect all the possible options of the drop-down list of roles from the controller. MVC pattern focuses on segregating the code in model, view and controller format. Further, we will learn how this drop-down list will be displayed on view after collecting options from the controller and how the selected option can be further processed and render the selected value back to the user.
Examples to Implement MVC DropDownList
Below are the examples mentioned:
Example #1
Firstly we will need a model that will hold the state and values selected by the user in the registration form. Note that both the fields on registration form namely name and role are required fields.
Code:
public class RegistrationModel
{
[Required]
[Display(Name="Name")]
public string Name { get; set; }
// This property will hold a role selected by user
[Required]
[Display(Name="Role")]
public string Role { get; set; }
// It will hold all possible Roles for selection
public IEnumerable<SelectListItem> Roles { get; set; }
}
Explanation: The name and role will store or hold the values as selected by the employee on the registration form and roles enum will store all the possible positions or roles.
Examples #2
Now we will go for the main essence and most critical part of the code which is the controller. The controller consists of a bit complex code and three action methods one for form loading, second for taking up the form inputs and then for the submission of the form.
Code:
public class RegistrationController : Controller
{
//
// 1. Action method for displaying 'Employee Registration' page
//
public ActionResult register()
{
// Getting all roles that we need for a DropDownList
var roles = GetAllRoles();
var model = new registerModel();
// Get list of SelectListItems
model.roles = GetOptionRolesList(roles);
return View(model);
}
//
// 2. Action method for handling employee-entered data when 'Employee Registration' button is pressed.
//
[HttpPost]
public ActionResult register(registerModel model)
{
// Get all roles again
var roles = GetAllRoles();
// Set these roles on the model. We need to do this because
// only the selected value from the DropDownList is posted back, not the whole
// list of roles.
model.roles = GetOptionRolesList(roles);
// In case everything is fine - i.e. both "Name" and "Role" are entered/selected,
// redirect employee to the "Successful" page, and pass the employee object along via Session
if (ModelRole.IsValid)
{
Session["registerModel"] = model;
return RedirectToAction("Successful");
}
// Something is not right - so render the registration page again,
// keeping the data employee has entered by supplying the model.
return View("register", model);
}
//
// 3. Action method for displaying 'Successful' page
//
public ActionResult Successful()
{
// Get Employee Registration information from the session
var model = Session["registerModel"] as registerModel;
// Display Successful.html page that shows Name and selected Role.
return View(model);
}
private IEnumerable<string> GetAllRoles()
{
return new List<string>
{
"Project Manager",
"Team Leader",
"Senior Developer",
"Junior Developer",
"Tester",
"Network Manager",
"Support Person",
};
}
private IEnumerable<SelectListItem> GetOptionRolesList(IEnumerable<string> elements)
{
var roleList = new List<SelectListItem>();
foreach (var element in elements)
{
roleList.Add(new SelectListItem
{
Value = element,
Text = element
});
}
return roleList;
}
}
Explanation: The most important code over here is the getOptionRolesList method where we iterate all the enum values of the supplied enum parameter to it which in our case will be enum returned from GetAllRoles method. While iterating each element of the enum it creates a new SelectItemList type of object which consists of the value and the text of our dropdownlist’s option. This is equivalent to HTML’s <option> tag. This code will be rendered twice. Firstly, when the form will be loaded and the second time when the employees will select or enter all values and submit the form.
One of the important things to consider over here is that we have to render it twice because of the browse’s nature which posts back only the selected values back to the page. In this case, if the drop-down list is not passed all the selectItemList again it will be rendered blank. This creates a problem when you want to redisplay the form during some validation failure. That’s the reason why the code is rendered twice.
Example #3
Here is the code for the final view section that will be displaying the dropDownList of roles on the form by using the method DropDownList().
Code:
@model Dropdowns.Models.RegistrationModel
@{ ViewBag.Title = "Employee Registration"; }
<div class="row">
<div class="col-sm-4 col-sm-offset-4">
<h1>Employee Registration</h1>
<div class="panel panel-default">
<div class="panel-body">
@using (Html.BeginForm("register", "register", FormMethod.Post, new { role = "form" })) {
@* Name textbox *@
<div class="form-group">
@Html.LabelFor(m => m.Name)
@Html.TextBoxFor(m => m.Name, new { @class = "form-control" })
</div>
@* Role selection dropdown *@
<div class="form-group">
@Html.LabelFor(m => m.Role)
@Html.DropDownList(m => m.Role, // 1. Store selected value in Model.Role;
// when page is rendered after postback,
// take selected value from Model.Role.
Model.Roles,
"- Please select a Role -",
new { @class = "form-control" })
</div>
<button type="submit" class="btn btn-primary">Employee Registration</button>
}
</div>
</div>
</div>
</div>
Note: That is the view part of code the most important thing is the DropDownList method’s usage who’s the first parameter consists of the currently held/selected value of the user which is passed to the controller, second parameter consisting of the list of select item list objects containing all possible roles. The third parameter is the optional label parameter which will act as the first value on dropDownList and the last parameter being the HTML attribute specifying CSS is any and other information.
Example #4
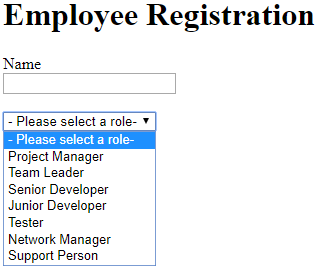
The final code that will be sent to your browser will look somewhat like the following which is similar to HTML code.
Code:
<select class="form-control" id="Role" name="Role">
<option value="">- Please select a role-</option>
<option value="Project Manager">Project Manager</option>
<option value="Team Leader">Team Leader</option>
<option value="Senior Developer">Senior Developer</option>
<option value="Junior Developer">Junior Developer</option>
<option value="Tester">Tester</option>
<option value="Network Manager">Network Manager</option>
<option value="Support Person">Support Person</option>
</select>
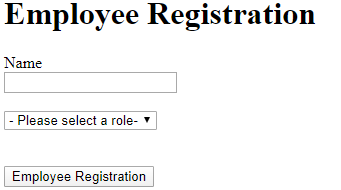
Output:
EducationPlatforms Model
Let’s consider another simple example, We will have one entity named EducationPlatforms. Here’s how it will look like containing id, name, mode of learning, subject, and duration as its properties. We will create a small model for it.
Code:
public class EducationPlatforms
{
public int Id { get; set; }
public string name { get; set; }
public Mode modeOfLearning { get; set; }
public string subject { get; set; }
public int duration { get; set; }
}
public enum Mode
{
Online,
LiveClasses
}
Now, we will code for the dropdownlist of the mode of learning field of our model EducationPlatforms.
@using MyMVCApp.Models
@model EducationPlatforms
@Html.DropDownList("modeOfLearning",
new SelectList(Enum.GetValues(typeof(Mode))),
"Select Mode",
new { @class = "form-control" }
The HTML equivalent of the above code is as shown below
<select class="form-control" id=" modeOfLearning " name=" modeOfLearning ">
<option>Select Mode</option>
<option>Online</option>
<option>LiveClasses</option>
</select>
Explanation: In the above example, we have mentioned the first parameter for the property name for which we are building the dropDownList. For the second parameter instead of the passing list of SelectItemList objects, we have used enum of Modes enum and retrieved its possible values by using the built-in method of Enum class named getValues which gets all the possible values of that enum. The third parameter to this method is the label name which will act as the first member of our dropdown list and finally the fourth parameter is for specifying the HTML properties and attributes like the CSS that needs to be applied for our drop-down list.
We may add MyMVCApp.Models namespace to the <namespaces> section in the web.config file of our View folders instead of mentioning here by using @ so that all namespaces will be included in all the views of your application.
Output:
Conclusion
In this way, we can use the DropDownList method for creating a drop-down in our MVC architecture. In this article, ASP .Net MVC is used. We can even collect the options or selectItemList values from the database and then assign them to our drop-down is necessary. This is the most common case while dealing with drop-down in real-time applications.
Recommended Articles
This is a guide to MVC DropDownList. Here we discuss an introduction to MVC DropDownList with synatx and examples to implement with proper codes and outputs. You can also go through our other related articles to learn more –


