Updated March 13, 2023
Introduction to MVVM Design Pattern
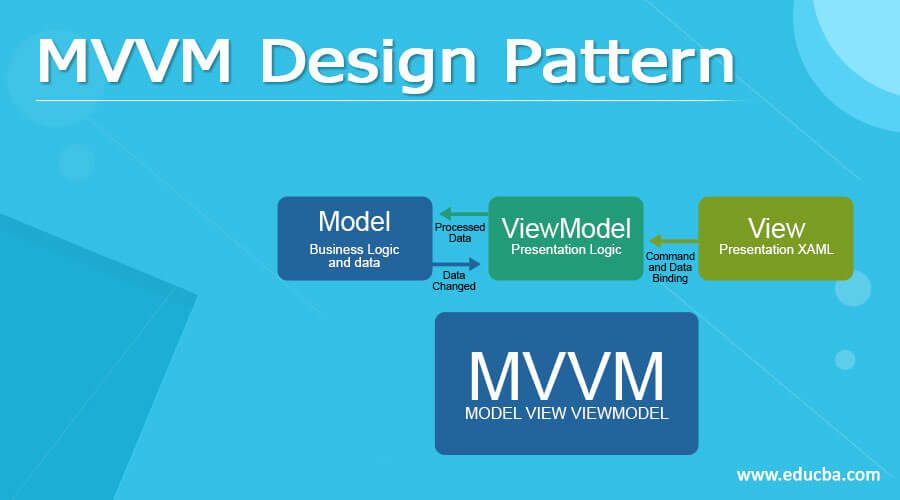
MVVM Design Pattern is the structural design pattern that separates the objects into three major components; they are Model, View, and ViewModel. This software design pattern separates into program logic, and user interface controls. It is also called the Model-View-Binder, and it facilitates the simpler parallel development of User interfaces and building blocks. They are mostly structs or simple classes. The view is used to display visually and some controls on the UI.
Overview of MVVM Design Pattern
The MVVM abstract just imagines the view and diminishes the business logic needed in the application code. ViewModel is simpler to test than in the event-driven code. The MVVM design pattern is also called the architecture, which separates the objects into three components they are Model-View-ViewModel which is the industry-recognized architecture pattern that overcomes the entire drawback of MVC and MVP pattern of design. MVVM separates the UI Logic from the business logic part of the application.
The MVVM (Model-View-ViewModel) pattern acquires the group of attention, and this pattern is simple where most of the developers got stuck in implementing it. Frequently developers use the toolkit/ framework which offers the implementation of the MVVM pattern, and they delay in particular framework due to no knowledge of the pattern itself. Frameworks are the essential thing that offers libraries to make the implementation of the pattern by encapsulating functionalities which is not accessible in the fundamental XAML engine.
How to Use MVVM Design Pattern?
Let’s see the basic functionality and use of the MVVM Pattern,
The MVVM (Model-View-ViewModel) is the architectural pattern used in a software platform invented by Microsoft, which specializes in model design patterns of presentation. It is based on the MVC (Model-View-Controller) pattern and is aimed at modern User Interface development platforms (like WPF & SilverLight). They are UX developer who has various needs than usual developer. MVVM (Model-View-ViewModel) is the method of creating client applications which is a feature of the WPF platform it enables simple testing of applications and assists designers, and developers to work jointly with minimal technical issues.
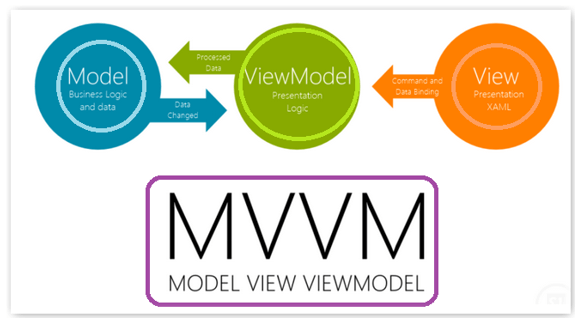
MVVM (Model- View- ViewModel) is separated into three components they are
- View
- Model
- ViewModel
Let’s see the use of each component
- View – View is described in XAML, and it must not have any logic in code behind it is bound in ViewModel by using data binding.
- Model– The model is mainly used for representing data in the method, which is simply delicate by WPF.
- ViewModel – ViewModel is the model for presenting the application or, we can say, the abstraction of view. It depicts the data applicable to the view and represents the activities for the view, generally with commands.
Create Project MVVM Design Pattern
MVVM Design Pattern is the software design pattern separates into program logic and user interface controls. It is the structural design pattern that separates the objects into three major components; they are Model, View, and ViewModel. Let’s see the creation as follows,
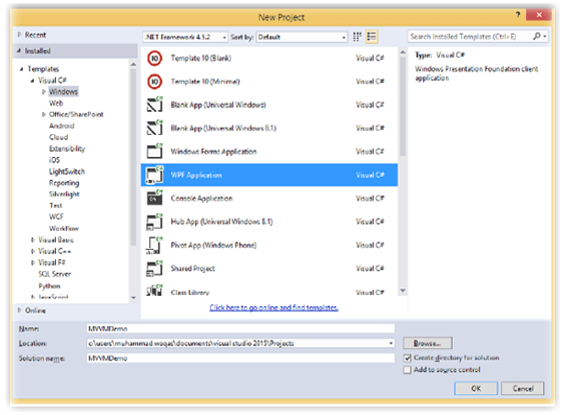
Initially, open the VS 2010 and File à Newà Project to create the WPF Project.
Select the Window in the installed templates, select WPF Application, and give the suitable name and desired location to save.
Finally, click OK.
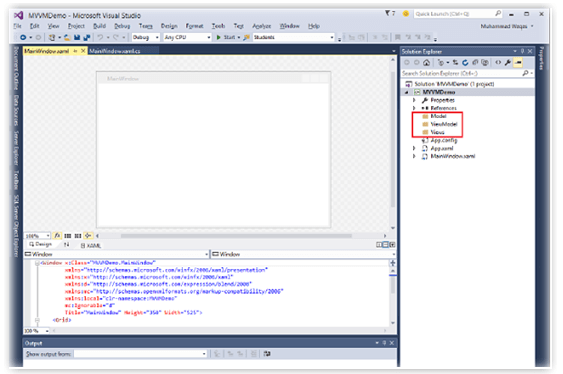
Create the three folders in the root application. Those names must be Model, View, and ViewModel and include the new class in Model
Folder here, the class name is UserDetails and includes the namespace
using System.ComponentModel;
UserDetails.cs
public class UserDetails : INotifyPropertyChanged

{

private int u_userId;

private string u_firstName;

private string u_lastName;

private string u_city;

private string u_state;

private string u_country;

public int u_userId

{

get

{

return u_userId;

}

set

{

u_userId = value;

OnPropertyChanged("u_userId");

}

}

public string u_firstName

{

get

{

return u_firstName;

}

set

{

u_firstName = value;

OnPropertyChanged("u_firstName");

}

}

public string u_lastName

{

get

{

return u_lastName;

}

set

{

u_lastName = value;

OnPropertyChanged("u_lastName");

}

}

public string u_city

{

get

{

return u_city;

}

set

{

u_city = value;

OnPropertyChanged("u_city");

}

}

public string u_state

{

get

{

return u_state;

}

set

{

u_state = value;

OnPropertyChanged("u_state");

}

}

public string u_country

{

get

{

return u_country;

}

set

{

u_country = value;

OnPropertyChanged("u_country");

}

}


#region INotifyPropertyChanged Members

public event PropertyChangedEventHandler PropertyChanged;

private void OnPropertyChanged(string propertyName)

{

if (PropertyChanged != null)

{

PropertyChanged(this, new PropertyChangedEventArgs(propertyName));

}

}

#endregion

 }
And then just right-click on the ViewModel Folder and include the New Class as follows,
UserDetailViewModel.cs
using System.Windows.Input;

using System.ComponentModel;

class UserDetailViewModel

{

private IList<UserDetails> _UsersList;

public UserDetailViewModel()

{

_UsersList = new List<UserDetails>

{

new UserDetails {u_UserId=1001,u_firstName="Peter",u_lastName="Paul",u_city="New York",u_state="NY",u_country="USA"},

new UserDetails{u_UserId=1002,u_firstName="Danial",u_lastName="Rio",u_city="Delhi", u_state="DEL", u_country="India"},

};

}

public IList<UserDetails> Users

{

get { return _UsersList; }

set { _UsersList = value; }

}

private ICommand mUpdater;

public ICommand UpdateCommand

{

get

{

if (mUpdater == null)

mUpdater = new Updater();

return mUpdater;

}

set

{

mUpdater = value;

}

}

private class Updater : ICommand

{


public bool CanExecute(object parameter)

{

return true;

}

public event EventHandler CanExecuteChanged;

public void Execute(object parameter)

{

}

}

}
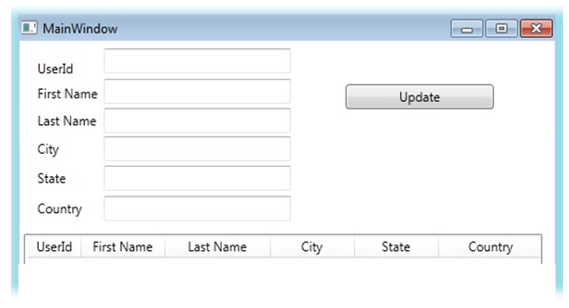
And now move on to View to include new windows in View Folder.
Important.xaml
<Window x:Class="WpfMVVMSample.MainWindow"

xmlns="http://schemas.microsoft.com/winfx/2006/xaml/presentation"

xmlns:x="http://schemas.microsoft.com/winfx/2006/xaml"

Title="MainWindow" Height="485" Width="525">

<Grid Margin="0,0,0,20">

<Grid.RowDefinitions>

<RowDefinition Height="Auto"/>

<RowDefinition Height="*"/>

<RowDefinition Height="Auto"/>

</Grid.RowDefinitions>

<ListView Name="UserGrid" Grid.Row="1" Margin="4,178,12,13"  ItemsSource="{Binding Users}"  >

<ListView.View>

<GridView x:Name="UsergrdTest">

<GridViewColumn Header="ID" DisplayMemberBinding="{Binding u_UserId}"  Width="50"/>

<GridViewColumn Header="First Name" DisplayMemberBinding="{Binding u_firstName}"  Width="80" />

<GridViewColumn Header="Last Name" DisplayMemberBinding="{Binding u_lastName}" Width="100" />

<GridViewColumn Header="City" DisplayMemberBinding="{Binding u_City}" Width="80" />

<GridViewColumn Header="State" DisplayMemberBinding="{Binding u_State}" Width="80" />

<GridViewColumn Header="Country" DisplayMemberBinding="{Binding u_Country}" Width="100" />

</GridView>

</ListView.View>

</ListView>

<TextBox Grid.Row="1" Height="23" HorizontalAlignment="Left" Margin="80,7,0,0" Name="txtUserId" VerticalAlignment="Top" Width="178" Text="{Binding ElementName=UserGrid,Path=SelectedItem.User_UserId}" />

<TextBox Grid.Row="1" Height="23" HorizontalAlignment="Left" Margin="80,35,0,0" Name="txtFirstName" VerticalAlignment="Top" Width="178" Text="{Binding ElementName=UserGrid,Path=SelectedItem.u_firstName}" />

<TextBox Grid.Row="1" Height="23" HorizontalAlignment="Left" Margin="80,62,0,0" Name="txtLastName" VerticalAlignment="Top" Width="178" Text="{Binding ElementName=UserGrid,Path=SelectedItem.u_lastName}" />

<Label Content="ID" Grid.Row="1" HorizontalAlignment="Left" Margin="12,12,0,274" Name="label1" />

<Label Content="Last Name" Grid.Row="1" Height="28" HorizontalAlignment="Left" Margin="12,60,0,0" Name="label2" VerticalAlignment="Top" />

<Label Content="First Name" Grid.Row="1" Height="28" HorizontalAlignment="Left" Margin="12,35,0,0" Name="label3" VerticalAlignment="Top" />

<Button Content="Update" Grid.Row="1" Height="23" HorizontalAlignment="Left" Margin="310,40,0,0" Name="btnUpdate"

VerticalAlignment="Top" Width="141"  Command="{Binding Path=UpdateCommad}"  />

<TextBox Grid.Row="1" Height="23" HorizontalAlignment="Left" Margin="80,143,0,0" x:Name="txtCity" VerticalAlignment="Top" Width="178" Text="{Binding SelectedItem.City, ElementName=UserGrid}" />

<Label Content="Country" Grid.Row="1" Height="28" HorizontalAlignment="Left" Margin="12,141,0,0" x:Name="label2_Copy" VerticalAlignment="Top" />

<TextBox Grid.Row="1" Height="23" HorizontalAlignment="Left" Margin="80,88,0,0" x:Name="txtCountry" VerticalAlignment="Top" Width="178" Text="{Binding SelectedItem.Country, ElementName=UserGrid}" />

<Label Content="City" Grid.Row="1" Height="28" HorizontalAlignment="Left" Margin="12,86,0,0" x:Name="label2_Copy1" VerticalAlignment="Top" />

<TextBox Grid.Row="1" Height="23" HorizontalAlignment="Left" Margin="80,115,0,0" x:Name="txtSTate" VerticalAlignment="Top" Width="178" Text="{Binding SelectedItem.State, ElementName=UserGrid}" />

<Label Content="State" Grid.Row="1" Height="28" HorizontalAlignment="Left" Margin="12,113,0,0" x:Name="label2_Copy2" VerticalAlignment="Top" />

</Grid>

</Window>
And then App.xaml.cs in this to bind the application startup
protected override void OnStartup(StartupEventArgs e)

{

base.OnStartup(e);

WpfMVVMSample.MainWindow window = new MainWindow();

UserDetailViewModel VM = new UserDetailViewModel();

window.DataContext = VM;

window.Show();

}
Finally execute the application.
MVVM Design Non-Pattern
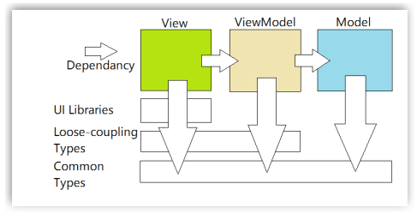
The MVVM (Model-View-ViewModel ) pattern supports the developers in creating the application by giving the three-component layer with their dependencies as given below,
It resembles the non-pattern of MVVM. The MVVM design pattern is called the architecture, which separates the objects into three components: Model-View-ViewModel.
Conclusion
This article has explained the MVVM design pattern, which is a software design pattern separated into program logic, and user interface controls. The article is explained with examples programmatically for better understanding.
Recommended Articles
This is a guide to MVVM Design Pattern. Here we discuss the introduction, overview, How To Use MVVM Design Pattern, and examples with code implementation. You may also have a look at the following articles to learn more –
