Updated May 25, 2023
Introduction to MySQL UPDATE Trigger
MySQL UPDATE_TRIGGER is one of the triggers that enable the update actions on the specified table. Generally, a trigger can be defined as a set of instructions or steps that automatically perform the intended change action on the specified table. The possible change actions can be INSERT, UPDATE, or DELETE. The concept of triggers is similar to stored procedures, and the execution helps in saving time and effort in writing the queries. The ‘CREATE TRIGGER’ statement defines a trigger, explicitly associating it with a table, and it represents a database object. We will discuss the details of both CREATE TRIGGER and UPDATE TRIGGER statements.
Syntax
You can create and drop triggers as per your requirements, just like any other set of statements. The CREATE trigger syntax is as below:
CREATE
[DEFINER = user]
TRIGGER trigger_name
trigger_time trigger_event
ON tbl_name FOR EACH ROW
[trigger_order]
trigger_body
Explanation:
- DEFINER: The definer is the user entitled to perform the trigger operations.
- trigger_name: trigger_name is the name of the trigger instruction. This is a user-defined field.
- trigger_time: trigger_time is the moment in which the trigger is to be initiated. Either BEFORE or AFTER indicates whether to perform the trigger action before each row or after.
- trigger_event: trigger_event is the change operation referred upon. INSERT, UPDATE, or DELETE actions are used as triggers.
- trigger_order: trigger order specifies if the trigger FOLLOWS or PRECEDES
- trigger_body: trigger_body defines the trigger actions. Using the BEGIN-END block and changing the default delimiters is preferred when mentioning multiple statements.
The syntax is as follows:
DELIMITER $$
CREATE TRIGGER trigger_name
trigger_time trigger_event
ON table_name FOR EACH ROW
BEGIN
-- statements
END $$
DELIMITER;
How does the UPDATE Trigger function work in MySQL
We learned from the above discussion that there could be two UPDATE triggers, either BEFORE or AFTER UPDATE. These triggers work differently in performing an action on each row before or after the update.
AFTER UPDATE trigger
Let us consider two tables to understand the UPDATE trigger in detail. The first table is InitialSales, and the second table is SalesUpdates. Below is gives an idea of columns in the table.
Initial Sales Table:
We define the sales update table as follows:
Code:
CREATE TABLE SalesUpdates (
prodId INT AUTO_INCREMENT PRIMARY KEY,
sales_Id INT,
InitialQuantitiy INT,
UpdatedQuantity INT,
UpdatedOn TIMESTAMP NOT NULL DEFAULT CURRENT_TIMESTAMP
);
Let’s define the Trigger as below:
Code:
DELIMITER $$
CREATE TRIGGER Updated_Sales_Data
AFTER UPDATE
ON InitialSales FOR EACH ROW
BEGIN
IF OLD.qty<>new.qty THEN
INSERT INTO SalesUpdates(sales_Id, InitialQuantity, UpdatedQuantity)
VALUES(old.prodId, old.qty, new.qty);
END IF;
END $$
DELIMITER;
Output:
Explanation: The trigger name is Updated_Sales_Data. The trigger_event is “UPDATE,” and the trigger_time is “AFTER”. The trigger will act upon the table “InitialSales”. As per the query, if any update is made to column “qty” in the InitialSales table, a new entry will be added in the SalesUpdatetable, with the old and new values of the “qty” columns. Any updates made to the InitialSales table will automatically initiate the trigger. No need to explicitly execute the trigger every time.
To further check on the working of TRIGGER, let’s do two types of updates to the InitialSales table.
First, we will see updates made to the “qty” column of only one ‘prodId’.
Consider the InitialSales table below:
Code:
UPDATE InitialSales
SET qty = 500
WHERE prodId = 3;
Query will update the column ‘qty’ of prodId ‘3’, from ‘150’ to ‘500’.
Output:
Let’s see both tables InitialSales and SalesUpdates:
InitialSales:
SalesUpdates:
If we look into this scenario, we can understand the following things:
- Update made to qty column in InitialSales table reflects properly
- The salesUpdates table has data only for the updated row of the InitialSales table, which is a row of prodId = 3.
- The UPDATE TRIGGER was not explicitly called but automatically updated the theSalesUpdate table.
- The SalesUpdates table holds old and new values of the qty column
In the second scenario, let’s update all three rows of the InitialSales table.
InitialSales:
Code:
UPDATE initialSales
SET qty = CAST(qty * 1.5 AS UNSIGNED);
The query updates an increment to the ‘qty’ column of all three rows in the InitialSales table by 50%
Output:
InitialSales:
SalesUpdates:
The first row of the SalesUpdate table corresponds to the first update made to the InitialSales table (by our first query). So, we can see that the SalesUpdate table holds the history of all updates made, along with a timestamp.
BEFORE UPDATE trigger
Thus we have clearly understood the AFTER UPDATE trigger. Let’s try and familiarise ourselves with the BEFORE UPDATE trigger now.
For the BEFORE UPDATE trigger, let us consider the tables below:
InitialSales:
SalesUpdates:
Code:
CREATE TABLE SalesUpdates (
sales_Id INT AUTO_INCREMENT PRIMARY KEY,
prodId INT,
InitialQuantitiy INT,
UpdatedQuantity INT,
Updated On TIMESTAMP NOT NULL DEFAULT CURRENT_TIMESTAMP
);
Let’s define the Trigger as below:
Code:
DELIMITER $$
CREATE TRIGGER Updated_Sales_Data
BEFORE UPDATE
ON InitialSales FOR EACH ROW
BEGIN
IF OLD.qty<>new.qtyTHEN
INSERT INTO SalesUpdates(sales_Id, InitialQuantity, UpdatedQuantity)
VALUES(old.prodId, old.qty, new.qty);
END IF;
END $$
DELIMITER;
Output:
Explanation: The trigger name is Updated_Sales_Data. The trigger_event is “UPDATE” and the trigger_time is “BEFORE”. The trigger will act upon the table “InitialSales”. According to the query, whenever a update is made to the “qty” column in the InitialSales table, a new entry will be inserted into the SalesUpdate table, containing the old and new values of the “qty” column. Any updates made to the InitialSales table will automatically initiate the trigger. No need to explicitly execute the trigger every time.
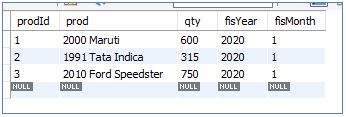
We have our InitialSales table below:
And SalesUpdate table as below:
Let’s execute a query to update the qty column in the InitialSales table.
Code:
UPDATE InitialSales
SET qty = 500
WHERE prodId = 3;
Output:
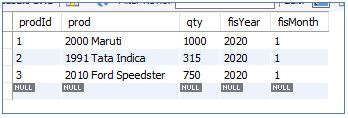
InitialSales table: The update statement modifies the value of the “qty” column in this table from ‘600’ to ‘1000’ for prodId = 1.
SalesUpdates table: The system displays the initial and updated values of the “qty” column and the “update_timestamp.”
In general, we can say that the BEFORE UPDATE trigger performs an update before committing it to the database. In contrast, the AFTER UPDATE trigger performs the update after the database commit.
Conclusion
In this section, we discussed the UPDATE triggers. A trigger can either be a BEFORE trigger or an AFTER trigger. In the CREATE trigger statement, we define the trigger_event as UPDATE for UPDATE trigger, trigger_time as BEFORE or AFTER as per requirement, trigger name, trigger body, and the table on which trigger will be performed. Once any updates are made to the highlighted column, the UPDATE trigger is automatically invoked, resulting in the update table being updated.
Recommended Articles
We hope that this EDUCBA information on “MySQL UPDATE Trigger” was beneficial to you. You can view EDUCBA’s recommended articles for more information.


