Updated April 14, 2023

Definition of NumPy Array Append
NumPy append is a function which is primarily used to add or attach an array of values to the end of the given array and usually, it is attached by mentioning the axis in which we wanted to attach the new set of values axis=0 denotes row-wise appending and axis=1 denotes the column-wise appending and any number of a sequence or array can be appended to the given array using the append function in numpy.
Syntax:
The basic syntax of the Numpy array append function is:
numpy.append(ar, values, axis=None)- numpy denotes the numerical python package.
- append is the keyword which denoted the append function.
- ar denotes the existing array which we wanted to append values to it.
- values are the array that we wanted to add/attach to the given array.
- axis denotes the position in which we wanted the new set of values to be appended.
- axis=0 represents the row-wise appending and axis=1 represents the column-wise appending.
Examples of NumPy Array Append
Following are the examples as given below:
Example #1
Let us look at a simple example to use the append function to create an array.
Code:
import numpy as np
arr1=np.append ([12, 41, 20], [[1, 8, 5], [30, 17, 18]])
arr1
Output:
In the above example, arr1 is created by joining of 3 different arrays into a single one. np.append () function is used to perform the above operation. We also see that we haven’t denoted the axis to the append function so by default it takes the axis as 1 if we don’t denote the axis.
Example #2
Code:
import numpy as np
arr1=np.append ([[12, 41, 20], [1, 8, 5]], [[30, 17, 18]],axis=0)
arr1
Output:
In this example, we have performed a similar operation as we did in example 1 but we have to append the array into a row-wise order. The axis=1 denoted the joining of three different arrays in a row-wise order.
Example #3
In this example, let’s create an array and append the array using both the axis with the same similar dimensions.
Code:
import numpy as np
arr1=np.array([[12, 41, 20], [1, 8, 5]])
print(arr1)
#### Appending Row-wise
print(np.append(arr1,[[41,80,14]],axis=0))
print('\n')
#### Appending column-wise
print(np.append(arr1,[[41,80,14],[71,15,60]],axis=1))
print('\n')
Output:
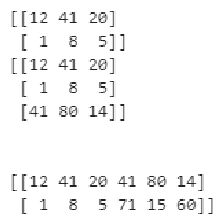
In this example, we have created a numpy array arr1 and we have tried to append a new array to it in both the axis. Here while appending the existing array we have to follow the dimensions of the original array to which we are attaching new values else the compiler throws an error since it could not concatenate the array when its out the boundaries of the dimension. So we have to keep the dimension in mind while appending the arrays and also the square brackets should be used when we are declaring the arrays else the data type would become different.
Example #4
Code:
import numpy as np
arr1 = np.arange(10)
print("one dimensional arr1 : ", arr1)
print("Shape of the array : ", arr1.shape)
arr2 = np.arange(5, 15)
print("one dimensional arr2 : ", arr2)
print("Shape of the array : ", arr2.shape)
# Array appending
arr3 = np.append(arr1, arr2)
print("Appended arr3 : ", arr3)
Output:
In this example, we have created two arrays using the numpy function arrange from 0 to 10 and 5 to 15 as array 1 & array 2 and for a better understanding we have printed their dimension and shape so that it can be useful if we wanted to perform any slicing operation. The array 3 is a merger of array 1 & 2 were in previous methods we have directly mention the array values and performed the append operation. Here in this example we have separately created two arrays and merged them into a final array because this technique is very easy to perform and understand. It involves less complexity while performing the append operation.
Example #5
Code:
import numpy as np
arr1 = np.arange(10).reshape(2, 5)
print("one dimensional arr1 : ", arr1)
print("Shape of the array : ", arr1.shape)
arr2 = np.arange(5, 15).reshape(2, 5)
print("one dimensional arr2 : ", arr2)
print("Shape of the array : ", arr2.shape)
# Array appending
arr3 = np.append(arr1, arr2)
print("Appended arr3 : ", arr3)
Output:
In this example, we have used a different function from the numpy package known as reshape where it allows us to modify the shape or dimension of the array we are declaring. Array 1 has values from 0 to 10 we have split them into 5×2 structure using the reshape function with shape (2,5) and similarly, we have declared array 2 as values between 5 to 15 where we have reshaped it into a 5×2 structure (2,5) since there are 10 values in each array we have used (2,5) and also we can use (5,2). So depending upon the number of values in our array we can apply the shape according to it. So the resulting appending of the two arrays 1 & 2 is an array 3 of dimension 1 and shape of 20. Since we haven’t denoted the axis the append function has performed its operation in column-wise.
Let’s see another example where if we miss the dimensions and try to append two arrays of different dimensions we’ll see how the compiler throws the error.
Example #6
Code:
import numpy as np
arr1=np.array([[12, 41, 20], [1, 8, 5]])
print(arr1)
#### Appending Row-wise
print(np.append(arr1,[[41,80]],axis=0))
print('\n')
Output:
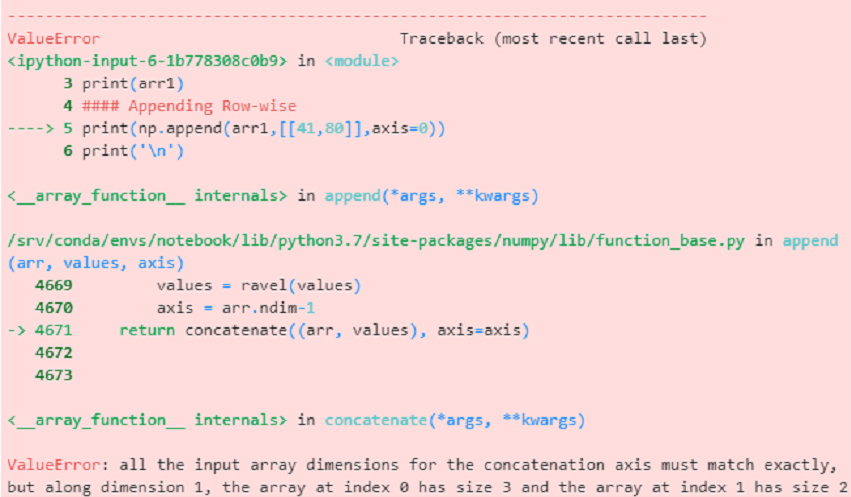
So here we can see that we have declared an array of 2×3 as array 1 and we have performed an append operation using an array of 1×2 in axis 0 so it is not possible to merge a 2×3 array with 1×2 so the output throws an error telling “all the input array dimensions except for the concatenation axis must match exactly”.
Conclusion
In this article, we have discussed numpy array append in detail using various examples. We have also discussed how to create arrays using different techniques and also learned how to reshape them using the number of values it has. We also discussed different techniques for appending multi-dimensional arrays using numpy library and it can be very helpful for working in various projects involving lots of arrays generation.
Recommended Articles
This is a guide to NumPy Array Append. Here we also discuss the definition and syntax of numpy array append along with different examples and its code implementation. You may also have a look at the following articles to learn more –


