Updated April 7, 2023
Introduction to OpenCV Histogram Equalization
The following article provides an outline for OpenCV Histogram Equalization. It is an inbuilt function which provides for processing of the image based on the contrast adjustments made by the usage of the histogram miss that has been provided by the user. This method functions by increasing the overall Global contrast that are present in the image, essentially when the image that has been provided to be processed is represented with values that are contract.
By making this adjustment, the data intensity which is recorded in the image distributed in a better manner in the histogram. Hence, this provides allowance contrast to be gained by the areas that have lower contrast locally. This is accomplished by efficiently spreading the high intensity values that are frequently present in the histogram. This is essentially useful for the images that have a foreground and background which are both or both bright.
Syntax:
Following is the syntax which is used for implementation the OpenCV Histogram Equalizer function:
equalizeHistsrc, dst)Parameters:
The following parameters are accepted by the OpenCV Histogram Equalizer function:
- src: This parameter represents the object of the class mat representing the input image or the source image.
- dst: This parameter is representative of the object with respect to class mat which is representing the output image – the image which is processed with OpenCV equalization function after processing the grayscale image.
How does OpenCV Histogram Equalization Execute?
By application of the histogram equalization process the system starts to compute the histogram of the pixels within the source image by intensifying in an output image which is single channel or gray scaled in simpler terms. You would notice in the below image how the histogram has various peaks presented which indicate that there are a lot of pixels that are binned within these buckets which are representing a good image. With histogram equalization the goal of the user is to spread these bundles or buckets of pixels so that there are not many pixels binded with them.
In mathematical terms this means that the user attempts to apply a linear trend to the cumulative distribution curve function which is being applied for the image. After the process of equalization is done you might notice that the contrast in the image improves significantly but this also comes at an expense of increasing the noise which is present in the input image. This can be rectified by application of adaptive histogram equalization method. In such application the user divides the input image which is to be processed into a X x Y grid. After the image is sorted into a grid the equalization is applied to each of the cells that are in captured by the grid which results in the output image to be of a much higher quality.
Input image where application of histogram equalization is to be done:
Example:
Below is Python code which demonstrates the implementation of the OpenCV Histogram Equalization function.
Code:
# command used to import the OpenCV library to utilize the histogram equalizer function
import cv2
# command used to import the Numpy library for utilization of the function in the below code
import numpy as np1
# command imread is used in order to read the image which is being sourced by the user
img_1 = cv2.imread(\C:\\My Computer\Desktop\EDU CBA LOGO 1.png\', 0)
# the process to create a Histograms Equalization of the source image cv2.equalizeHist()
equ1 = cv2.equalizeHist(img_1)
# the images are being stacked parallel to each other
res1 = np.hstack((img_1, equ1))
# the resultant image is displayed which are showed together show the difference in the images
cv2.imshow(\'image\', res1)
cv2.waitKey(0)
cv2.destroyAllWindows()
Output image after application the function:
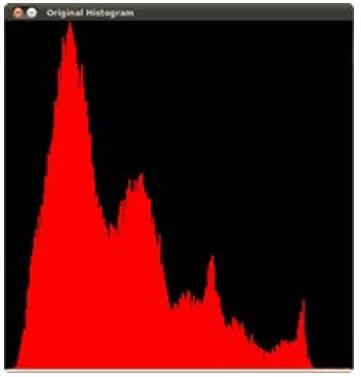
(Image 1: Histogram generated after application of gray scaling on the Source Image after gray scaling)
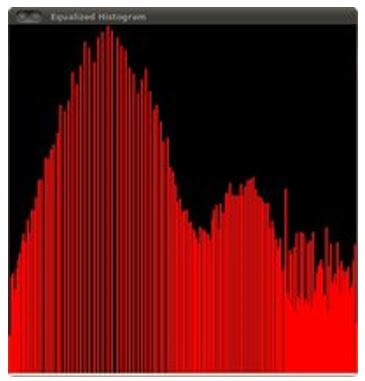
(Image 2: Processed histogram generated after application of the OpenCV Histogram Equalizer function the gray scaled image)
In the two images of the histogram presented, you can observe the 1st grayscale image has a declining contrast histogram graph which represents a less variety all variation in the contrast presented in the image. After the image is processed with the help of the function OpenCV histogram equalizer the second graph clearly represents a more diversified contrast that can be observed in the output image.
Conclusion – OpenCV Histogram Equalization
The OpenCV Histogram Equalizer function is responsible for reading an image and loaded it into the system by user and loading it into the system as per the instructions of the user. The function further converts the original image that has been provided by the user into a grayscale version of the same image and finally displaced the original image or the source image and upon trusting equalized image in the output window which is presented by the system processor. After the process of equalization is done you might notice that the contrast in the image improves significantly but this also comes at an expense of increasing the noise which is present in the input image. This can be rectified by application of adaptive histogram equalization method. This is used a lot in image processing and image detection applications and reduces the verbosity in such areas of allocation.
Recommended Articles
We hope that this EDUCBA information on “OpenCV Histogram Equalization” was beneficial to you. You can view EDUCBA’s recommended articles for more information.


