Updated April 15, 2023

Introduction to Pandas melt()
Pandas melt()unpivots a DataFrame from a wide configuration to the long organization. Melt() function in Pandas is helpful to rub a DataFrame into an arrangement where at least one sections are identifier factors, while every single other segment, thought about estimated factors, is unpivoted to the line pivot, leaving only two non-identifier segments, variable and worth.
Pandas melt() function is utilized to change the DataFrame design from wide to long. It is utilized to make a particular configuration of the DataFrame object where at least one segments fill in as identifiers. All the rest of the sections are treated as qualities and unpivoted to the line pivot and just two segments – variable and worth.
Pandas melt() permits you to ‘unpivot’ information from a ‘wide configuration’ into a ‘long arrangement’, ideal for my errand taking ‘wide organization’ monetary information with every segment speaking to a year and transforming it into ‘long configuration’ information with each line speaking to an information point.
Syntax and Parameters
Syntax and parameters of pandas melt() is given below:
Pandas.melt(column_level=None, variable_name=None, Value_name='value', value_vars=None, id_vars=None, frame)Where,
The column level represents all the columns of the dataframe which can be an integer, a floating-point value, or a string. Hence, by default it considers the none value because it consists of multiple indices then we use this column level to melt the values. Variable name represents the particular variable name which is used in columns to melt. It is always a scalar value and it is given a default value none because this value utilizes the variable used in that specific column to melt the dataframe.
The value name represents the name of the column value that is present. The value name is a scalar value and hence it is represented as ‘value’. Value_vars represents the unpivot columns that are present. If the column names are not indicated, then most of the columns are returned and not set as id variables. These value variables can be a list or tuple or ndarray. Id_vars represents all the columns which are implemented as identifier variables. These values could be a list, tuple, or ndarray. The frame represents the dataframe that has to be assigned in Pandas.
How melt() Function Works in Pandas?
Now we see various examples of how melt() function works in Pandas.
Example #1
Using melt() function to define id_vars and value_vars.
Code:
import pandas as pd
df = pd.DataFrame({'Name': {0: 'Span', 1: 'Vetts', 2: 'Suchu'},
'Score': {0: '98', 1: '97', 2: '96'},
'Age': {0: 24, 1: 30, 2: 23}})
pd.melt(df, id_vars =['Name'], value_vars =['Score'])
print(pd.melt(df, id_vars =['Name'], value_vars =['Score']) )
Output:
In the above program, we first import the Pandas library as pd and then define the dataframe under the headings Name, score, and age. Once we define the dataframe, we need to use the melt function to melt the age column values and only the variable values of the score column and name column has to be printed. Thus, once we use this function, the values get printed and finally displays the output.
Example #2
Using melt() function to print all the unpivot column values.
Code:
import pandas as pd
df = pd.DataFrame({'Name': {0: 'Span', 1: 'Vetts', 2: 'Suchu'},
'Score': {0: '98', 1: '97', 2: '96'},
'Age': {0: 24, 1: 30, 2: 23}})
pd.melt(df, id_vars =['Name'], value_vars =['Score', 'Age'])
print(pd.melt(df, id_vars =['Name'], value_vars =['Score', 'Age'])  )
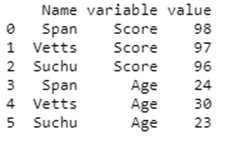
Output:
In the above program, we first import the pandas library as pd, and then we define the dataframe. Once the dataframe is defined, we use the melt() function to unpivot all the column values and print them in the output. Thus the command considers the melt() function in Pandas and finally displays the variable values and column values in the above-shown output.
Example #3
Code:
import pandas as pd
df = pd.DataFrame({'Name': {0: 'Span', 1: 'Vetts', 2: 'Suchu'},
'Score': {0: '98', 1: '97', 2: '96'},
'Age': {0: 24, 1: 30, 2: 23}})
pd.melt(df, id_vars =['Name'], value_vars =['Score'],
var_name ='NewName', value_name ='NewName')
print(pd.melt(df, id_vars =['Name'], value_vars =['Score'],
var_name ='NewName', value_name ='NewName') )
Output:
Here, we use the melt() function to customize the names of the variable values and finally print the output of the dataframe that is defined. As done before, we first import the pandas library as pd and finally define the dataframe. After defining the dataframe, we use this melt() function to perform the above implementation.
Conclusion
Hence, I conclude by saying that the Pandas melt() function is an adaptable capacity to reshape the Pandas dataframe. Prior, we perceived how to utilize Pandas melt() capacity to reshape a wide dataframe into a long clean dataframe, with a basic use case. Regularly while reshaping the dataframe, you should reshape some portion of the sections in your information and keep at least one segment as it is as identifiers. Pandas Melt() function is an incredible asset for changing information. It is especially helpful in the event that you on the off chance that you manage bunches of wide-style monetary and money related information, and need it in a more database amicable long-style design.
Recommended Articles
We hope that this EDUCBA information on “Pandas melt()” was beneficial to you. You can view EDUCBA’s recommended articles for more information.


