Updated March 23, 2023

Introduction to Peek Function in QlikView
The peek() function acts as a scripting function in QlikView. This function is an inter-record function that allows the user to peek into previously read records of a table and use its values to evaluate a condition or to affect the record that is being read. To put it in simple words, the peek() function fetches the value of a field from a previous record which could be further used in calculations. The row number and the table can be specified.
Syntax:
Peek(field_name[, row_no[, table_name ] ] )
Arguments:
| Argument | Description |
| field_name | The name of the field for which the return value is required. The input value must be given as a string (for example, ‘Sales Volume’). |
| row_no | The row in the table that specifies the field required. This can be an expression but should resolve to an integer. 0 indicates the first record, 1 for the second record and so on. Negative values denote order from the end of the table. -1 denotes the previous record read. If no row_no is stated, -1 is assumed by default |
| table_name | Table label without the ending colon. If table_name is not specified, the current table is assumed. In the case of referring to another table or using outside the LOAD statement, the table_name must be included. |
Example:
peek('Profit')
Returns the value of Profit in the previous record read (equivalent to previous(Profit)).
peek('Profit',2)
Returns the value of Profit from the third record read from the current input table.
Example of Peek Function in QlikView
Here is the example is given step by step
Step 1: Input Data
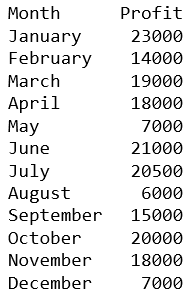
Let us create an excel file with the monthly profit of an organization as shown below and save the file in an excel format as ‘monthly_profit.xlsx’.
Step 2: Load Script
Press CTRL+E to open the script editor or it could also be directly opened by clicking on the script editor icon in the File Menu. The data is loaded to QlikView memory by using the script editor. When opened the script looks as shown below.
LOAD Month,

Profit

FROM

[C:\Users\smoham87\Desktop\monthly_profit.xlsx]
(ooxml, embedded labels);
Now, we need to add the peek() function to the script as shown is the example below.
LOAD Month,

Profit,

peek('Profit') as PrevMonth

FROM

[C:\Users\smoham87\Desktop\monthly_profit.xlsx]
(ooxml, embedded labels);
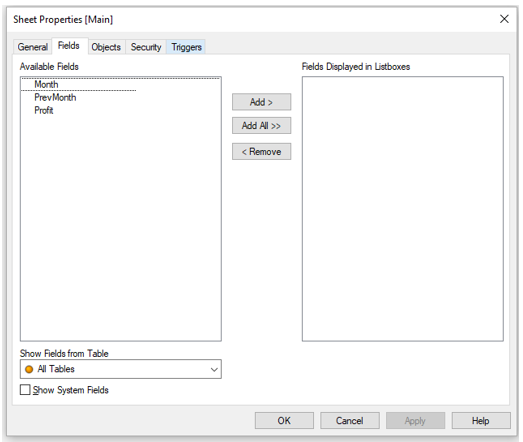
Click on Ok and try to reload the script. You will find that the new variable ‘PrevMonth’ will be created as shown in the figure below.
Step 3: Creating Sheet Object
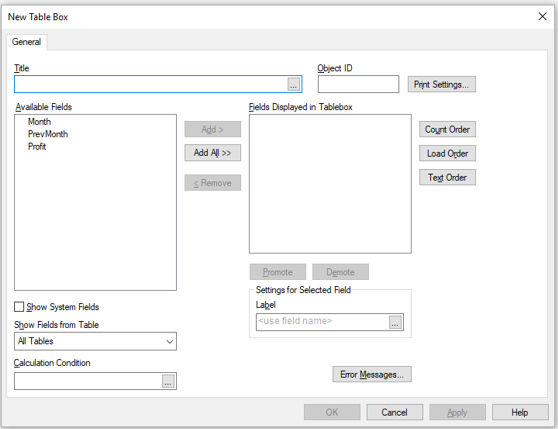
Lets us create a Table Box as an example to show how the data is generated by using the peek() script (Layout -> New Sheet Object -> Table Box). You will find the window as shown in the figure below.
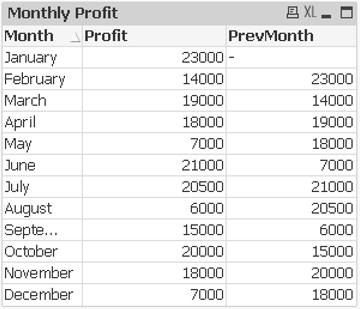
Enter the Title for the sheet object and select the required fields to be displayed and click OK. You will find the table box created as below. (You can later Sort the month column to list the months in sequence, in case they appear to be shuffled)
The Previous Month value for January appears to be Null as we do not have data prior to January.
Step 4: Using the peek() Function in Calculations
The peek() function can also be used in calculations involving various other columns. Let us now calculate the percentage change in the profits for each month and display it in the table box.
Open the script editor and edit the script as shown below and click OK.
LOAD Month,

Profit,

peek('Profit') as PrevMonth,

(([Profit]-peek('Profit')))/peek('Profit')*100  as Difference

FROM

[C:\Users\smoham87\Desktop\monthly_profit.xlsx]
(ooxml, embedded labels);
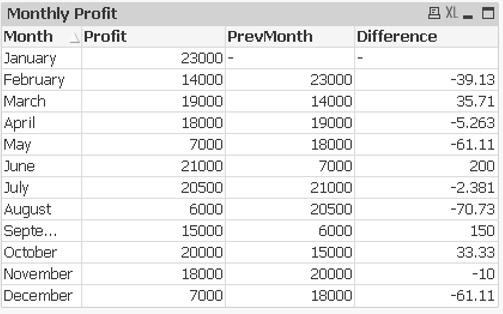
In the above script, we are creating a new variable that calculates the percentage change in the profit and assigning it to the variable name called ‘Difference’.
Step 5: Creating Sheet Object
Let us edit the existing Table Box we created earlier and add the ‘Difference’ column to it.
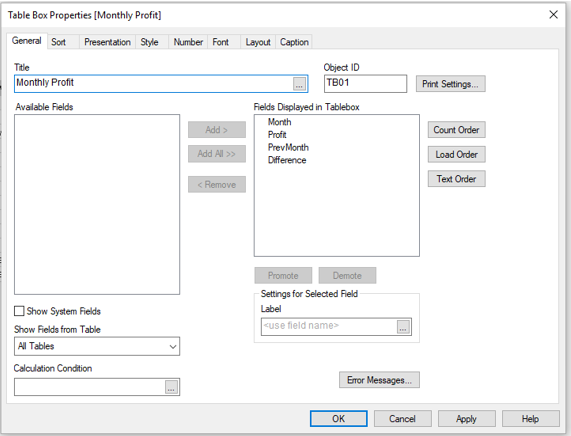
To edit the table box ‘Right Click’ on the table and click on ‘Properties’. The ‘Table Box Properties’ window will open as shown in the figure below.
Add the ‘Difference’ variable to ‘Fields Displayed in Tablebox’ and click OK.
You will find the table box as below added with the new column showing the percentage change.
Peek() vs Previous() – By now, there may be some of you who might have already used the Previous() function in QlikView and might be wondering what is the difference between the two.
The answer to that is that in most cases QlikView offers the developers to accomplish a task in more than one way. It has a lot of useful functions that at times are not used. It depends on us to use the right function in the right place. In this case, there are surely a few similarities between the two functions, but we also need to consider the differences that need to be considered while deciding the function we need to use.
Similarities
- The two functions are used to read previously recorded rows in a table.
- The two functions can be programmed further to not only read the last row but also read previously recorded rows.
Difference
The Previous() function runs on the Input and Peek() function runs on the Output of the Load statement. In the previous() function the data is directly loaded from the source which enables to refer even to the fields that have not been previously loaded in QlikView (it will work even if the associative database does not contain the loaded data). This will result in different behavior while we use a ‘where-clause’.
When to use Peek() function?
The peek() function should ideally be used when the user wants a field that has not been previously recorded into the table or if a specific row is targeted.
Conclusion
The Peek() function is not just limited to reading the previously loaded records from the table we are currently processing, but it can also read a specific field from any row in any previously loaded table.
Recommended Articles
This is a guide to Peek Function in QlikView. Here we discuss the Example of Peek Function in QlikView along with the similarities and differences. You may also have a look at the following articles to learn more –
