Updated April 5, 2023
Introduction to Perl block Comment
In Perl, comment or block comment is defined as writing or selecting the source code or explanation of source code which can be written in a single line or multiple lines such multiple lie comments are known as block comments where this line or multiple lines will start with some delimiter (symbol) and end with a delimiter. In general, we can define block comments as multi-line comment declaration within the Perl program, which is used to better understand the code for the developer and for further coding, which is done using some symbols or words in the beginning and at the end of the comments.
How to declare block comments in Perl with examples?
In this article, we will discuss how to write block comments in the Perl programming language. In Perl, there are two types of comments single line and multi-line comments which can also be said as block comments, where these block comments can be declared or created using some kind of delimiter at the start and the end of the line where we need to declare it as a comment which is used for just describing the code written which means it will be used and is the best practice to use comments in programs are to make the code understandable.
In Perl, a single line is defined and declared using the “#” symbol at the start of the comment line and is left out with no symbol at the end. The block comments or multi-line comments are defined as commenting block of code or some text using “=begin” at the start of the comment and “=end” at the end of the comment line, which is applied only for multiline comments or block comments. Sometimes at the end of the multi-line comment, even “=cut” is also used instead of “=end” in defining the block comments.
Now let us see syntax and examples for demonstrating the block of comments in the blow section.
Syntax:
=beginSome content or statements or codes.
=endSo in the above syntax, we can see this format can be used for commenting multi-lines wherein the above syntax can have =start instead of =begin and =cut instead of =end can also be used.
In Perl, it is usually likely that when 80 characters are completed in a single line comment, we have to start with a new line. In Perl, the first line itself contains the comment symbol, which informs the shell that the below code is to be passed by the Perl compiler. In general, we can say multiline comment starts with “=’ and “=end” or “=cut” statement and such kind of multi-line are special kind of comments known as plain old documentation (POD), and the text between these markers will be commented out.
Example:
#!/usr/bin/perl
print "Demonstration of block comments in Perl:";
print "\n";
print "\n";
print "Single line comment starts with #";
#this is single line comment in Perl.
print "\n";
print "\n";
print "Printing the variable value as:";
print "\n";
$a = "Educba Training Institute";
print $a;
print "\n";
print "Block comment starts with = and =end in Perl:";
print "\n";
=begin
This is a multi line comment or block comment.
The comments are not printed on the output screen
as they will be ignored by the Perl compiler.
=cut
Output:
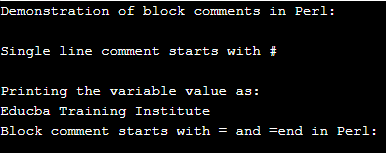
In the above program, we can see we have first defined and declared single line comment using “#” in the first line of the code and later also. In the above code, we have declared a variable that holds the string and can be printed using the print command. Then we have declared a multi-line comment starting with “=begin” followed by the statements that need to be commented out is written and then to end this comment line, we have written “=cut” in the above code so that anyone who is reading the code can make it out as it is the block comments or multi-line comment. Therefore, as in every programming language, the comments are used only for making the way to understand the codes better, and the compilers ignore these comments, and hence the comments are not printed on the output screen. The output of the above code can be seen in the above screenshot.
There is also a way of using the # symbol at the starting of each line in the program, but that is not the better way to define comments; we can just say it as multiple single-line comments but not as multi-line comments. In Perl, we can also define and declare the multiline comments using the quote operator, and this can be demonstrated in the below section with an example.
Example:
#!/usr/bin/perl
print "Demonstration of block comments in Perl:";
print "\n";
print "\n";
print "Single line comment starts with #";
#this is single line comment in Perl.
print "\n";
print "\n";
print "Printing the variable value as:";
print "\n";
$a = "Comments in Perl";
print $a;
print "\n";
print "Block comment using quote operator in the Perl program:";
print "\n";
q{
This is block comment.
This is done by using the quote operator q.
};
Output:
In the above program, we have declared a variable to see the output of the print command, and then we are declaring the block comment using quote operator such as q{ with comment statements }. So to declare or define the multi-line comment in Perl other than using “=begine” and “=end”, we can also write the multiline comments starting with the letter “q” followed by the statements that need to be commented out and these statements are written within the flower braces {}. The above code output can be seen in the screenshot above, and as above, the comments are never printed as the Perl compiler ignores them.
Conclusion
In this article, we conclude that in Perl defining single line comments is easier and is also used for multi-line comments but having “#” at the beginning of each line that needs to be commented out. In Perl, multi-line comments are also known as block comments and are defined using “=begin” at the start of the line and “=end” at the end of the comment line, and the other way of using block comments is by using quote operators q{}. These two demonstrations are done in the above article with examples.
Recommended Articles
This is a guide to Perl block comment. Here we discuss How to declare block comments in Perl with examples and outputs. You may also have a look at the following articles to learn more –


