Updated March 23, 2023

Introduction to PowerShell Copy-Item
You have copied one file from another directory and copied one directory to another directory, but have you ever imagine how many things you can perform before copy or at the time of copying. Have you ever realize what is happening internally. Let me explain to you in detail, actually by changing the location of any file we are changing memory reference of that files. Now PowerShell copies any item and changes the reference of memory only by placing it on other locations.PowerShell Copy-Item command copy a file (media, text, pdf, etc), it changes the location but namespace will be the same. Remember PowerShell Copy-Item command does not delete or cut an item. It is possible to copy a file from one location to another by renaming the file placed at the destination. Copy command Powerful for transferring any recursive (multiple files inside file system) file systems
We will learn how to use it and what we can do with the command Copy-Item command of PowerShell.
Syntax
A very simple syntax for PowerShell Copy-Item is
Copy-Item {path,-PassThru}-optional “sourcePath/sourceFile” -destination “destinationPath/” {force,include,exclude...}-optional
Below syntax is cover regular use things,
Copy-Item

[-Path(source folder location)] <array of string>-optional

[[-Destination(destination location)] <String>]
[-Force]-optional

[-Filter <String(filter contents for copy)>]-optional

[-Include <array of string>](specify contents need to be included like *pdf)-optional

[-Exclude <array of string>](specify contents need to be excluded like *txt)-optional

[-Recurse](this commands allow to copy folder containing another folder folder)-optional

[-PassThru](it will return an object of item on which it is working , by default it will return nothing)-optional

[-WhatIf](It shows what can happen if command run)-optional

[-Confirm](before  copying any file ask for confirmation)-optional

[<CommonParameters>]
Parameters
1. Confirm: It will ask you before running the command for your confirmation. It’s great some time to think before running a command of a copy.
2. Container: This is a boolean value command which preserves a container at the time of copying the file. By default this set true.
3. Destination: Its name is revealing its purposes, It direct command for the path at which file should be paste. We can also copy a file from source to destination with renaming the file.
4. Exclude: This command is used when we wanted to copy a folder from one location to another location with skipping some files like *pdf, here we are using a wild card which implies copy all and skips pdf files.
5. Filter: Here we can specify filter parameters for passing copy commands.
6. Force: Here it will give access to copy those items which are not allowed to copy, let’s take an example if there is any file with read-only access and we wanted to copy this file then we can use this command. Or take another example if a file already exists and we want to forcefully replace it with a new file.
7. Include: Included performs a similar task as -exclude, the only difference is here can define wildcard for files to be included at the time of copying file or media system.
8. LiteralPath: This command has the ability to copy a file on one or location in array format we can define them in an array of string format.
9. PassThru: It will always return an object of the item with which copy command was working .remember it will not return any value by default.
10. Path: It is the path from where we are picking an item for a copy to another location,
11. Recurse: Here it copies the folder containing folder inside it like we are copying a folder called /Ranjan and it contains three more folders /job, /education and /locations and all these folders contain some more folders inside it. So copying these we use Recurse command.
12. WhatIf: This only shows what could happen if the command runs, or in simple terms, it describes the command outcome.
Examples to implement PowerShell copy-item
The examples to implement PowerShell copy-item are given below:
Example #1
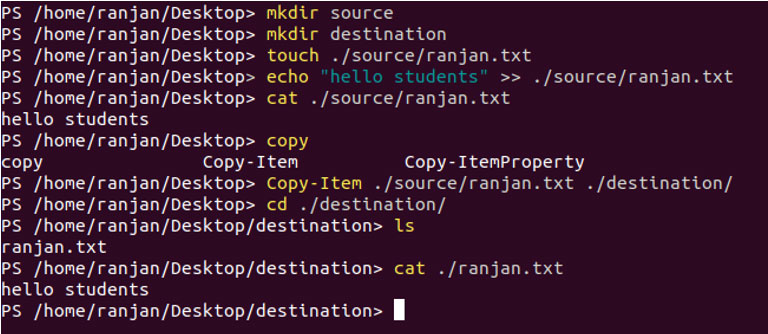
Let us take a very simple and first example for it, we are just copying one file from one location to another location.
Copy-Item ./source/ranjan.txt -destination ./destination
Screen for above example from file creation to copy is given
Example #2
Let us do some recursive copy, in this, we are going to copy directory files and this directory also contains a subdirectory with files.
Copy-Item ./source/* -Destination ./destination/ -Recurse
In the above example, we created two folders one with a name source and another with the name destination. We created a file ranjan.txt inside source and we also created a folder inside the source folder with name jobs. Now with executing the above command, we are transferring all the contents along with the subfolders of the source folder to the folder destination. This type of file transfer is called as resource transfer as we are transferring subfolder containing file myjob.txt along with all contents.
Example #3
Now we are going to write a command which will copy directory contents to a newly created directory with contents.
Copy-Item -Path "./source/" -Destination "./newSource" -Recurse.
In the above example, we are transferring all the files and folders from the source to a new file which will be generated on the execution of these commands.
Example #4
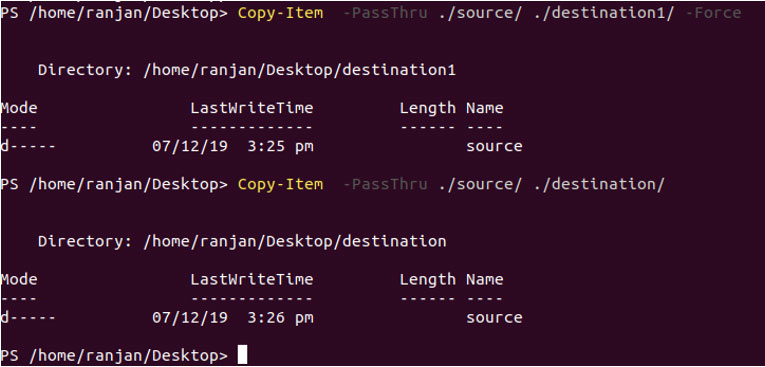
Suppose we wanted to see properties of a file on which copy command is working then we can use -PassThru command along with Copy-Item.
Copy-Item  -PassThru ./source/ ./destination1/ -Force

Copy-Item  -PassThru ./source/ ./destination/
Example #5
If we want to transfer the whole directory to another folder including all we can run Copy-Item along with include “*”.
Copy-Item -path ./source/ ./destination1/ -Include "*"
Example #6
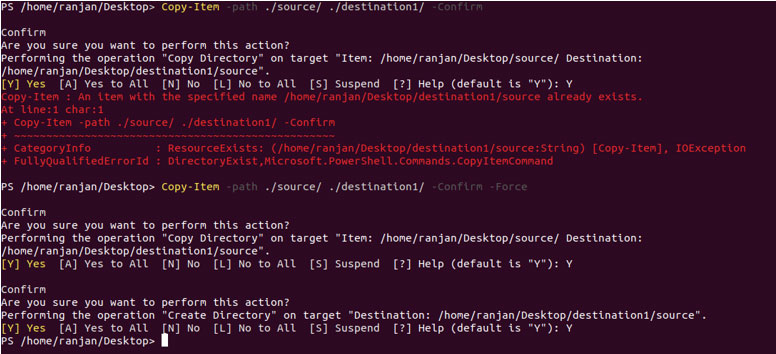
In this example we are covering two things one is “-Force” and another is “-Confirm”.We are trying to copy and paste files of the source directory to the destination1 directory. Once we run this command it asked for if you really want to copy it, and once we said “yes” it shows error file already exists, so again next command we used “-Force” it will forcefully replace older file with a new file from source folder .please see the below screen for reference.
Copy-Item -path ./source/ ./destination1/ -Confirm

Copy-Item -path ./source/ ./destination1/ -Confirm -Force
Conclusion
PowerShell Copy-Item command can solve many problems of the developer as now they can perform recursive copy with many more options which is far better than copy by UI. It’s better for developers who are more familiar with window environments.
Recommended Articles
This is a guide to PowerShell Copy-Item. Here we discuss the introduction, Parameters, and Examples to implement PowerShell copy-item. You can also go through our other suggested articles to learn more–


