Updated March 27, 2023
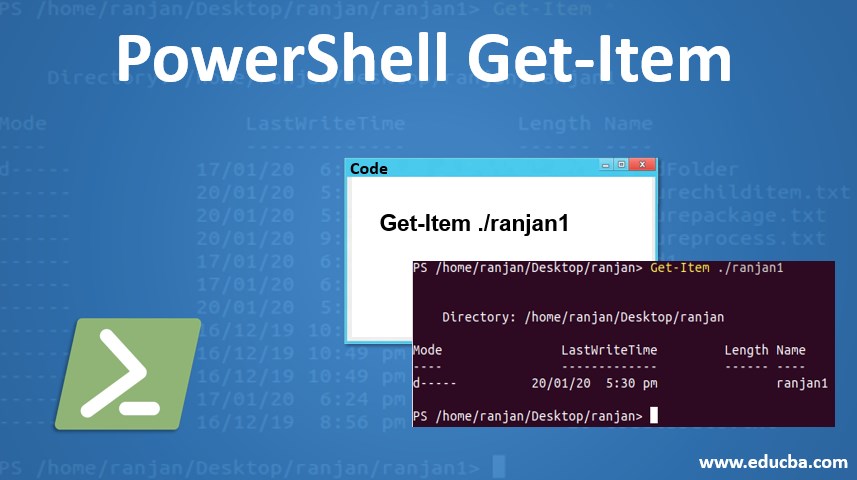
Introduction to PowerShell Get-Item
To get any item from any defined location we can use the command Get-Item. With this command we can not get the content of the item, I mean with this command we can not get content directly, but we can get content by using wildcard. To get the content from the item we need to use a wildcard for it, for example (*) to all the contents of the item. This command will be useful in case if you want to navigate through all the available data stores. The main purpose of this command it will allow us to know any available items of any folder or directories from any directories.
Syntax & Parameters in PowerShell Get-Item
Below are the syntax:
Syntax #1
Get-Item

[-Path] <String path for item location>

[-Filter <string filter condition for path>]
[-Include <string name of path to include for getting item details>]
[-Exclude <string name of path to exclude for getting item details>]
[-Force<find the hidden or read only item>]
[-Credential <PSCredential>]
[-Stream <get the alternate stream of NTFS file>]
[<CommonParameters>]
Syntax #2
Get-Item

-LiteralPath <String of exact path name>

[-Filter <string filter condition for path>]
[-Include <string name of path to include for getting item details>]
[-Exclude <string name of path to exclude for getting item details>]
[-Force<find the hidden or read only item>]
[-Credential <PSCredential>]
[-Stream <get the alternate stream of NTFS file>]
[<CommonParameters>]
Parameters
Below are the parameters in PowerShell Get-Item:
1. Credential
This parameter used for the secure execution of the command. Even by using force command one can not break or skip it. But this parameter is not supported by any PowerShell installed providers. If we are really interested in using this command along with Invoke-Command. We have already discussed this command. To know more about Invoke-Command you can refer to the previous section. In this command, we can use an argument like User1, or we can use Domain1/user1.Once you run this command along with the user name it will display a prompt and it will ask for the password. This command introduced in PowerShell version 3.0.
2. Exclude
It defined an array of items that command will execute while running. This parameter will take the path as it’s the parameter value. We can enter path params or we can also specify the pattern for it. The path pattern can be like *.txt.Remember the include command will work better if we will use wildcard character with it for operation, for example, \ranjan\* here character used in wildcard represents contents of the path.
3. Filter
It defines the filtered path to locate the item. We are able to use filter param with PowerShell because it has installed provider FileSystem.We can learn more about FileSystem in about_Wildcard. Always filters are a better option than any other because the provider works when the command received objects instead of after receiving the objects.
4. Force
Many times we will face a situation where we will not be able to fetch items, because of read-only access or any items are hidden file. In such type of situation, we can use this command. How it’s implementation will be done is totally depend on the providers. If you wanted to learn more about the providers please read about_Provider. Force command can not skip the security restrictions. Security restriction means user credential and a valid login user.
5. Include
It defined a string array of items that command will execute while running. This parameter will take the path as it’s the parameter value. We can enter path params or we can specify the pattern also for it. The path pattern can be like *.txt.We can also use a wildcard for it. Remember the include command will work better if we will use wildcard character with it for operation, for example, \ranjan\* here character used in wildcard represents contents of the path.
6. LiteralPath
We have seen many ways to locate the path of items, this one of the ways to locate the path of items. The only thing in this way to locate the path is that we can not use a wildcard as pathname example we can not use “*”. So basically we have to pass the exact path which is as it is typed. The good thing about the literal path is, we can use escape characters. In case if we are using escape character in -LiteralPath we must use a single quotation to notify the Powershell about escape character.
7. Path
Path defines the location of an item. Which the help of this command we can get the item. In the previous params which is LiteralPath, we learned that we have to use an exact path to locate the item, here in case path we can also use a wildcard as path like (*). This is a required parameter. The name of the parameter path is not a required field that means optional.
8. Stream
With the help of this command, we get another or alternate stream of NTFS file from your system files. We just have to give a stream name in this case . Name of the stream can be wildcard also, for example, we can use (*) as the stream name. This command is mainly made for the file system so in case of folders it will not work. A provider called FileSystem which adds the stream to command Get-Item. These streams are dynamic in nature which add by provider FileSystem to command Get-item.
Examples to Implement PowerShell Get-Item
The following are examples to implement:
Example #1
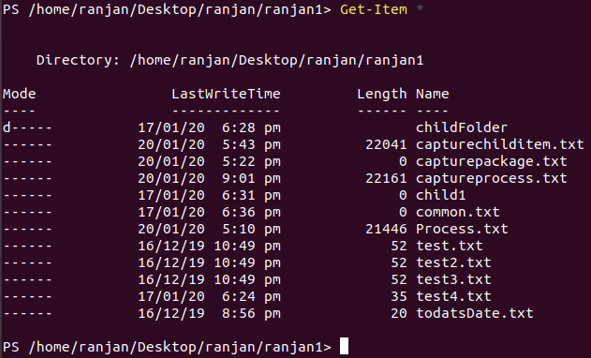
In this example, we will see the current directories’ details.
Code:
Get-Item *
Output:
Example #2
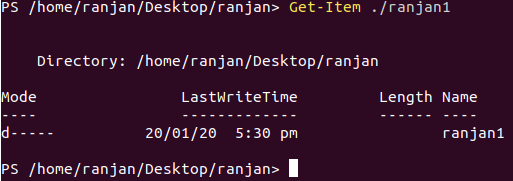
In this example, we are fetching the directories by specifying the pathname. See the below example along with the screen of the experiment.
Code:
Get-Item ./ranjan1
Output:
Example #3
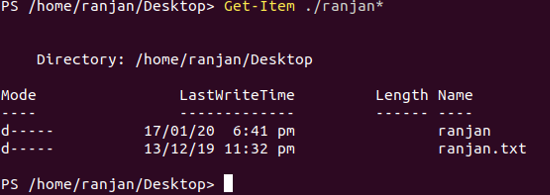
Till we have seen that by writing path names or current directories we were only able to fetch the folder path but as I said in starting that if we want to get the contents of the directories we need to use a wild card. See the example below where we are passing path names with a wildcard (*) and in output, we are getting all of the contents of the directories.
Code:
Get-Item ./ranjan*
Output:
Example #4
In the below example we want to see the last modified or open this directory. Their many properties we can see them in documentations. Please follow the example below along with screens.
Code:
(Get-Item ./ranjan).LastAccessTime
Output:
Example #5
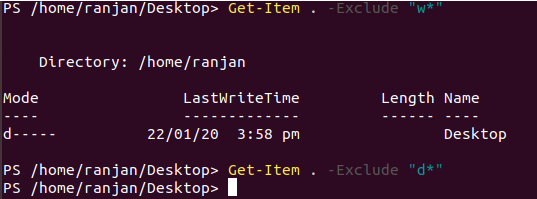
We have discussed parameters like excluding and include, I am giving an example of excluding. In the below example we are fetching items in the current directory, it returns Desktop. Because we are excluding “W*” once we used “*d” it returns nothing as Desktop starts with D and we are excluding “d”.Please see the below example with the experiment screen.
Code:
Get-Item . -Exclude "w*"

Get-Item . -Exclude "d*"
Output:
Recommended Articles
This is a guide to PowerShell Get-Item. Here we discuss Syntax, parameters, examples to implement PowerShell Get-Item. You can also go through our other related articles to learn more –
