Introduction to Move-Item in PowerShell
In this article, we will learn about PowerShell Move-Item. Move-Item cmdlet in Powershell works similar to the cut / Paste option in Windows. It moves files, folders, registry and along with their properties, contents and child items from one location to another location. The location must be supported by the same provider. When you move items from one location to another then it basically deletes items from the original location and moves to another location.
Syntax
Move-Item

[-Path] <String[]>

[[-Destination] <String>]
[-Force]
[-Filter <String>]
[-Include <String[]>]
[-Exclude <String[]>]
[-PassThru]
[-Credential <PSCredential>]
[-WhatIf]
[-Confirm]
[<CommonParameters>]
Syntax
Move-Item

-LiteralPath <String[]>

[[-Destination] <String>]
[-Force]
[-Filter <String>]
[-Include <String[]>]
[-Exclude <String[]>]
[-PassThru]
[-Credential <PSCredential>]
[-WhatIf]
[-Confirm]
[<CommonParameters>]
Parameters of PowerShell Move-Item
Below are the parameter used in PowerShell Move-Item:
- Path: Specifies the source location of the file. The default directory is the current directory. You can also specify (.) as the current location. Wildcard parameters are permitted. You can use wildcard (*) to refer all items in the directory.
- LiternalPath: Almost the same as the -path parameter except you need to type exact path value as no wildcard parameters are permitted. No characters are interpreted as a wildcard. If you want to use escape characters then use them under a single quote. Once they are in a single quotation, PowerShell treats escape character as a string. To learn more about escape (special) characters. docs.microsoft
- Destination: Path of the items which are going to move to the desired location. If the destination path is not available then it will throw an exception but you can rename the file name you need to provide a new file name in the destination parameter itself. The default destination is current location and wildcard characters are permitted but the result must specify a single location.
- Force: Move items to the destination folder without user confirmation. In addition, if any duplicate items are found at destination location then it overwrites them if security permissions are satisfied. It can also move the system’s read-only file.
- Include: Includes specific file name(s) (C:\temp\test*) or extension(s) (*.pdf) from the source path to move them to destination location. Wildcard characters are permitted. The parameter Include is helpful when the content of the source path specified. For example, at source path c:\temp\* so it will include all files from c:\temp folder and then whatever the filters are set in Include parameter Move-Item cmdlet will work accordingly.
- Exclude: Excludes specific file name(s) (c:\temp\test*) or extension(s) (*.txt) from the source path so they will not be moved to the destination location. Wild card parameters are permitted. Again you need to use the whole folder or registry content to filter out specific data.
- Filter: Filter parameter is more efficient than Include and Exclude parameter because it applies filter while retrieving objects rather than filtering objects after value retrieved. The exact syntax of the filter like wildcard support depends on the provider.
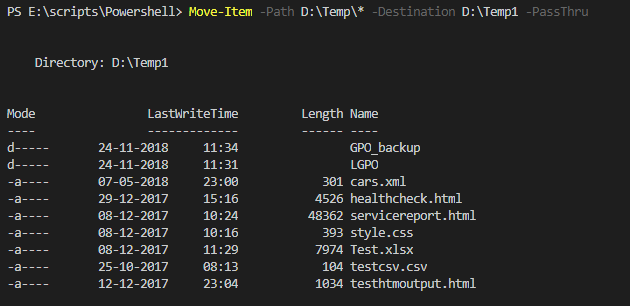
- PassThru: When the PassThru parameter is used, the output of the command returns to the PowerShell console.
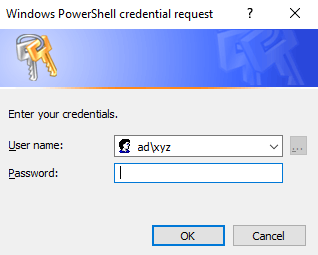
- Credential: If source and destination directories are on different domains or workstations and if they are using different credentials then you need to specify destination host credentials. You can store credentials in a variable using Get-Credential and provide it to the credential parameter. For example, $cred = Get-Credential. If you provide username after –Credential parameter then it will prompt for the password.
- Whatif: Shows what will happen when the command runs without executing the command.
- Confirm: Confirms before performing any action. When you use this parameter you get below options. [Y] Yes [A] Yes to All [N] No [L] No to All [S] Suspend [?] Help (default is “Y”):
- CommonParameters: Below is common parameters used with Move-Item cmdlet which are also called advance function parameters. Verbose, -Debug, -ErrorAction, -WarningAction, – InformationAction, -ErrorVariable, -WarningVarible, -InformationVariable, -OutVariable, -OutBuffer, -Pipelinevariable, -UseTransacation
Examples to Implement PowerShell Move-Item
Below are the examples of PowerShell Move-Item:
1. Move-Item with Source and Destination
Move-Item -Path D:\Temp\* -Destination D:\Temp1
If you use the wildcard (*) is displayed in the above example, then it will move the folder contents otherwise it will move the entire folder. In the above example, you cannot see which files were moved from source to destination because no explicit parameters specified but when you use PassThru (which returns output in the console itself) or –Verbose parameter then output/process will be displayed in PowerShell console only.
2. Move-Item with – PassThru
Code:
Move-Item -Path D:\Temp\* -Destination D:\Temp1 -PassThru
Output:
3. Move-Item with – Verbose
Code:
Move-Item -Path D:\Temp\* -Destination D:\Temp1 -Verbose
Output:
4. Move-Item with – Include
Code:
Move-Item -Path D:\Temp\* -Destination D:\Temp1 –Include *.html -Verbose
Explanation to the above code: In the above example, the script will move all files which have .html extension. When we use only Include parameter script will throw an error for files or folders which don’t have HTML extension.
Output:
We can simply eliminate the above exception by –ErrorAction parameter.
Code:
Move-Item -Path D:\Temp\* -Destination D:\Temp1 -Include *.html -ErrorAction Ignore -Verbose
Output:
5. Move-Item with – Exclude
Code:
Move-Item -Path D:\Temp\* -Destination D:\Temp1 -Exclude *.html -ErrorAction Ignore -Verbose
Output:
In the above example, files will be moved excluding .html files to the destination folder.
6. Move-Item with child items
When we use wildcard character it only includes the items under that folder but not the subfolders. For example, D:\temp\* folder cannot filter files under D:\temp\LGPO or under other subfolders. To do so, we need to first extract the files using the Get-ChildItem and –Recurse parameter and then move them to another location.
Code:
Get-ChildItem -Path D:\Temp -Recurse -Include *.html | Move-Item -Destination D:\Temp1 -Verbose
Output:
7. Move-Item with – Confirm
Code:
Move-Item -Path D:\Temp\* -Destination D:\Temp1 -Confirm -Verbose
It will wait for confirmation from the user before moving any item.
Output:
8. Move-Item with -WhatIf
Code:
Move-Item -Path D:\Temp\* -Destination D:\Temp1 -WhatIf
Shows what will happen when the command is executed without actually running it.
Output:
9. Move-Item with – Credential
Code:
Move-Item -Path D:\Temp\* -Destination D:\Temp1 -Credential ad\xyz
The above command will open a credential box with username ad\xyz (domain\username).
Output:
Recommended Articles
This is a guide to PowerShell Move-Item. Here we discuss the parameters of PowerShell Move-Item with the appropriate examples. You can also go through our other related articles to learn more –


