Updated March 27, 2023

Introduction to PowerShell New-Item
Its name itself is explaining about its behaviour. So you are thinking it is going to create something new so you are totally correct. So basically new-Item command is used if we wanted to create any new item. The new item can be any file inside a directory or multiple files inside one directory. New Item allows us to create files inside multiple directories in one execution. The good thing about the New-Item command is it will create a file inside folders and registry inside the registry. Even we can write commands to create a file inside the folder along with writing some contents on the file.
Syntax in PowerShell New-Item
Below are the syntax of PowerShell New-Item:
Syntax #1
New-Item

[-Path] <String path where new item will be created>

[-ItemType <Type of item going to be created like file, folder etc>]
[-Value <Object of value of new item>]
[-Force<create new item even read only access>]
[-Credential <PSCredential>]
[-WhatIf<display outcome of command execution>]
[-Confirm<display prompt for yes or not>]
[<CommonParameters>]
Syntax #2
New-Item

[[-Path] <String path where new item will be created>]
-Name <Name of new item to be created>

[-ItemType <Type of item going to be created like file, folder etc>]
[-Value <Object of value of new item>]
[-Force<create new item even read only access>]
[-Credential <PSCredential>]
[-WhatIf<display outcome of command execution>]
[-Confirm<display prompt for yes or not>]
[<CommonParameters>]
Parameters in New-Item PowerShell
The following points explain the parameters in PowerShell new-item:
1. Confirm: It ‘s a very useful command, suppose you are going to run a command which will create a new file and if the same file exists in a folder it will replace it. So, in this case, there are chances that you may replace any important file. In that case, it is advisable to use confirm the command, as it will give a warning before executing the command, and it will ask for your confirmation with the prompt box where it will ask you to enter yes or no. If you enter yes it will execute command else it will not execute the command.
2. Force: Force command will be used with new item creation when there are less right to perform. So for example, if you do not have write access to directories that means you have only read access, in that case, we can use force new item creation command. In the case of the existing item also it will be used. it will create a new item forcefully.
3. ItemType: We learned that we can add a new item, but the question is what are those items which we can add. We can add many things like a new item that is given below.
- We can any Directories as an item
- We can add a file or multiple files in a directory
- We can also create a Symbolic link
- We can add Junction as a new item
- We can add a hard link as the new item
Other than these kinds of a new item we can add items in Certificate drive, they are given below
- We can add any Certificate provider as the new item
- We can add the certificate as the new item
- We can add store a new item
- We can add store location as a new item
4. Name: Defines the name of the item which is going to be added. This name can be defined in name and path parameter values. We can also define a new item path in name or path value.
5. Path: This defines the path for the new item which is going to be created. The good thing is we can also use wildcard characters for the pathname. For example, we can write “*” as the pathname which means perform the creation of a new file or items inside all the folders on the root directories.
6. Value: This command defines the new item value it may be the name of any file or directory. The provided value will be added to the defined path. We will see more in the example section.
7. WhatIf: Many times when we are going to execute any command we do not know the outcome of the execution of the command, so with the help of -WhatIf command, we will able to predict the outcome of the execution of the command. For safety, we can use this command.
Examples to Implement PowerShell New-Item
Below are the examples to implement the New-Item in PowerShell:
Example #1
See the below example here we are creating a file with name test4.txt inside the ranjan1 directory. On execution of the command, it created a file test4.txt inside the ranjan1 directory. The file which we created contains the value argument inside the file which is “This world is a very beautiful place.”
Code:
New-Item -Path ./ranjan1/ -Name "test4.txt" -ItemType "file" -Value "This world is very beautyful place.”
Output:
Example #2
See the below example here we are creating a folder with name childFolder inside the ranjan1 directory. On execution of the command, it created a file childFolder inside the ranjan1 directory. See the example below along with screens.
Code:
New-Item -Path "./ranjan1" -Name "childFolder" -ItemType "directory"
Output:
Example #3
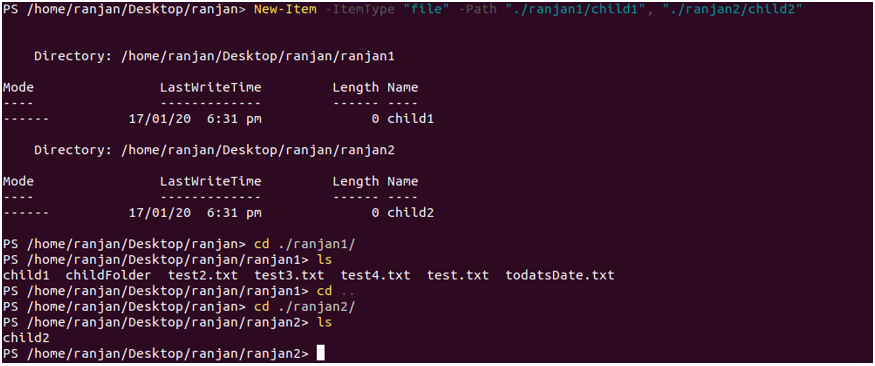
In this example, we are creating two files with the name child1 and child2 by running a single command. In the command, we can see we are passing -ItemType in item type we are passing file.
Code:
New-Item -ItemType "file" -Path "./ranjan1/child1", "./ranjan2/child2"
Output:
Example #4
In the below command we are creating a file common.txt inside all the directories inside the root. Because we are using wildcard here, that means we are using “*” it will create common.txt file inside all directories of current directories.
Code:
New-Item -Path *
-Name common.txt -ItemType File | Select-Object FullName
Output:
Example #5
Here in this example, we are creating a symlink file, we are assigning symlink command execution value to a variable called $symboliclink and getting it to value we can see in the below example along with the screen. The creation of symlinks is useful if you wanted to an auto reflection of changes of one file inside many directories without changing many places, which means a change in one file and it will reflect in all other symlinked files in any directories.
Code:
$symboliclink = New-Item -ItemType SymbolicLink -Path ./ranjan5/ -Target ./ranjan1/test2.txt

$symboliclink | Select-Object LinkType, Target
Output:
Conclusion
From this tutorial, we learned that the command New-Item can create various types of item within multiple places. We also learned that we can create a single item inside multiple places with a single command. This command can be very useful for performing the creation of too many files on a repeated time basis as it will create everywhere on one command.
Recommended Articles
This is a guide to PowerShell New-Item. Here we discuss the syntax, parameters, and examples to implement new-item in Powershell with proper codes and outputs. You can also go through our other related articles to learn more –


