Updated March 13, 2023

Introduction to PowerShell wget
The PowerShell Wget, which is an alias for the Invoke-WebRequest in PowerShell, is a non-interactive utility that sends the request to the HTTP or HTTPS web page or the web services and parses the response and returns the collection of the links, images, and HTML elements and it also helps to download the files from the webpage, post or delete or modify the data on the website with the forms, checks the status of the websites, etc.
Syntax
Invoke-WebRequest

[-UseBasicParsing]
[-Uri] <Uri>

[-WebSession <WebRequestSession>]
[-SessionVariable <String>]
[-AllowUnencryptedAuthentication]
[-Authentication <WebAuthenticationType>]
[-Credential <PSCredential>]
[-UseDefaultCredentials]
[-CertificateThumbprint <String>]
[-Certificate <X509Certificate>]
[-SkipCertificateCheck]
[-SslProtocol <WebSslProtocol>]
[-Token <SecureString>]
[-UserAgent <String>]
[-DisableKeepAlive]
[-TimeoutSec <Int32>]
[-Headers <IDictionary>]
[-MaximumRedirection <Int32>]
[-MaximumRetryCount <Int32>]
[-RetryIntervalSec <Int32>]
[-Method <WebRequestMethod>]
[-Proxy <Uri>]
[-ProxyCredential <PSCredential>]
[-ProxyUseDefaultCredentials]
[-Body <Object>]
[-Form <IDictionary>]
[-ContentType <String>]
[-TransferEncoding <String>]
[-InFile <String>]
[-OutFile <String>]
[-PassThru]
[-Resume]
[-SkipHttpErrorCheck]
[-PreserveAuthorizationOnRedirect]
[-SkipHeaderValidation]
[<CommonParameters>]
If we check the Invoke-Webrequest syntax, PowerShell 7.1 version supports the 4 sets for this command.
The other 3 sets include the below extra parameters.
-NoProxy
-CustomMethod
This means that you can not combine the above 2 parameters with the First set of certain parameters. For example, you can’t use the -Proxy and -NoProxy parameter together but set support the -NoProxy and -CustomMethod both together.
How does PowerShell wget works?
Wget utility is the Unix-based utility that, in general, people using to download files from the webpages. PowerShell has introduced a similar utility in the form of the cmdlet Invoke-WebRequest, and its alias name is wget so that the people coming from the Unix background can understand that this command has the similar or more advanced functionality in the PowerShell.
The Invoke-WebRequest was introduced in PowerShell 3.0 onwards and has become very popular for interacting with the webpage.
Wget is the name of the alias of the Invoke-WebRequest command in the PowerShell .Net framework version (v1.0 to 5.1).
Get-Alias -Name wget
Output:
While in the Powershell Core version (6.0 onwards), the wget alias name is replaced with the iwr command.
Get-Alias -Definition Invoke-Webrequest
Output:
Wget and iwr also have the same supported utility called curl, which is a Unix command but introduced as an alias of the Invoke-Webequest command.
Get-Alias -Definition Invoke-WebRequest
Output:
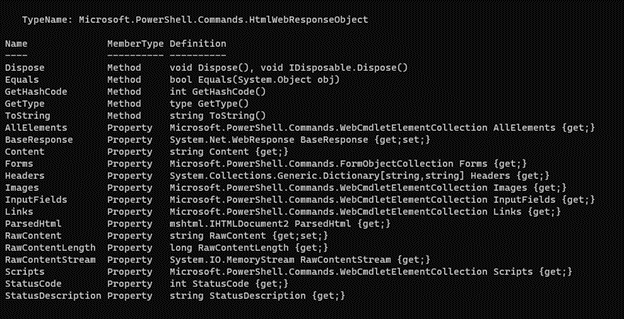
When you parse the web page using the Wget command, a few properties and methods are associated with this command. Let see what those members are.
$uri = "https://theautomationcode.com"

$response = wget -Uri $uri

$response | gm
Output:
There are various properties like Headers, Images, links, which you can retrieve directly through the wget command.
In the examples below, we will see how various parameters are supported with the wget command.
Examples of PowerShell wget
Given below are the examples of PowerShell wget:
Example #1
Using the wget command to check the website status
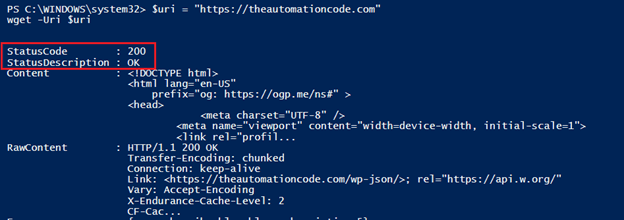
We can check the status of the webpage using the wget (Invoke-WebRequest) command.
$uri = "https://theautomationcode.com"

wget -Uri $uri
Output:
StatusCode 200 means that the site is OK. You can check the various status codes on the wiki page link below.
https://en.wikipedia.org/wiki/List_of_HTTP_status_codes
Example #2
Exception handling in the Wget command.
Programming language uses the try/catch methods for exception handling. In this example, we will handle the non-existence website exception using the same method in PowerShell.
Try {

$uri = "https://theautomationcode222.com"

wget -Uri $uri -EA Stop

}

Catch {

Write-Host $($_.Exception.Message) -BackgroundColor DarkRed

}
Output:
To catch the status code of the message.
try{

$uri = "www.microsoft.com/unkownhost"

wget -Uri $uri -EA Stop

}

catch{

Write-Output "Status Code:  $($_.Exception.Response.StatusCode.value__)"

}
Output:
Example #3
Downloading a file with the Wget command.
We can download files directly from the internet using the wget command as shown below. We are downloading a Web-based net framework from the MS website in this example, as shown below.
$uri = https://go.microsoft.com/fwlink/?LinkId=2085155

wget -Uri $uri -OutFile "C:\temp\netframework.exe" -Verbose
Output:
The above command will keep the download file in the C:\temp folder with the NetFramework.exe name.
Example #4
Downloading Images, links from the webpage.
With the wget widget, we can access the images or links from the website directly to the local system, as shown below.
$uri = "https://theautomationcode.com"

$response = wget -Uri $uri
With the above command, the response from the webpage will be stored in the $Response variable. Thus, we can directly access those properties. But, first, let’s check the images stored on the website.
$response.Images.src
Output:
The above command shows the source of the images from the website.
With some operation on the command above, you can download those images to the particular folder as shown below. It will download all the images from the link to the C:\temp\WebImages folder.
foreach($img in $response.Images.src){

$imgurl = ($img.Split('?'))[0]
$imgname = ($imgurl -split '/')[-1]
wget -Uri $imgurl -OutFile "C:\temp\WebImages\$imgname" -Verbose

}
Output:
Similarly, you can access the links from the website.
$response.Links.Href
Example #5
Converting Rest API content to JSON data using wget.
When we use the rest API to get the website data, that data is generally is in JavaScript Object Notation (JSON) format. Therefore, when we use the Invoke-RestMethod command, it directly converts the output to the JSON format, as shown below.
Invoke-RestMethod -Uri "https://jsonplaceholder.typicode.com/posts"
Output:
But using the wget command, we need to use some cmdlets to filter the content and then we can convert to the above output display format.
$uri = 'https://jsonplaceholder.typicode.com/posts'

$response = Invoke-WebRequest -Uri $uri

$response.Content | ConvertFrom-Json
You will get the same output as the first one.
Example #6
Login to the website using the wget post method.
In the below example, we will use the LinkedIn website to log in using wget forms as shown below.
$linloginpage = 'https://www.linkedin.com/login?fromSignIn=true&trk=guest_homepage-basic_nav-header-signin'

$response = wget -Uri $linloginpage -SessionVariable LIN

$form = $response.Forms[1]
$form.Fields["Username"] = "user@emailid"

$form.Fields["Password"] = "Your password"

$uri = "https://www.linkedin.com" + $form.Action

$r = wget -Uri $uri -WebSession $Lin -Method Post -Body $form.Fields

Write-Output "`n`nWebsite Status: $($r.StatusDescription)"
Output:
Conclusion
Wget or Invoke-WebRequest (Curl, iwr) is one of the best command-line tools for webpage scrapping and is used by various developers and scripters to call the APIs, pass, delete, modify, add the information to the APIs or the webpages without using the GUI and also helpful to deal with the various types or webpage errors and reporting purpose.
Recommended Articles
This is a guide to PowerShell wget. Here we discuss How does PowerShell wget work along with the examples and outputs. You may also have a look at the following articles to learn more –


