Introduction to Python 3 HTTP Server
In web development, a web server plays a crucial role in serving web pages, handling client requests, and responding with appropriate content. Understanding how to build and deploy web apps is critical for developers in the continually changing web development market. The Python HTTP server is a core tool in this domain, allowing clients and servers to communicate seamlessly. Python’s versatility and simplicity have made it popular for developing HTTP servers and RESTful APIs. This article provides a detailed guide on creating, securing, and deploying Python 3 HTTP Server. This guide enables both beginner and expert developers to harness the power of Python for robust web development.
Table of Contents
- Introduction to Python 3 HTTP Server
- What is a Python 3 HTTP server
- Install Python3
- How to set up Python 3 HTTP server?
- Create HTTP Server in Python 3
- Securing Your Python HTTP Server
- Deploying Your Python HTTP Server
What is a Python 3 HTTP server?
A Python 3 HTTP server is a lightweight web server that allows you to handle HTTP requests and responses with Python code. It offers the infrastructure to listen to incoming HTTP requests, process them, and respond appropriately. Python 3’s built-in modules, such as http. Server and BaseHTTPServer, make it easy to develop and run a basic HTTP server without needing other dependencies. Typically, developers use these servers for development, testing, or serving static files, but they can also extend and customize them to support more complicated web applications.
Key features of the http.server module includes:
- Basic HTTP Functionality: The http.server module supports standard HTTP methods such as GET and HEAD, allowing developers to handle simple HTTP requests.
- Easy Setup: Creating an HTTP server using the http.server module requires minimal code. You can easily set up a functional server with just a few lines of code.
- Static File Serving: The module can serve static files, making it helpful in hosting simple websites or web applications that rely on static content.
- Customizable Request Handling: Static files are default served from the current directory. However, developers have the option to create customized request handlers that can handle specific types of requests or serve dynamic content.
- Portability: Python is a cross-platform language, and the HTTP server code is written using the http.server module will work consistently across different operating systems.
Install Python3
Below are the steps to Install Python 3
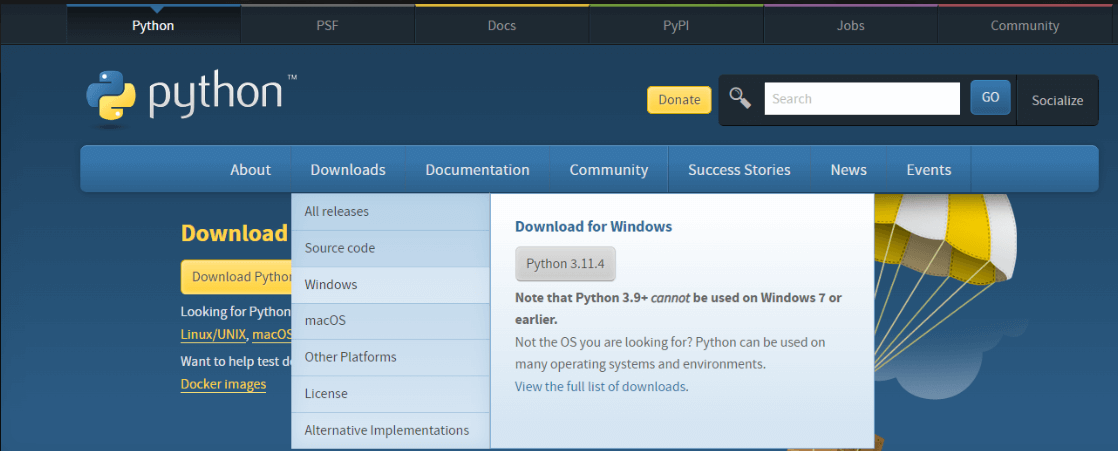
1. To install Python 3, visit the official Python website (https://www.python.org/) and download the latest version for your operating system.
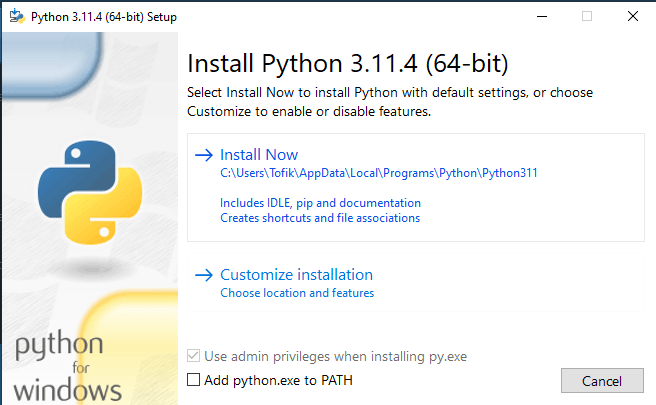
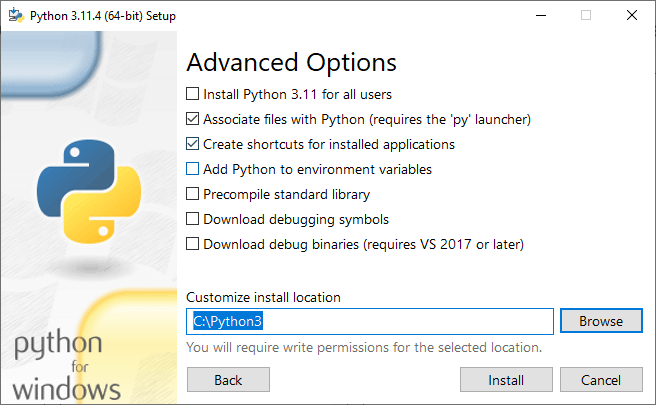
2. We need to Install Python under C drive, so first, create a folder in C drive as Python 3, then Click on Customize the installation.
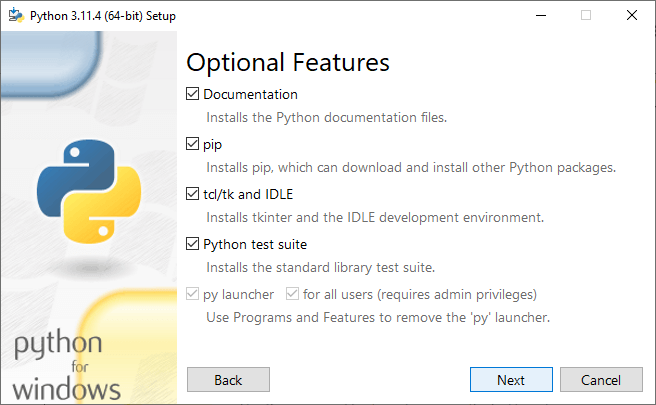
3. Choose the appropriate options and select Next.
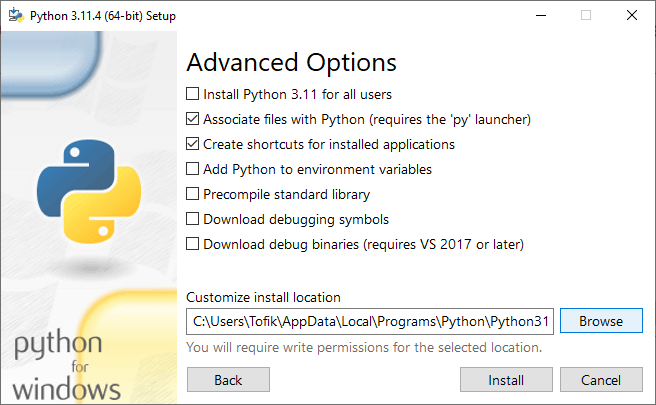
4. Click on Browse > Local disk(c) > Python 3 > OK > Install
5. Copy the path it will be required in the later process.
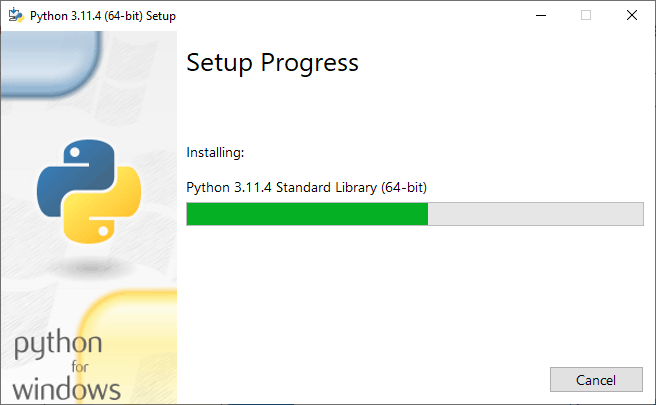
6. The installation process will begin.
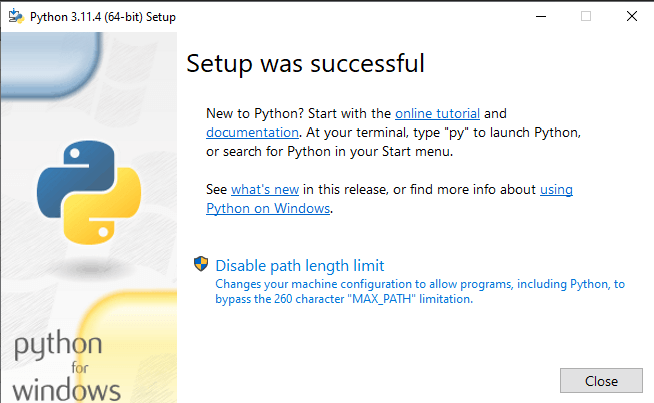
7. Python has been successfully downloaded and installed on your system.
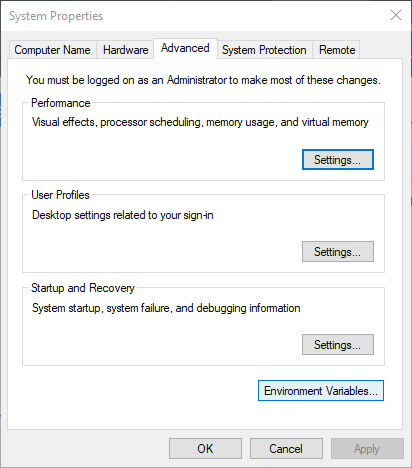
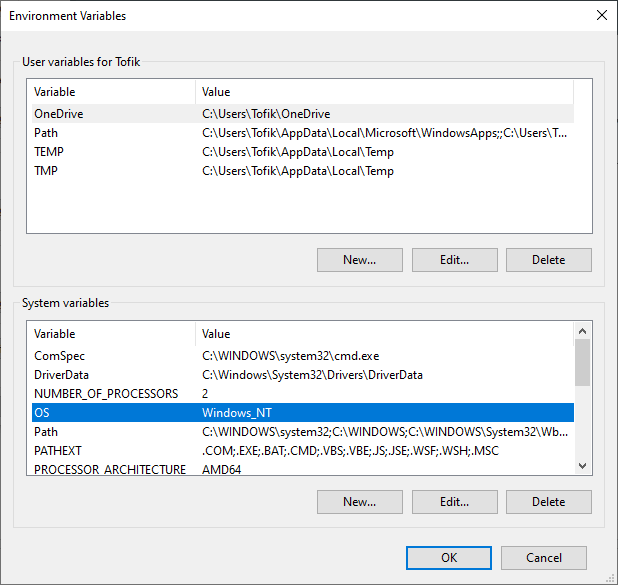
8. After installation, we are going to change the path. Go to This PC, right-click select properties> Advanced system setting > Environment Variables
9. Select any Variable and click New.
10. Write a variable name and paste the value we copied in Step 5. Click OK
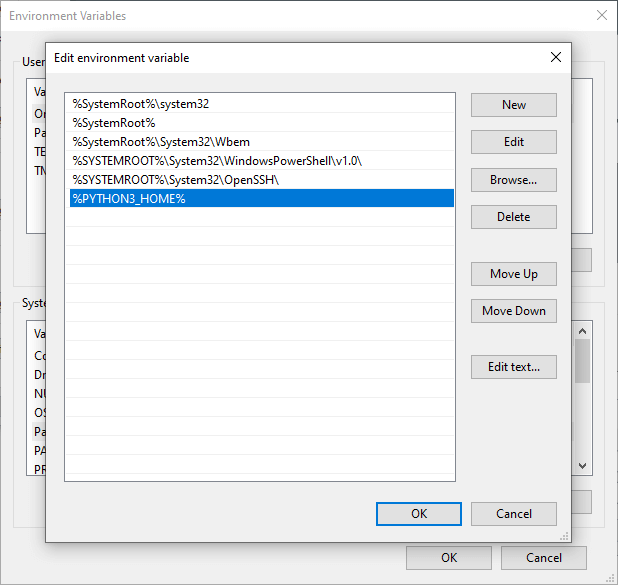
11. Now click on path variable> Edit >New > write Variable Name Under %.> Enter
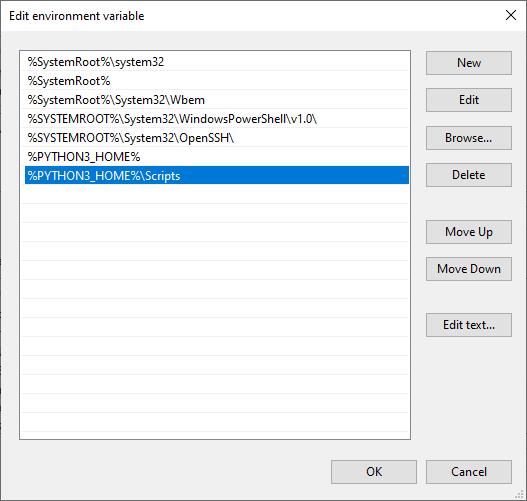
12. Click New > add the same variable as above, then put \Scripts (\Scripts is where our pip is, so remember to put after the variable name, or else pip will not work). Click OK.
Save the changes made and Close all the windows.
How to set up Python 3 HTTP server?
The below step shows how we set up the Python 3 HTTP server.
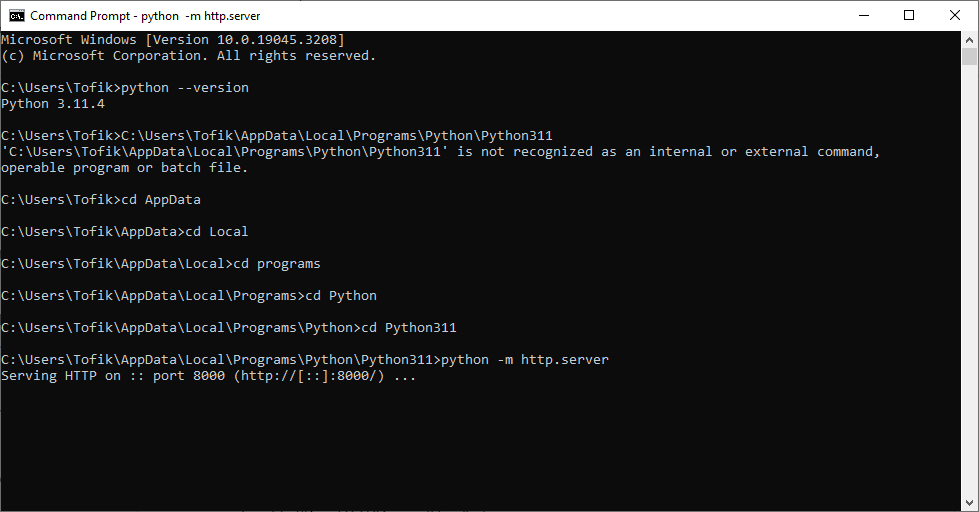
1. In the first step, we check the version of Python which we have installed in our system. We are checking the Python version by using the following command.
python –versionOutput:
2. Go to the specified directory where we kept the file in the python3.11 location.
3. Execute the below command to start the HTTP server as follows.
4. Your Python –m http server has been set up
Create HTTP Server in Python 3
To create a simple HTTP server in Python 3, we’ll use the built-in http.server module.
In this example, we will create an HTTP server for an education website.
Let’s proceed with the steps:
1. Open the Command prompt and add a new directory as given below
mkdir education_website
cd education_website
Output:
2. Open your Python editor (e.g., Visual Studio Code) and create a new Python file. Let’s name it Server.
3. Create an index.html and server.py file inside the server folder
Below is a sample HTML code for an educational website’s homepage.
Code:
<!DOCTYPE html>
<html lang="en">
<head>
<meta charset="UTF-8">
<meta name="viewport" content="width=device-width, initial-scale=1.0">
<title>Education Hub</title>
<style>
/* Reset some default styles for consistency */
body, h1, p {
margin: 0;
padding: 0;
}
/* Styles for the header section */
header {
background-color: #355C7D;
color: #F8B195;
padding: 20px;
text-align: center;
}
/* Styles for the navigation bar */
nav {
background-color: #F8B195;
padding: 10px;
text-align: center;
}
/* Styles for the main content section */
.container {
max-width: 900px;
margin: 0 auto;
padding: 20px;
}
</style>
</head>
<body>
<header>
<h1>Education Website</h1>
<p>Achieve Your Goals</p>
</header>
<nav>
<a href="#">Home</a>
<a href="#">Courses</a>
<a href="#">About Us</a>
<a href="#">Contact</a>
</nav>
<div class="container">
<h2>Welcome to Our Website</h2>
<p>
Education is the key to a brighter future.
start your learning journey today!</p>
<img src="education.jpg" width="1000" height="400">
</body>
</html>
4. In server.py, use the below Python code to run the http server
Code:
# server.py
import http.server
import socketserver
# Set the server port number
PORT = 8000
# Define the request handler
Handler = http.server.SimpleHTTPRequestHandler
# Create the server
with socketserver.TCPServer(("", PORT), Handler) as httpd:
print(f"Serving at port {PORT}")
try:
# Start the server until interrupted
httpd.serve_forever()
except KeyboardInterrupt:
# Shut down the server gracefully when interrupted
print("\nServer is shutting down...")
httpd.shutdown()
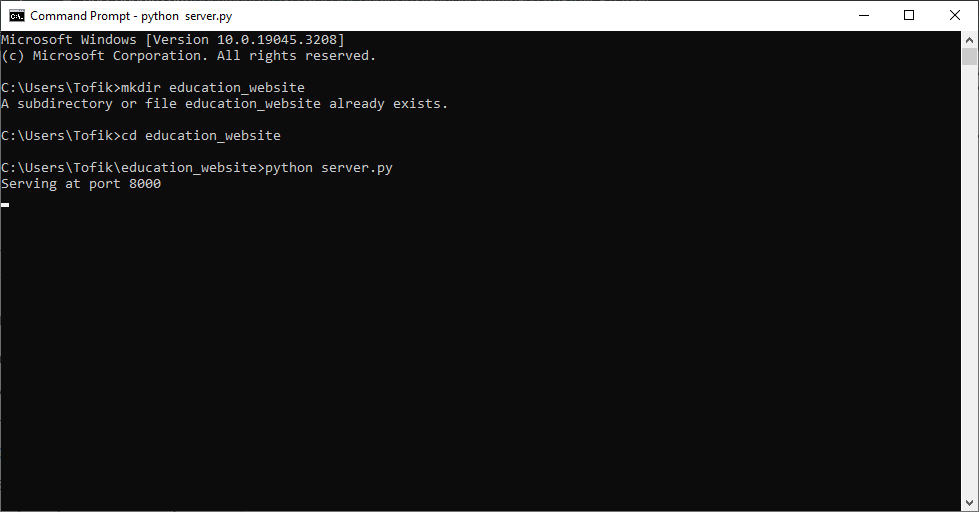
5. Open a command prompt and navigate to the education_website directory.
Run the Python script to start the Server:
python server.pyOutput:
6. To access your education website, open a web browser and enter the URL provided below:
http://localhost:8000
7. The content from your index.html is displayed in the browser.
Securing Your Python HTTP Server
- HTTPS Encryption: Enable HTTPS by obtaining a trusted certificate authority’s SSL/TLS certificate. This encrypts data sent between the Server and clients, ensuring secure communication and preventing malicious actors from intercepting data.
- Input Validation: Implement thorough input validation to sanitize and validate user input. To prevent data breaches and unauthorized access, verifying user inputs and avoiding common threats such as SQL injection and cross-site scripting (XSS) is essential.
- Authentication and Authorization: Implement strong authentication systems to validate user identities. For authorization to specific resources, use secure mechanisms such as OAuth or JSON Web Tokens (JWT). Ensuring user authentication and authorization is essential for limiting access to sensitive areas of your application to only authorized users.
- Avoid Sensitive Data in URLs: Avoid sharing sensitive information via URL query parameters, such as passwords or API keys. This is because server logs or user browser histories can easily store and uncover such data.
- Rate Limiting: Use rate restriction to limit the number of requests from a single IP address in a specific time frame. Rate limitation safeguards your Server against brute-force and denial-of-service (DoS) attacks.
- CORS Protection: Use Cross-Origin Resource Sharing (CORS) headers to prohibit unauthorized cross-origin requests and restrict access to your Server’s resources. This prevents harmful access to your Server’s data from other domains.
- Content Security Policy (CSP): Enforce Content Security Policy (CSP) headers to reduce the possibility of code injection attacks such as cross-site scripting (XSS). Specifying which sources of scripts are allowed helps prevent the execution of malicious scripts using CSP (Content Security Policy).
- Secure Cookies: Setting the “Secure” attribute for the cookie ensures that it only transmits over secure HTTPS connections. By preventing cookie stealing through insecure connections, your application gains an additional layer of security.
- Server Hardening: Apply regular security patches and updates to the Server’s operating system to keep it secure. Unnecessary services and ports should be disabled to reduce the attack surface available to potential attackers.
- Logging and Monitoring: Implement logging and monitoring to watch server activities and quickly detect unusual behavior or potential security breaches. Proper logging aids in auditing and debugging, while monitoring allows you to respond swiftly if any security issues develop.
Deploying Your Python HTTP Server
Making your Python HTTP server available on the internet allows clients to connect to it from anywhere. The following are the procedures for deploying your Python HTTP server:
- Choose a Deployment Platform: You must decide where to deploy your Server. Cloud systems such as Microsoft Azure, Google Cloud Platform (GCP), Amazon Web Services (AWS), or a typical web hosting provider are popular choices. To make an informed decision, consider scalability, pricing, and platform features.
- Obtain a Public IP or Domain: You’ll need a public IP address or a domain name to make your Server available to the public. If you use a cloud platform, they will usually assign your Server a public IP address. You can also get a domain name through a domain registrar.
- Configure Firewall and Security Groups: Configure the firewall or security group on the cloud platform to accept inbound traffic on the port your Server is listening on (e.g., port 80 for HTTP or port 443 for HTTPS). It is essential to have sufficient security measures to prevent unauthorized access to your Server.
- Deploying with WSGI: Using a WSGI server (Web Server Gateway Interface) to deploy your Python HTTP server in a production environment would be best. WSGI is a common interface for web servers and Python web applications. Popular WSGI servers include uWSGI, mod_wsgi and Gunicorn.
- Set Up Virtual Environment (Optional): Setting up a virtual environment for your project helps manage dependencies and ensures a clean environment that allows you to operate your application.
- Install Required Dependencies: If your Python server requires external packages, install them in your virtual environment.
- Start Your Server: To start your Python HTTP server, use the WSGI server of your choice. If you’re using Gunicorn, enter the command “gunicorn my_app:app.” Here, my_app is the name of your Python file containing the server code, and the app is the variable or object representing your WSGI application.
- Monitor and Maintain: Once your Server is up and running, monitor its performance and logs to ensure everything runs smoothly. Please update your Server and dependencies regularly to maintain it secure and up to date.
Conclusion
To Conclude, the Python 3 HTTP server is a powerful and flexible tool for web development to create dynamic web applications. By following security best practices like HTTPS encryption, input validation, and rate limiting, developers can safeguard their users’ data and prevent potential vulnerabilities. Additionally, applications can reach a global audience by deploying the Python HTTP server to the internet. This guide gives you the expertise and abilities to utilize Python’s features and construct efficient, secure, and scalable web solutions.
FAQs
Q1. What are some real-world applications of Python HTTP servers?
Ans: Python HTTP servers have a wide range of applications, such as creating RESTful APIs for mobile and web apps, building content management systems and data visualization dashboards, designing single-page apps, developing IoT apps, and constructing e-commerce websites.
Q2. Is Python suitable for large-scale web applications?
Ans: Python is well-suited to large-scale web applications, particularly when combined with web frameworks such as Flask and Django. These frameworks enable developers to follow the best software design and architecture practices while providing scalability.
Q3. Can I use Python for real-time applications and chatbots?
Ans: Yes, With Python, it is possible to develop real-time applications, chatbots, and conversational interfaces. Flask-SocketIO libraries enable real-time communication between clients and servers, making Python an appropriate choice for such applications.
Q4. What are some popular Python web frameworks for building web applications?
Ans: There are several well-known Python web frameworks, such as Flask, Django, FastAPI, and Pyramid. These frameworks offer advanced features and a more abstract approach to web development, making it easier to create complex web applications.
Recommended Articles
We hope that this EDUCBA information on the “Python 3 HTTP Server” was beneficial to you. You can view EDUCBA’s recommended articles for more information.
