Definition of Python Pillow
Python Pillow is a Python Imaging Library that improves our Python interpreter’s image processing capabilities. This library supports many file formats, has a fast internal representation, and performs pretty complex image processing. The core image library is built to provide quick access to data. It should be a good foundation for an image processing program. Python Pillow is handy and essential.
What is a Python Pillow?
- As technology advances, digital images may become a vital data transmission source. In our daily lives, we come into contact with numerous digital images.
- These images, on the other hand, could be about anything. In addition, Python includes many other useful libraries, including OpenCV and PIL.
- Using the pillow module, we can do whatever we want with the digital images. For example, we can filter images using Python Pillow, create thumbnails, merge pictures, resize images, create a watermark, and perform many other operations on images.
- PIL is the foundation for the Python Pillow module. It is one of the most important Python modules for image processing. However, Python 3 does not support it.
- The term “digital image processing” refers to the process of digitally processing an image with the aid of a computer.
- Image processing allows us to perform image enhancement, blurring, and text extraction operations.
- Python Pillow is a fork of PIL, which was discontinued in 2011. The pillow supports a variety of image file formats
- PIL is built on top of a pillow. PIL is a vital image-processing module in Python. On the other hand, the PIL module does not support Python 3.
- We come across a lot of digital images in today’s digital world. If we are working with the Python programming language, it has a plethora of image-processing libraries.
How to use a Python Pillow?
- Python Pillow module or pill is not under when installing the Python package in our system. So to use the Python Pillow, we need to install a pillow or PIL module using the pip command. The steps below show how to use the Python pillow as follows.
- We install a Pillow module using the pip command in the first step. After that, we can install the pillow module in any operating system on which Python is installed. In the below example, we are installing a pillow module on UNIX-like systems.
pip install pillow- After installing all the modules, we open the Python shell using the python3 command.
python3- We check that the pillow package is installed in our system after logging into the Python shell.
from PIL import Image- After checking the installation of the pillow package in this step, we open an image using the open method. In the below example, the Image class will represent the object of the image.
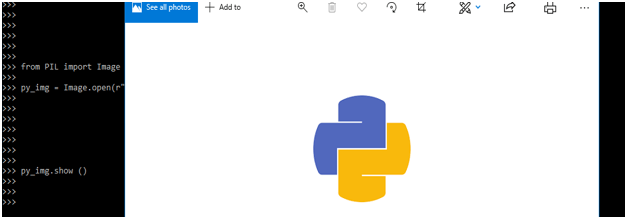
py_img = Image.open (r"python.jpg")- After opening an image in this method, we display an image using the show method. The image is displayed using this method. Pillow first converts the image into png format. As a result, it is recommended that this method be used only for testing purposes. The below example shows the image by using the show method as follows.
Code –
from PIL import Image
py_img = Image.open(r"python.jpg")
py_img.show ()- After showing an image in this step, we obtain information about an opened image. The image’s mode attribute specifies the pixel type and depth. For example, a 1-bit pixel has a value range of 0 to 1, while an 8-bit is 0-255. This module offers several modes. The below example shows to obtain the information from an image.
Code –
from PIL import Image
py_img = Image.open (r"python.jpg")
print (py_img.mode)- In the example below, we get the image size using the size method. The size method is used to get the size of an image.
Code –
from PIL import Image
py_img = Image.open (r"python.jpg")
print (py_img.size)
Python Pillow Image Module
- Library, we will call it the PIL module instead of the Pillow module (PIL). As a result, our code begins from PIL import Image rather than Pillow import Image.
- The image object we obtained by calling image.open can later draw or perform other image manipulation operations.
- Below is the attribute of the image module as follows.
1. Image.filename: This function is used to get the filename; it will also show the package’s path.
Code –
from PIL import Image
py_img = Image.open (r"python.jpg")
py_img.filename
2. Image.format: The below function returns the format of the image.
Code –
from PIL import Image
py_img = Image.open (r"python.jpg")
py_img.format
3. Image.width – Below function will return the image’s width.
4. Image.size – The below function will return an image’s size.
5. Image.height – Below function will return an image’s height.
6. Image.info – Below function will return an image’s info.
Code –
from PIL import Image
py_img = Image.open (r"python.jpg")
py_img.width
py_img.size
py_img.info
py_img.height- The below example shows the width, size, height, and info attributes of Python Pillowmodules.
Python Pillow Examples
- Below is an example of a Python Pillow as follows. To use the pillow in our code, we need to install the pillow module in our system first.
- In the below example, we are showing and rotating the image.
Code –
from PIL import Image
py_img = Image.open("python.jpg")
py_img.show()
py_img = py_img.rotate (45)
py_img.show()- The below example shows to open and display the image as follows.
Code –
from PIL import Image
py_img = Image.open("python.jpg")
py_img.show()
Conclusion
As technology advances, digital images may become a vital data transmission source. In our daily lives, we come into contact with numerous digital images. There are multiple methods for digitally processing images. It is a Python Imaging Library that improves our Python interpreter’s image processing capabilities.
Recommended Article
We hope that this EDUCBA information on “Python pillow” was beneficial to you. You can view EDUCBA’s recommended articles for more information.


