Updated June 7, 2023

Introduction to React Dispatcher
The dispatcher is the center point of the data flow in a Flux application. It is simply a directory of call-backs and incites these callbacks in a particular order. Callbacks are stored in every store with a dispatcher. Whenever new data is introduced in the dispatcher, it takes the help of callbacks to send the data to all the different stores. The callbacks are invoked using the dispatch() method, which uses the data payload object. In this article, we will go through React Dispatcher and the four methods it can use. The examples will help in understanding its use according to the different requirements. In this topic, we are going to learn about React Dispatcher.
Syntax of React Dispatcher:
function Counter({ count, dispatch }) {
return (
<div>
<button onClick={() => dispatch({ type: 'DECREMENT' })}>-</button>
<span>{count}</span>
<button onClick={() => dispatch({ type: 'INCREMENT' })}>+</button>
<button onClick={() => dispatch({ type: 'RESET' })}>reset</button>
</div>
)
}
Working of Dispatcher in React
Dependencies, along with the stores, become a certainty once an application grows. For example, store X will be required that store Y updates itself first, which can help store X update itself. The dispatcher is needed to incite a callback for store Y and complete the callback before moving toward store X. For declaring this dependency, store X must tell the dispatcher that it has to wait for store Y until it completes its course of action. This functionality is provided by the dispatcher by its waitFor() method.
Synchronous iteration is provided by dispatch() through its callbacks, calling in turns. Whenever a waitFor() occurs between a callback, the callback stops executing, and over the dependencies, waitFor() provides a new cycle. When all dependencies are completed, the previous callback, which was stopped, can start executing.
Methods of Implementing React Dispatcher
Here are the following methods:
1. Using Flux in React Redux
In the application below, the Redux framework is used. Here we will go through the method of implementing flux pattern in React Application using the dispatcher.
Step #1: Creating files and folders.
Folders:
- public
- src
Files:
- json
Files inside the public folder:
- html
Files inside the src folder:
- js
- css
Step #2: Public.
This folder includes an index.html file, which includes CDN links to import dispatchers in the application.
index.html
<link rel="manifest" href="%PUBLIC_URL%/manifest.json">
<link rel="shortcut icon" href="%PUBLIC_URL%/favicon.ico">
Step #3: src folder
This folder includes the main files, which constitute the applications’ main actions. Our codes consist of 2 files; these are index.js and styles.css.
index.js file includes the main plan of action and styles.css used for styling the actions written in index.js.
index.js
import React from 'react';
import ReactDOM from 'react-dom';
import { Dispatcher } from 'flux';
import { EventEmitter } from 'events';
const AppDispatcher = new Dispatcher();
const Store = {
...EventEmitter.prototype,
todos: ['Learn New Technology Every Year']
};
AppDispatcher.register(payload => {
console.log('In AppDispatcher register event', payload);
switch (payload.type) {
case 'ADD':
console.log(
'InAppDispatcher register event -> run ADD with',
payload.todo
);
Store.todos.push(payload.todo);
Store.emit('ADD', payload);
break;
default:
}
});
class App extends React.Component {
constructor(props) {
super(props);
this.handleAddTodo = this.handleAddTodo.bind(this);
this.state = { todos: Store.todos };
}
componentDidMount() {
Store.on('ADD', e => {
console.log('Store emit ADD event', e);
this.forceUpdate();
});
}
handleAddTodo(e) {
console.log('add todo', this._input.value);
AppDispatcher.dispatch({
type: 'ADD',
todo: this._input.value
});
}
render() {
return (
<div>
<ul>{this.state.todos.map(todo => <li>{todo}</li>)}</ul>
<input
type="text"
ref={ref => {
this._input = ref;
}}
/>
<button onClick={this.handleAddTodo}>Add to List</button>
</div>
);
}
}
ReactDOM.render(<App />, document.getElementById('root'));
styles.css
.App {
font-family: Cambria
, Cochin
, Georgia
, Times
, 'Times New Roman'
, serif;
text-align: center;
}
Step #4: package.json
This file includes all of the dependencies used in implementing the whole application.
{
"dependencies": {
"flux": "3.1.3",
"react": "16.4.2",
"react-dom": "16.4.2",
"react-scripts": "1.1.4"
};
}
Output:
2. Passing the Dispatch method to any component.
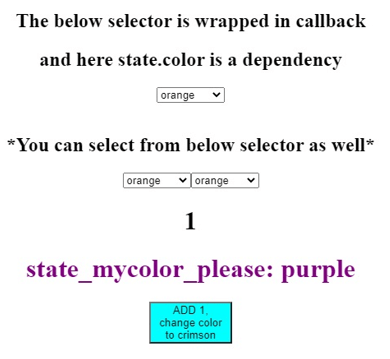
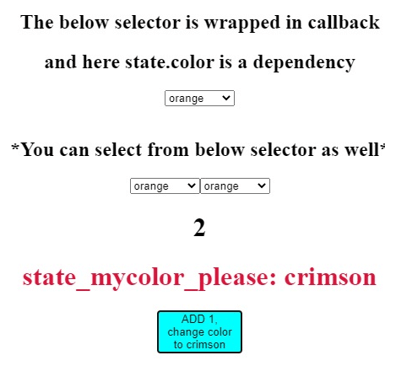
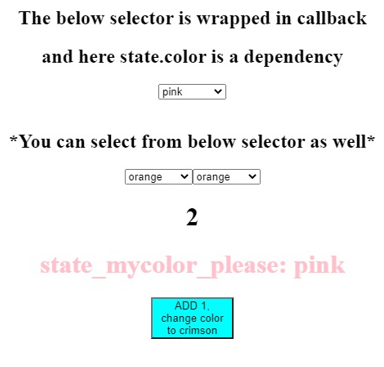
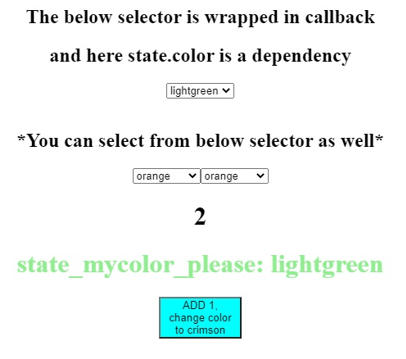
Here, the dispatch method is available, especially on the store object. Here we have passed dispatch in state.color.
Step #1: Creating files and folders.
Folders:
- public
- src
Files:
- json
Files inside the public folder:
- html
Files inside the src folder:
- js
- css
Step #2: Public
This folder includes an index.html file, which includes CDN links to import dispatcher in the application.
index.html
<link rel="manifest" href="%PUBLIC_URL%/manifest.json">
<link rel="shortcut icon" href="%PUBLIC_URL%/favicon.ico">
Step #3: src folder
This folder includes the main files which constitute the applications’ main actions. Our codes consist of 2 files; these are index.js and styles.css.
index.js file contains a main plan of action, and styles.css is used for styling the actions written in index.js.
index.js
import React from "react";
import ReactDOM from "react-dom";
import "./styles.css";
function myreducer(state, action) {
switch (action.type) {
case "color":
return { ...state, ...action.payload };
case "num":
return { ...state
, num: state.num + 1 };
default:
return { ...state };
}
}
function Select({ dispatch, state }) {
const Dispatcher = dispatch;
return (
<select
onChange={e =>
Dispatcher({ type: "color"
, payload: { mycolor: e.target.value } })
}
defaultValue={state.mycolor}
>
<option>orange</option>
<option>pink</option>
<option>grey</option>
<option>lightgreen</option>
</select>
);
}
function Select2({ dispatch, state }) {
const Dispatcher = dispatch;
return (
<select
onChange={e =>
Dispatcher({ type: "color"
, payload: { mycolor: e.target.value } })
}
defaultValue={state}
value={state}
>
<option>orange</option>
<option>pink</option>
<option>grey</option>
<option>lightgreen</option>
</select>
);
}
function App() {
const [state, dispatcher] = React.useReducer(myreducer, {
mycolor: "purple",
num: 1
});
const SSelect = React.useCallback(
() => <Select dispatch={dispatcher} state={state} />,
[state.mycolor, state]
);
return (
<div className="App">
<h2>The below selector is wrapped in callback</h2>
<h2>and here state.color is a dependency</h2>
<SSelect />
<br />
<br />
<h2>*You can select from below selector as well*</h2>
<Select dispatch={dispatcher} state={state} />
<Select2 dispatch={dispatcher} state={state.color} />
<h1>{state.num}</h1>
<h1 style={{ color: state.mycolor }}>state_mycolor_please: {state.mycolor}</h1>
<button
style={{ backgroundColor: "cyan", height: "51px", width: "101px" }}
onClick={e => {
dispatcher({ type: "num" });
dispatcher({ type: "color", payload: { mycolor: "crimson" } });
}}
>
ADD 1, change color to crimson
</button>
</div>
);
}
const rootElement = document.getElementById("root");
ReactDOM.render(<App />, rootElement);
styles.css
.App {
font-family: 'Times New Roman'
, Times
, serif;
text-align: center;
}
Step #4: package.json
This file includes all of the dependencies used in implementing the whole application.
{
"dependencies": {
"react": "16.8.6",
"react-dom": "16.8.6",
"react-scripts": "3.0.1"
},
}
Output:
3. Dispatching Actions from Saga
Executing multiple instructions that are asynchronous and, in the meantime, also keeping some content readable is called dispatching an action that triggers a saga.
Step #1: Creating files and folders.
Folders-
- public
- src
Step #2: public.
This folder includes an index.html file, which includes CDN links to import dispatcher in the application.
index.html
<link rel="manifest" href="%PUBLIC_URL%/manifest.json">
<link rel="shortcut icon" href="%PUBLIC_URL%/favicon.ico">
Step #3: reducers
This file includes all of the reducers-components.
index.js
export * from "./user-reducer";
export * from "./loading-reducer";
loading-reducer.js
import { createAction
, createReducer } from "@reduxjs/toolkit";
const setLoadingAction = createAction("@ui/setLoading");
function handleSetLoading(state, action) {
state.loading = action.payload;
}
export const LoadingActions = {
setLoadingAction
};
export const reducer = createReducer(
{
loading: false
},
{
[setLoadingAction.toString()]: handleSetLoading
}
);
user-reducer.js
import { createAction
, createReducer } from "@reduxjs/toolkit";
const addUserRequest = createAction("@user/addUserRequest");
const addUserSuccess = createAction("@user/addUserSuccess");
const initialState = {
users: []
};
const handleAddUser = (state, action) => {
state.users.push(action.payload);
};
export const UserActions = {
addUserRequest,
addUserSuccess
};
export const reducer = createReducer(initialState, {
[addUserSuccess.toString()]: handleAddUser
});
Step #4: sagas
This file includes all of the Saga components.
index.js
import { all } from "redux-saga/effects";
import * as userSaga from "./user-saga";
export function* setupSaga() {
yield all([...userSaga.setup()]);
}
user-saga.js
import { takeLatest
, put
, call } from "redux-saga/effects";
import { UserActions } from "../reducers/user-reducer";
import { LoadingActions } from "../reducers/loading-reducer";
const sleep = ms => new Promise
(
resolve => setTimeout
(
resolve,
ms)
);
async function fakeApi() {
await sleep(2000);
}
function* addingUserSaga({ payload }) {
yield put(LoadingActions.setLoadingAction(true));
console.log(`userinfo: ${payload.name}`);
yield call(fakeApi);
yield put(UserActions.addUserSuccess(payload));
yield put(LoadingActions.setLoadingAction(false));
}
export function setup() {
return [takeLatest(UserActions.addUserRequest.toString(), addingUserSaga)];
}
Step #5: store
This file includes all of the storage components.
createStore.js
import { configureStore
, combineReducers } from "@reduxjs/toolkit";
import createSagaMiddleware from "redux-saga";
import
{ reducer as userReducer
} from "../reducers/user-reducer";
import { reducer as loadingReducer } from "../reducers/loading-reducer";
import { setupSaga } from "../sagas";
export function createStore() {
const rootReducer = combineReducers({
user: userReducer,
loading: loadingReducer
});
const saga = createSagaMiddleware();
const store = configureStore({
reducer: rootReducer,
middleware: [saga]
});
saga.run(setupSaga);
return store;
}
index.js
export * from "./createStore";Step #6: src folder
This folder includes the main files which constitute the applications’ main actions. In our application, src consists of 3 folders and 3 files: reducers, sagas, and store, and the files are App.js, index.js, and styles.css.
App.js
import React from "react";
import { useSelector
, useDispatch } from "react-redux";
import { UserActions } from "./reducers/user-reducer";
function App() {
const dispatch = useDispatch();
const users = useSelector(state => state.user.users);
const loading = useSelector(state => state.loading.loading);
const handleAddUser = () => {
dispatch(
UserActions.addUserRequest({
name: "test user"
})
);
};
return (
<div className="App">
User Database Adder
<div>Number of Users in the Database:{users.length} </div>
{loading && <span>Wait a Minute...</span>}
<button onClick={handleAddUser}>Click to Add User</button>
</div>
);
}
export default App;
index.js
import React from "react";
import ReactDOM from "react-dom";
import { Provider } from "react-redux";
import "./styles.css";
import RootApp from "./App";
import { createStore } from "./store";
function App() {
const store = createStore();
return (
<Provider store={store}>
<RootApp />
</Provider>
);
}
const rootElement = document.getElementById("root");
ReactDOM.render(<App />, rootElement);
styles.css
.App {
font-family: Cambria
, Cochin
, Georgia
, Times
, 'Times New Roman'
, serif;
text-align: center;
}
Output:
4. Using the Bindactioncreators Method
BindActionCreators allows us to dispatch the actions of a component which are not even connected to the store, as react redux’s connect method has mapDispatchToPros.
Step #1: Creating files and folders.
Folders:
- public
- src
Files:
- json
Step #2: Public
This folder includes an index.html file, which includes CDN links to import dispatchers in the application.
index.html
<link rel="manifest" href="%PUBLIC_URL%/manifest.json">
<link rel="shortcut icon" href="%PUBLIC_URL%/favicon.ico">
Step #3: src folder
This folder includes the main files that constitute the applications’ main actions. Our codes consist of 2 files; these are index.js and Hello.js.
index.js file includes the main plan of action and Hello.js used for importing written in index.js.
Hello.js
import React from 'react';
export default ({ name }) => <h1>Heyooo {name}!</h1>;
index.js
import React from "react";
import { render } from "react-dom";
import { Provider
, connect } from "react-redux";
import { bindActionCreators
, createStore } from "redux";
import Hello from "./Hello";
export const INCREMENT = "INCREMENT";
export const DECREMENT = "DECREMENT";
export function increment() {
return {
type: INCREMENT
};
}
export function decrement() {
return {
type: DECREMENT
};
}
const actions = { increment, decrement };
const store = createStore(function CounterApp(state = { count: 0 }, action) {
switch (action.type) {
case INCREMENT:
return { ...state
, count: state.count + 1 };
case DECREMENT:
return { ...state
, count: state.count - 1 };
}
return state;
});
const styles = {
fontFamily: "times",
textAlign: "center"
};
function mapStateToProps(state) {
return {
count: state
};
}
function mapDispatchToProps(dispatch) {
return bindActionCreators(actions, dispatch);
}
const Connect = ({
mapStateToProps,
mapDispatchToProps,
mergeProps,
options,
children
}) =>
React.createElement(
connect(mapStateToProps, mapDispatchToProps, mergeProps, options)(children)
);
const App = () => (
<Provider store={store}>
<div style={styles}>
<Connect
mapStateToProps={({ count }) => ({ count })}
mapDispatchToProps={{ increment, decrement }}
>
{
(
{ increment
, decrement
, count
}
) => (
<div>
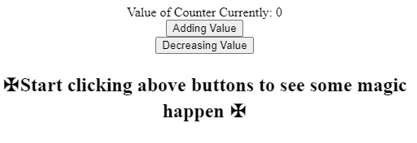
Value of Counter Currently: {count}
<div>
<button onClick={e => increment()}>Adding Value</button>
</div>
<div>
<button onClick={e => decrement()}>Decreasing Value</button>
</div>
</div>
)}
</Connect>
<h2>{"\u2720"}Start clicking above buttons to see some magic happen {"\u2720"}</h2>
</div>
</Provider>
);
render(<App />, document.getElementById("root"));
Step #4: package.json
{
"dependencies": {
"react": "16.2.0",
"react-dom": "16.2.0",
"react-redux": "5.0.6",
"react-scripts": "1.1.0",
"redux": "3.7.2"
},
}
Output:
Conclusion
Based on the above article, we understood React Dispatcher, its working, and why it is used. We went through the four methods to use, and the examples will help us understand how dispatchers can be used according to the different requirements.
Recommended Articles
We hope that this EDUCBA information on “React Dispatcher” was beneficial to you. You can view EDUCBA’s recommended articles for more information.


