Updated March 30, 2023
Introduction to React If
For any coder or a Developer, applying If statements is one of the most basic skills they need. If statements are used to make behavioral changes in the product. For example, If a person’s age is above 18, he can drive a vehicle else; he is not eligible for driving. It also supports If statements. It comes under conditional rendering and is used just the way it is used in JavaScript. If a statement is used to match the condition, let the User Interface reaction be the basis of the user’s action. This article has covered some examples to help you understand how the If statement can be used to React to fulfill our requirements.
Syntax
<If condition={ age >= drivingAge }>
<Then><span className="ok">Heyoo! Bro, {name}!</span></Then>
<Else><span className="not-ok">Sorry! Bro, {name}, You are not in the age limit of Driving.</span></Else>
</If>
Working of If statement in React
As we can see in the above syntax of the If statement in React, Here, the age which the user provides is matched against the driving age, and if the user’s age fulfills the condition, then there is a success message; otherwise, the user is not eligible for driving. This was a basic example to understand the working of the If statement in React.
Examples of React If
Different examples are mentioned below:
Example #1 – Basic Example of React If
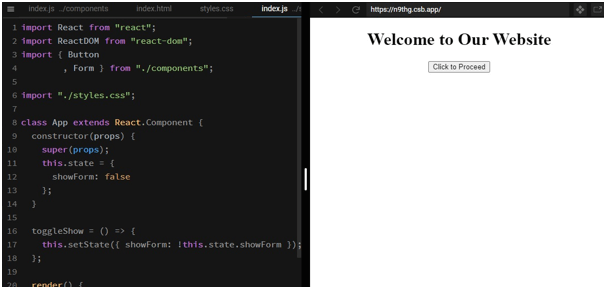
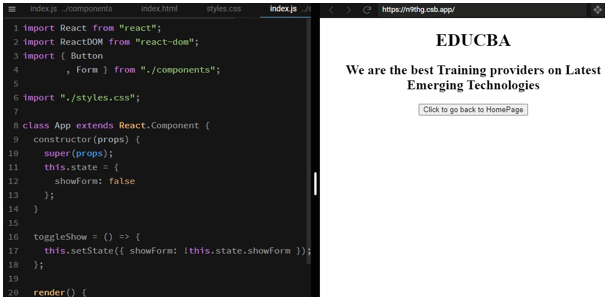
In the example below, we have used if statement in this.state.showForm inside the main index.js file where the state is changed when the button is clicked. In the components folder, there is an index.js file that contains the main content of the Pages.
index.js (inside component folder)
import React from "react";
export const Form = props => {
const { onClick } = props;
return (
<div>
<h1>EDUCBA</h1>
<h2>We are the best Training providers on Latest Emerging Technologies</h2>
<button onClick={onClick}>Click to go back to HomePage</button>
</div>
);
};
export const Button = props => {
const { onClick } = props;
return (
<div>
<h1>Welcome to Our Website</h1>
<button onClick={onClick}>
Click to Proceed
</button>
</div>
);
};
index.js (main file)
import React from "react";
import ReactDOM from "react-dom";
import { Button
, Form } from "./components";
import "./styles.css";
class App extends React.Component {
constructor(props) {
super(props);
this.state = {
showForm: false
};
}
toggleShow = () => {
this.setState({ showForm: !this.state.showForm });
};
render() {
let RenderedComponent;
if (this.state.showForm) {
RenderedComponent = <Form onClick={this.toggleShow} />;
} else {
RenderedComponent = <Button onClick={this.toggleShow} />;
}
return <div className="App">{RenderedComponent}</div>;
}
}
const rootElement = document.getElementById("root");
ReactDOM.render(<App />, rootElement);
styles.css
.App {
font-family: times;
text-align: center;
}
Output:
Examples #2 – React If in a Form
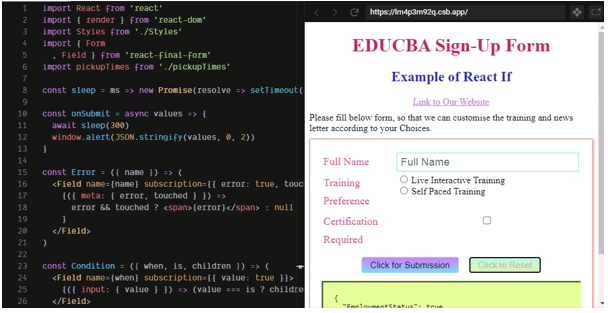
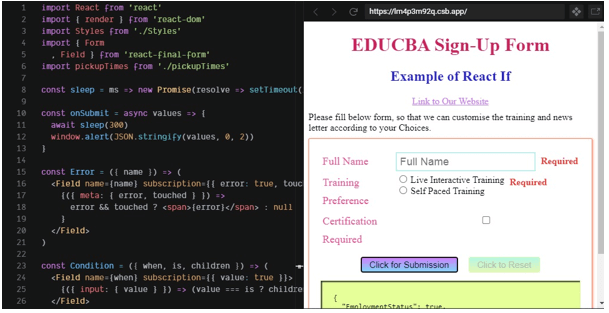
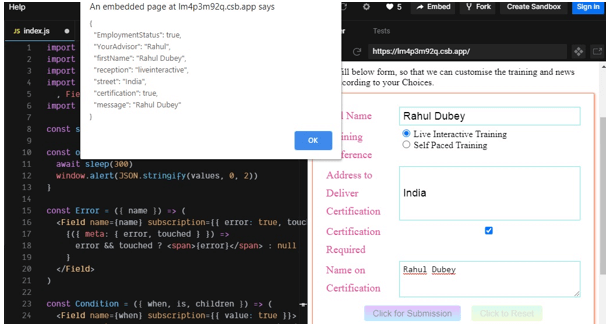
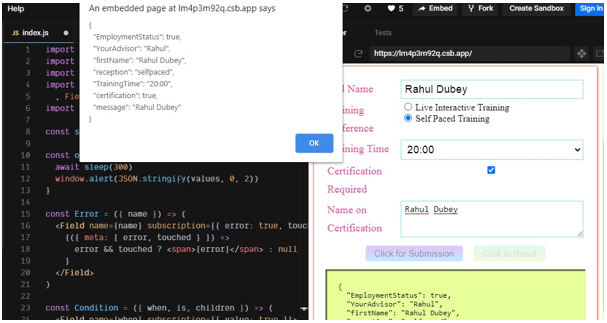
Below we have made a registration form, where one can choose training according to one’s preference. The “If” statement is used so that no detail gets left unfilled. In the example below, we have used if statement in values.firstName, values.reception, values.street and values.pickupTime inside index.js file.
index.js
import React from 'react'
import { render } from 'react-dom'
import Styles from './Styles'
import { Form
, Field } from 'react-final-form'
import pickupTimes from './pickupTimes'
const sleep =
ms => new Promise(
resolve => setTimeout(
resolve, ms)
)
const onSubmit = async values => {
await sleep(300)
window.alert(JSON.stringify(values, 0, 2))
}
const Error = (
{ name }
) => (
<Field name={name} subscription={{ error: true, touched: true }}>
{
(
{ meta: { error, touched }
}
) =>
error && touched ? <span>{error}</span> : null
}
</Field>
)
const Condition = ({ when, is, children }) => (
{
(
{ input: { value } }
) => (value === is ? children : null)
}
</Field>
)
const App = () => (
<Styles>
<h1> EDUCBA Sign-Up Form</h1>
<h2>Example of React If</h2>
<a href="https://www.educba.com/">
Link to Our Website
</a>
<p>
Please fill the below form so that we can customize the training and newsletter according to your Choices.
</p>
<Form
onSubmit={onSubmit}
initialValues={{ EmploymentStatus: true, YourAdvisor: 'Rahul' }}
validate={values => {
const errors = {}
if (!values.firstName) {
errors.firstName = 'Required'
}
if (!values.reception) {
errors.reception = 'Required'
}
if (values.reception === 'delivery') {
if (!values.street) {
errors.street = 'Required'
}
} else if (values.reception === 'pickup') {
if (!values.pickupTime) {
errors.pickupTime = 'Required'
}
}
return errors
}}
>
{({ handleSubmit
, form
, submitting
, pristine
, values }) => (
<form onSubmit={handleSubmit}>
<div>
<label>Full Name</label>
<Field
name="firstName"
component="input"
type="text"
placeholder="Full Name"
/>
<Error name="firstName" />
</div>
<div>
<label>Training Preference</label>
<div>
<label>
<Field
name="reception"
component="input"
type="radio"
value="liveinteractive"
/>{' '}
Live Interactive Training
</label>
<label>
<Field
name="reception"
component="input"
type="radio"
value="selfpaced"
/>{' '}
Self Paced Training
</label>
</div>
<Error name="reception" />
</div>
<Condition when="reception" is="liveinteractive">
<div>
<label>Address to Deliver Certification</label>
<Field
name="street"
component="input"
type="text"
placeholder="Your Address"
/>
<Error name="street" />
</div>
</Condition>
<Condition when="reception" is="selfpaced">
<div>
<label>Training Time</label>
<Field name="TrainingTime" component="select">
<option />$
{pickupTimes.map(time => (
<option key={time} value={time}>
{time}
</option>
))}
</Field>
<Error name="TrainingTime" />
</div>
</Condition>
<div>
<label>Certification Required</label>
<Field name="certification" component="input" type="checkbox" />
</div>
<Condition when="certification" is={true}>
<div>
<label>Name on Certification</label>
<Field
name="message"
component="textarea"
placeholder="Your Name"
/>
<Error name="message" />
</div>
</Condition>
<div className="buttons">
<button type="submit" disabled={submitting}>
Click for Submission
</button>
<button type="button" onClick={form.reset} disabled={submitting}>
Click to Reset
</button>
</div>
<pre>{JSON.stringify(values, 0, 2)}</pre>
</form>
)}
</Form>
</Styles>
)
render(<App />, document.getElementById('root'))
Styles.js
import styled
, { css } from 'styled-components'
const btn = (light, dark) => css`
white-space: nowrap;
display: inline-block;
border-radius: 4px;
padding: 4px 14px;
font-size: 15px;
color: #030303;
&:visited {
color: #baf573;
}
background-image: linear-gradient(${light}, ${dark});
border: 0.5px solid ${dark};
&:hover {
background-image: linear-gradient(${light}, ${dark});
&[disabled] {
background-image: linear-gradient(${light}, ${dark});
}
}
&:visited {
color: #171716;
}
&[disabled] {
opacity: 0.5;
cursor: not-allowed;
}
const btnDefault = css`
${btn('#b5f7e3', '#e2f7b5')} color: #b7b8b4;
const btnPrimary = btn('#d07dfa', '#7dd7fa')
const btnDanger = btn('#eb6399', '#fcf586')
export default styled.div`
font-family: 'Times New Roman'
, Times
, serif;
h1 {
text-align: center;
color: #cc235b;
}
h2 {
text-align: center;
color: #2623cc;
}
& > div {
text-align: center;
}
a {
display: block;
text-align: center;
color: #c780f2;
margin-bottom: 9px;
}
p {
max-width: 501px;
margin: 9px auto;
& > a {
display: inline;
}
}
.loading {
font-size: 3em;
font-weight: bold;
text-align: center;
margin: 49px;
}
form,
div.form {
text-align: left;
max-width: 501px;
margin: 9px auto;
border: 0.5px solid #f58867;
padding: 19px;
box-shadow: 1px 1px 4px #f58867;
border-radius: 2px;
position: relative;
& > div {
display: flex;
flex-flow: row nowrap;
line-height: 1em;
margin: 4px;
position: relative;
& > label {
color: #ed4a96;
width: 111px;
min-width: 59px;
font-size: 1.15em;
line-height: 31px;
}
& > input,
& > .downshift > input,
& > select,
& > textarea {
flex: 2;
padding: 4px 6px;
font-size: 1.15em;
margin-left: 14px;
border: 0.5px solid #7cf2e6;
border-radius: 0.5px;
}
& > input[type='checkbox'] {
margin-top: 7px;
}
& > div {
margin-left: 15px;
& > label {
margin-left: 0;
display: block;
& > input {
margin-right: 2px;
}
}
&.downshift {
margin-left: 0;
padding-left: 14px;
flex: 1;
& > input {
width: 99%;
padding: 5px 4px;
font-size: 1.15em;
margin-left: 0;
border: 1.15px solid #d7f587;
border-radius: 2px;
}
}
}
& > span {
line-height: 29px;
margin-left: 9px;
color: #f52c2c;
font-weight: bold;
}
& > button.remove {
${btnDanger};
}
}
& > .buttons {
display: flex;
flex-flow: row nowrap;
justify-content: center;
margin-top: 14px;
}
.error {
display: flex;
font-weight: bold;
color: #f52c2c;
flex-flow: row nowrap;
justify-content: center;
}
pre {
position: relative;
border: 1.15px solid #e0faa5;
background: #e6ff99;
box-shadow: inset 2px 2px 2px #30302f;
padding: 21px;
}
.submitting {
display: block;
position: absolute;
top: -2px;
left: -4px;
right: -4px;
padding: 0;
text-align: center;
background: #41423e;
color: #f4f5f2;
z-index: 11;
font-weight: bold;
font-size: 0.9em;
}
.saving {
font-size: 0.9em;
font-weight: bold;
color: #516bed;
margin: 9px 0 0 6px;
}
}
button {
margin: 0 9px;
&[type='submit'] {
${btnPrimary};
}
&[type='button'] {
${btnDefault};
}
}
.downshift-options {
border: 2px solid #a0f2d8;
box-shadow: 2px 2px 3px #1a1b1c;
& > div {
padding: 3px 5px;
}
}
`
pickupTimes.js
const now = new Date();
let hours = now.getHours();
const times = [];
if (now.getMinutes() < 30) {
times.push(`${++hours}:30`);
} else {
hours++;
}
while (times.length < 6) {
times.push(`${hours}:00`);
times.push(`${hours}:30`);
hours = (
hours + 1
) % 24;
}
export default times;
Output:
Conclusion
Based on the above article, we understood the working of the If statement in React. Then, we went through a couple of examples to understand how an If statement can be used in different situations to change the behavior of the app according to the user’s action.
Recommended Articles
This is a guide to React If. Here we discuss the introduction, syntax, and working of the If statement in React along with examples and code implementation. You may also have a look at the following articles to learn more –
