Updated April 11, 2023

Introduction to React Native Accessibility
Accessibility means the ability to access something. Many users are not able to access different websites, apps, or mobile phones easily. So, the accessibility option helps them by providing a screen readers, voice enhancement, navigators, and many more. Web accessibility is a kind of creation of a website that can be used by anyone. Both the major platforms including Android, iOS have their own set of accessibility options like a voiceover in iOS and talkback in Android. React native also provides a set of complementary accessibility options for making the app usable for everyone. This article would explain the use of accessibility through different examples for a better understanding.
React Native Accessibility Syntax:
- accessible
<View accessible={true}>
<Text
>Heyoo<
/Text>
</View>- accessibilityLabel & accessibilityHint
<TouchableOpacity
accessible={
true}
accessibilityLabel="Press Me!"
accessibilityHint="The previous screen is navigated"
onPress={
onPress}>
Working of React Native Accessibility with Examples
Below are the working explained with examples:
Example #1
Below, the accessibility label property is used to a custom string on our Touchable. The accessibility label on the TouchableOpacity element would default to “Click me!”, which navigates the window to the previously used window. In the iOS platform, if the user has hints enabled in the device’s VoiceOver settings then VoiceOver will read the hint after the label. An accessibility hint helps users to understand what will happen on account of a certain action is performed by them on the accessibility element when they are unable to understand the result from the accessibility label.
[i] App.js
import React
, { useState
, useEffect } from "react";
import { View
, Text
, StyleSheet
, TouchableOpacity
, ImageBackground
, Alert } from "react-native";
export default function App() {
return (
<ImageBackground
source={
{
uri:
'https://images.pexels.com/photos/4453074/pexels-photo-4453074.jpeg?auto=compress&cs=tinysrgb&dpr=1&w=500',
}
}
style={
{
flex: 1
}
}
>
<View>
<TouchableOpacity
accessible={true}
accessibilityLabel="Lets go in past"
accessibilityHint="The previous screen is navigated"
onPress={() => {}}>
<View
style={{
color: '#991450'
, height: '180px'
, width: '200px'
, backgroundColor: '#8ef73e'
, textAlign: 'center'
, alignItems: 'center'
}
}
accessibilityRole={'button'}>
<Text style={
{fontSize: 36
, marginBottom: 48
, color: '#faf569'
, backgroundColor: '#54f0cb'
, alignItems: 'center'
, borderWidth: 10
, textAlign: 'center'
,borderRadius: 100
, borderColor: '#d938f5'
, justifyContent: 'center'
}
}>
Lets Go Back in Past
</Text>
</View>
</TouchableOpacity>
</View>
</ImageBackground>
);
}
Output:
Example #2
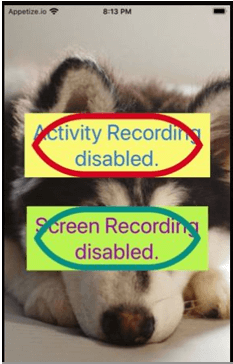
Below, the application would use the user’s accessibility information through useAccessibilityInfo and would perform certain actions to record screen and also recording the users activity on account of the accessibility granted or enabled by the users in the settings for the application.
[i] App.js
import React
, { useState
, useEffect } from "react";
import { useAccessibilityInfo } from '@react-native-community/hooks'
import { View
, Text
, StyleSheet
, TouchableOpacity
, ImageBackground} from "react-native";
const styles = StyleSheet.create({
container: {
flex: 1,
alignItems: "center"
, justifyContent: "center"
},
});
export default function App() {
const {
reduceMotionEnabled
, screenReaderEnabled
} = useAccessibilityInfo();
return (
<ImageBackground
source={
{
uri:
'https://images.pexels.com/photos/4681107/pexels-photo-4681107.jpeg?auto=compress&cs=tinysrgb&dpr=1&w=500',
}
}
style={
{
flex: 1
}
}
>
<View style={styles.container}>
<Text style={{fontSize: 36
, marginBottom: 48
, color: '#2976e3'
, backgroundColor: '#faf569'
, alignItems: 'center'
, borderWidth: 10
, textAlign: 'center'
,borderRadius: 100
, borderColor: '#d40820'
, justifyContent: 'center'
}
}>
Activity Recording {reduceMotionEnabled ? "enabled" : "disabled"}.
</Text>
<Text style={{fontSize: 36
, marginBottom: 48
, color: '#9913ba'
, backgroundColor: '#bdf03c'
, alignItems: 'center'
, borderWidth: 10
, textAlign: 'center'
,borderRadius: 100
, borderColor: '#0d8c7f'
, justifyContent: 'center'
}}>
Screen Recording {screenReaderEnabled ? "enabled" : "disabled"}.
</Text>
</View>
</ImageBackground>
);
}
Output:
Example #3
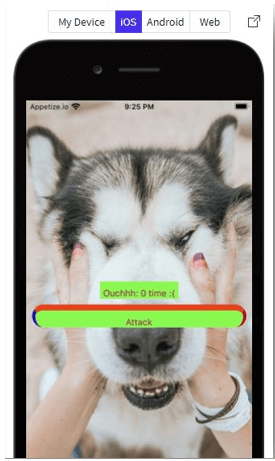
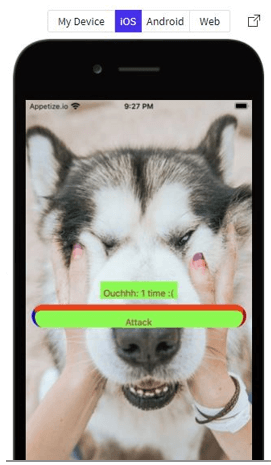
Below, the accessibilityActions property contains a list of action objects and each action object contains the name, type, and required fields. The action requests are handled through onAccessibilityAction function. Several custom actions of cutting, copying, and pasting the content are being performed using onAccessibilityAction function.
[i] App.js
import React
, { useState } from "react";
import { StyleSheet
, Text
, TouchableOpacity
, View
, ImageBackground
, Alert } from "react-native";
const Application = () => {
const onPress = () =>
setCount(
prevCount => prevCount + 1);
const [count
, setCount] = useState(0);
return (
<ImageBackground
source={
{
uri:
'https://images.pexels.com/photos/3663082/pexels-photo-3663082.jpeg?auto=compress&cs=tinysrgb&dpr=1&w=500',
}
}
style={
{
flex: 1
}
}
>
<View style={{
flex: 1,
justifyContent: "center",
paddingHorizontal: 10
}}>
<View style={{
alignItems: "center",
padding: 10,
}}>
<Text style={{
color: '#991450'
, height: '50px'
, width: '150px'
, backgroundColor: '#8ef73e'
, borderRadius: '50px'
, borderRightWidth: '5px'
, borderRightColor: '#b30b1b'
, borderLeftWidth: '5px'
, borderLeftColor: '#0b0ebd'
, borderTopWidth: '10px'
, borderTopColor: '#e3431b'
, borderBottomColor: '#22c0f5'
, fontSize: '15px'
}}
accessibilityLiveRegion="polite"
>
Ouchhh: {count} time :(
</Text>
</View>
<TouchableOpacity
style={{
color: '#991450'
, height: '50px'
, width: '150px'
, backgroundColor: '#8ef73e'
, borderRadius: '50px'
, borderRightWidth: '5px'
, borderRightColor: '#b30b1b'
, borderLeftWidth: '5px'
, borderLeftColor: '#0b0ebd'
, borderTopWidth: '10px'
, borderTopColor: '#e3431b'
, borderBottomColor: '#22c0f5'
, fontSize: '15px'
}}
onPress={onPress}
accessible={true}
accessibilityLabel="Lets go in past"
accessibilityHint="The previous screen is navigated"
>
<View
style={{
textAlign: 'center'
, alignItems: 'center'
}
}
accessible={true}
accessibilityActions={[
{
name: 'cuttingg'
, label: 'cuttingg'
},
{
name: 'copyingg'
, label: 'copyingg'
},
{
name: 'pastingg'
, label: 'pastingg'
}
]}
onAccessibilityAction={
(event) => {
switch (
event.nativeEvent.actionName) {
case 'cutting':
Alert.alert(
'Buzz'
, 'successfulll actionn of cuttingg');
break;
case 'copying':
Alert.alert(
'Buzzz'
, 'successfulll actionn of coypingg');
break;
case 'pasting':
Alert.alert(
'Buzz'
, 'successfulll actionn of pastingg');
break;
}
}}
accessibilityRole={'button'}>
<Text style={{
color: '#991450'
, height: '50px'
, width: '150px'
, backgroundColor: '#8ef73e'
, borderRadius: '50px'
, borderRightWidth: '5px'
, borderRightColor: '#b30b1b'
, borderLeftWidth: '5px'
, borderLeftColor: '#0b0ebd'
, borderTopWidth: '10px'
, borderTopColor: '#e3431b'
, borderBottomColor: '#22c0f5'
, fontSize: '15px'
}}
>Attack</Text>
</View>
</TouchableOpacity>
</View>
</ImageBackground>
);
};
export default Application;
Output:
- On code execution on iOS platform
- On Clicking “Attack” on iOS platform
- On code execution on Web Platform
- On Clicking “Attack” on web platform
Conclusion
On the basis of the above article, we can understand the concept of React Native accessibility. Different examples are explained in this article for a better understanding and implementation of accessibility according to the specific requirement. This article would help the beginners, who are exploring the react-native environment.
Recommended Articles
This is a guide to React Native Accessibility. Here we discuss the introduction, React Native Accessibility working with Examples and code implementation respectively. You may also have a look at the following articles to learn more –


