Updated April 20, 2023
Introduction to React Native Gesture Handler
In react native the concept of the gesture handler come into picture after the react-native inbuilt package called gesture responder system. We can check this package also, the problem was with the build-in library of react was with its performance. With the help of a gesture handler, we will be able to read the pinch, and also we can use it for rotation. We can control the rotation of any dimension and it will be very smooth and faster, It also allows us to use the touch activity which runs in the react-native thread which means it also allows us to handle default behavior.
Syntax
Below is the simple syntax where we are importing the PanGestureHandler. We have imported the PanGestureHandler from the react-native gesture handler and Inside the component of this, we can pass the animation for smooth transaction of the shape.
import {PanGestureHandler} from 'react-native-gesture-handler'
<PanGestureHandler onGestureEvent={handler function}>
{/* Animation for the view */}
</PanGestureHandler>
How to Use the Gesture Handler to react-native?
Before going to understand the working of the react-native gesture handler we need to understand why we need this package. It is mostly used for smooth flow of the shape as we used to have an inbuilt package for handling the shapes but the performance and the limitation of the attribute were not good. Hence This is a kind of replacement for the inbuilt package. Before using this package we need to import the gesture handler components for uses. Then we need to use the imported component and inside the gesture handler component, we need to pass the animation which we want to happen. The animation inside the gesture handler component we can feel the better performance, even we will get some more and extra features for handling this.
Examples of React Native Gesture Handler
To run a basic example, the first thing we need to create an app, we can use the command sudo npm install expo-cli -global. Because we are using the expo to run the app on the android environment and after that, we will use the command expo init my-new-project. It will allow us to create a basic structure for any react native app. It will download all the required modules for running a basic application.
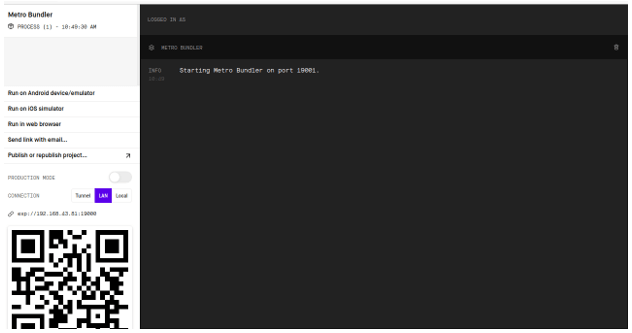
After performing the above activity we will see a screen of like below,
Run the command npm start to start the app.
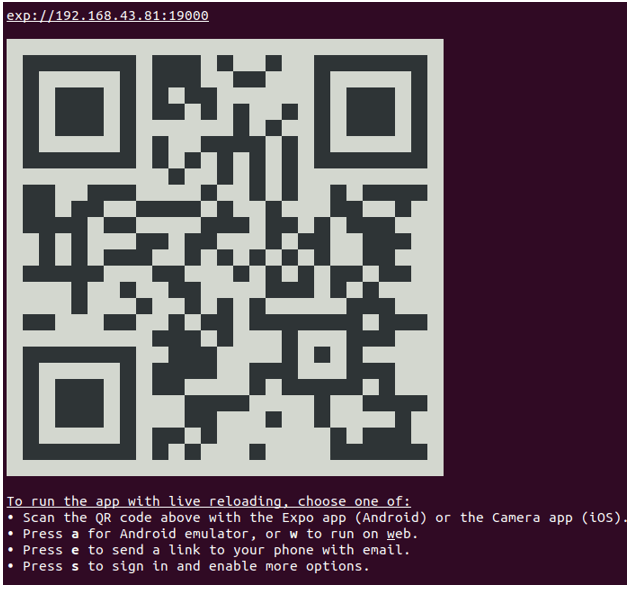
Finally, we will see a screen on command prompt which is like,
On this screen, we need to scan the QR code on the install app of the expo on your android phone.
Example #1
Below is a simple example where we are showing some list without using the react-native gesture package.
Code:
import React from 'react'
import {
SafeAreaView,
View,
Text,
StyleSheet,
FlatList
} from 'react-native'
//Array of list of the user details and it contains the key and message section
const userData = [
{ key: '11', msg: 'Ranjan is my name!' },
{ key: '21', msg: 'Ajay is my name!' },
{ key: '31', msg: 'Vijay is my name' }
]
//Creating view for gesture components
const GastureSeperators = () => <View style={Gasturestyles.GastureSeperator} />
const UserList = ({ msg }) => (
<View style={{ backgroundColor: "yellow" }}>
<Text style={{ fontSize: 24 ,fontWeight:"100",color:"black"}}>{msg}</Text>
</View>
)
const Example = () => {
return (
<>
//Start of the SafeAreaView
<SafeAreaView style={Gasturestyles.GastureC}>
<FlatList
data={userData}
keyExtractor={value => value.key}
renderItem={({ item }) => <UserList {...item} />}
ItemSeparatorComponent={() => <GastureSeperators />}
/>
//End of the SafeAreView
</SafeAreaView>
</>
)
}
//Style for displaying the components and views
const Gasturestyles = StyleSheet.create({
GastureC: {
flex: 2,
backgroundColor:"yellow"
},
GastureSeperator: {
flex: 2,
backgroundColor: 'green',
height: 2,
}
})
//Exporting the Default Example components
export default Example
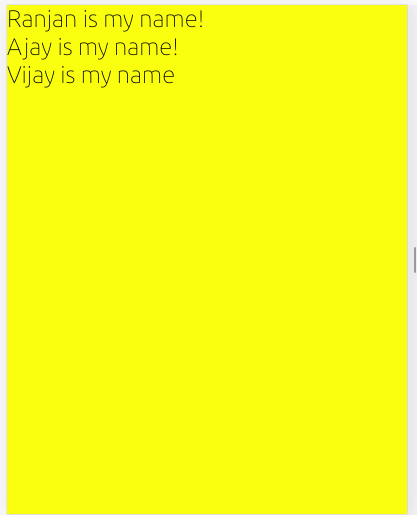
Screen, after running npm start we can see the below output for the above examples.
Example #2
This is the second example, here we have used the react-native-gesture-handler, we can see the
Code:
//Importing the react components from main react
import React, { Component } from 'react'
//Importing the components of react-native for uses
import { Text, View,StyleSheet ,Animated} from 'react-native'
//Importing the gesture handler components for uses
import {PanGestureHandler} from 'react-native-gesture-handler'
export default class GestureHandlerClass extends Component {
//Creating x axis movement for the shape
x = new Animated.Value(1)
////Creating y axis movement for the shape
y = new Animated.Value(1)
manageGesture = Animated.event([{nativeEvent: {translationX: this.x,translationY:this.y}}], { useNativeDriver: true });
render() {
let transformStyle
//Designing the transform style so that the movement of the shape is very smooth
transformStyle = {
transform:[
{
translateY : this.y
},
{
translateX : this.x
}
]
}
return (
{/* Start of the view along with the style*/}
<View style={[GestureStyle.gestureContainer]}>
<PanGestureHandler onGestureEvent={this.manageGesture}>
{/* Animation for the view */}
<Animated.View style={[GestureStyle.shape,transformStyle]} />
</PanGestureHandler>
</View>
)
}
}
//Style sheet for the above components and the for a better presentation of the components
const GestureStyle = StyleSheet.create({
gestureContainer: {
flex: 2,
flexDirection: "column-reverse",
justifyContent: "flex-end",
backgroundColor: "black"
},
shape: {
width: 155,
height: 155,
backgroundColor: "green",
fontWeight:100,
borderRadius: 99
}})
The screen below is the shape which we are displaying and we can move these shapes from one place to another place on the given android device. In the below shape initially, the circle was on top then we moved it from mouse to another position.
Advantages
There are many advantages of using the gesture handlers, let me give some of the important advantages of using it.
- It makes it easy to recognize any kind of pinch and any kind of touch.
- As a smooth way to handle the rotation of the shape in the react-native android app.
- It gives the ability to know the rotation between the react-native gesture handler.
- It also gives the ability for smooth animation and movement of the shapes, with the help of the Animation of the driver.
- It gives us the ability for responsive intersections even in cases when the thread of Javascript is too much or simply overloaded.
- Better performance as compared to the existing inbuilt handler.
Conclusion
From this tutorial, we learned the basics of the working of the gesture handler and we focus on the syntax of the gesture handler. We also focus on some of the examples along with all set up for the running example and also we learned the advantage of it.
Recommended Articles
This is a guide to React Native Gesture Handler. Here we discuss the introduction, syntax, uses, and examples of React Native Gesture Handler along with examples and advantages. You may also have a look at the following articles to learn more –
