Updated May 23, 2023

Introduction to React Native Menu
The following article provides an outline for React Native Menu. Menus show us the different options on an elevated surface temporarily. The menu placement depends on the requirements and the elements which open them. In any application or website, Menu is essential in navigating the user to the different parts of information the website/app shares. Creating Menus is not a difficult task in the case of React or React Native. It offers multiple ways to make a Menu.
Syntax:
<Menu
ref={this.setMenuRef} button={
<Text onPress={this.showMenu} style={this.props.textStyle}>
{this.props.menutext}
</Text>
}>
<MenuItem onPress={this.option1Click}>op1:Go to second Page</MenuItem>
<MenuItem onPress={this.option2Click}>op2:Demo Option</MenuItem>
<MenuItem onPress={this.option3Click} disabled> op3:Disabled option
</MenuItem>
<MenuDivider />
<MenuItem onPress={this.option4Click}> op4:Option After Divider
</MenuItem>
</Menu>
Examples of React Native Menu
Given below are the examples mentioned:
Example #1 – Context Menu
Components inside src folder:
- stylesfolder
- index.js
Components inside styles folder:
- custom.css
- react-contextmenu.css
a. custom.css
.custom-root {
background-color: #f2f7f6;
}
.custom-divider {
background-color:#050505;
}
.custom-selected { background-color:#b3f551;
}
b. react-contextmenu.css
.react-contextmenu {
background-color: #ebeded;
background-clip: padding-box;
border: 1px solid #42393930;
border-radius: 0.26rem;
color:#333636;
font-size: 15px;
margin: 3px 0 0;
min-width: 161px;
outline: none;
opacity: 0;
padding: 6px 0;
pointer-events: none;
text-align: left;
transition: opacity 251ms ease !important;
}
.react-contextmenu.react-contextmenu--visible {
opacity: 1;
pointer-events:
auto; z-index: 9999;
}
.react-contextmenu-item {
background: 00;
border: 0;
color: #373a3c;
cursor:pointer;
font-weight: 401;
line-height: 1.6;
padding: 4px 21px; t
ext-align: inherit;
white-space: nowrap;
}
.react-contextmenu-item.react-contextmenu-item--active,
.react-contextmenu-item.react-contextmenu-item--selected {
color: #f5f0f1;
background-color: #98e85f;
border-color: #e34467;
text-decoration: none;
}
.react-contextmenu-item.react-contextmenu-item--disabled,
.react-contextmenu-item.react-contextmenu-item--disabled:hover {
background-color: transparent;
border-color: rgba(0, 0, 0, 0.16);
color: #6e5e61;
}
.react-contextmenu-item--divider {
border-bottom: 2px solid rgba(12, 12, 12, 0.16);
cursor: inherit;
margin-bottom: 4px;
padding: 3px 0;
}
.react-contextmenu-item--divider:hover {
background-color: transparent;
border-color: rgba(0, 0, 0, 0.16);
}
.react-contextmenu-item.react-contextmenu-submenu {
padding: 0;
}
.react-contextmenu-item.react-contextmenu-submenu > .react-contextmenu-item
{
}
.react-contextmenu-item.react-contextmenu-submenu.react-contextmenu-item:after {
content: '▶';
display: inline-block;
position: absolute;
right: 6px;
}
.example-multiple-targets::after {
content: attr(data-count);
display: block;
}
c. index.js
import React from 'react'
import { render } from 'react-dom'
import { ContextMenu
, MenuItem
, ContextMenuTrigger } from 'react-contextmenu'
import './styles/react-contextmenu.css'
import './styles/custom.css'
const styles = {
textAlign: 'center',
textColor: '#9ded3b',
backgroundColor: '#ac46e8',
padding: 31
}
const ID = 'ID'
consthandleClick = (event, data) =>{
console.log(`clicked`, { event, data })
}
const attributes = {
className: 'custom-root',
disabledClassName: 'custom-disabled',
dividerClassName: 'custom-divider',
selectedClassName: 'custom-selected'
}
const App = () => (
<div style={{ fontFamily: 'sans-serif' }}>
<ContextMenuTrigger id={ID}>
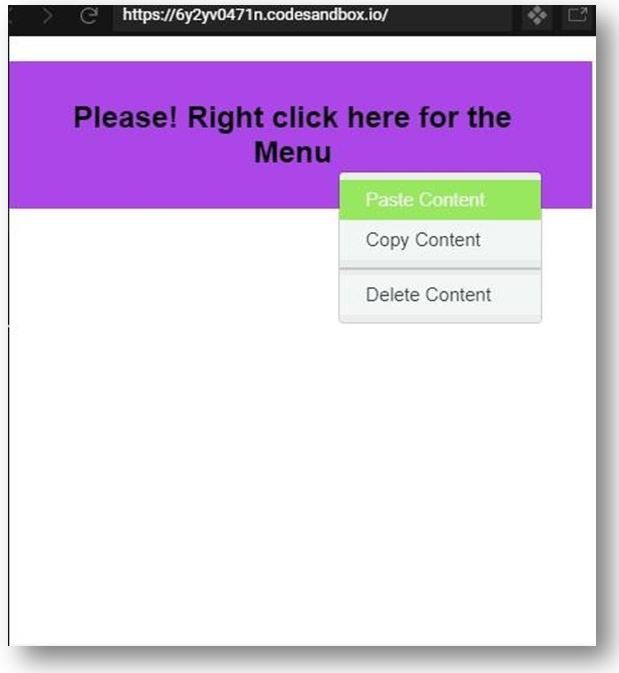
<h2 style={styles}>Please! Right click here for the Menu</h2>
</ContextMenuTrigger>
<ContextMenuid={ID}>
<MenuItem
data={{ action: 'paste' }}
onClick={handleClick}
attributes={attributes}
>
Paste Content
</MenuItem>
<MenuItem
data={{ action: 'copy' }}
onClick={handleClick}
attributes={attributes}
>
Copy Content
</MenuItem>
<MenuItem divider />
<MenuItem
data={{ action: 'delete' }}
onClick={handleClick}
attributes={attributes}
>
Delete Content
</MenuItem>
</ContextMenu>
</div>
)
render(<App />, document.getElementById('root'))
Output:
Example #2 – Hamburger Menu
Components for Hamburger Menu:
- index.html
- index.js
- menuContent.css
- menuContent.js
a. index.html
<div id="root"></div>b. index.js
import HamburgerMenu from 'react-hamburger-menu'
import MenuContent from './menuContent'
constcontentStyles = {
fontFamily: 'Times New Roman',
textAlign:'center',
}
class App extends Component {
constructor(props){
super(props)
this.state = {
menuOpen: false,
}
}
openMenu() {
this.setState({ menuOpen: true })
}
closeMenu() {
this.setState({ menuOpen: false })
}
render() {
return <div>
<CheeseburgerMenuisOpen={this.state.menuOpen}
color='#761aab'
closeCallback={this.closeMenu.bind(this)}>
<MenuContentcloseCallback={this.closeMenu.bind(this)}/>
</CheeseburgerMenu>
<HamburgerMenuisOpen={this.state.menuOpen} menuClicked={this.openMenu.bind(this)}
width={31}
height={25}
strokeWidth={4}
rotate={0}
color='#761aab'
borderRadius={0}
animationDuration={0.7}
/>
<div style={contentStyles}>
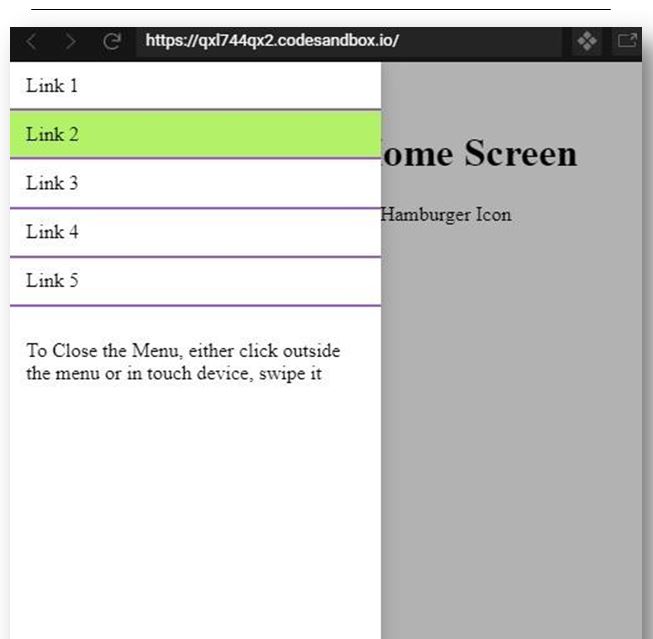
<h1>Welcome to the Home Screen</h1>
<p>To Open Menu, Click on the Hamburger Icon</p>
</div>
</div>
}
}
render(<App />, document.getElementById('root'))
c. menuContent.css
.menu {
font-family: 'Times New Roman', Times, serif;
}
.menu-item {
border-bottom: 2px solid #a359d4;
}
.menu-item a {
display: block;
padding: .6rem 16px;
color:inherit;
text-decoration: none;
}
.menu-item a:hover {
color: inherit;
text-decoration: none;
background-color: #b3f266;
}
.menu-item a:focus {
text-decoration: none;
}
.menu-item a:visited {
color: inherit;
}
.active-menu-item {
background-color: #fafa82;
}
.hint {
padding: .6rem 16px;
}
d. menuContent.js
import React, { Component } from 'react'
import './menuContent.css'
class MenuContent extends Component {
constructor(props) {
super(props)
this.items = []
for (let i=1; i<=5; i++) {
this.items.push(i)
}
}
render() {
return (
<div className="menu">
{this.items.map(i =><div className="menu-item" key={i}>
<a
href="https://www.educba.com/"onClick
={this.props.closeCallback}
target="_blank">
Link {i}
</a>
</div>)}
<p className="hint">To Close the Menu, either click outside the menu or in touch device, swipe it</p>
</div>
)
}
}
MenuContent.PropTypes = {
closeCallback: React.PropTypes.func.isRequired
}
export default MenuContent
Output:
Example #3 – Nested Menu
Components inside src folder:
- App.tsx
- index.tsx
- styles.css
a. App.tsx
import React, { useState } from "react";
import { Menu, MenuItem, Typography } from "@material-ui/core";
import NestedMenuItem from "material-ui-nested-menu-item";
export constNestedMenu = () => {
const [menuPosition, setMenuPosition] = useState<any>(null);
consthandleRightClick = (event: React.MouseEvent) =>{ if (menuPosition) {
return;
}
event.preventDefault();
setMenuPosition({
top: event.pageY,
left: event.pageX
});
};
consthandleItemClick = (event: React.MouseEvent) =>{
setMenuPosition(null);
};
return (
<div onContextMenu={handleRightClick}>
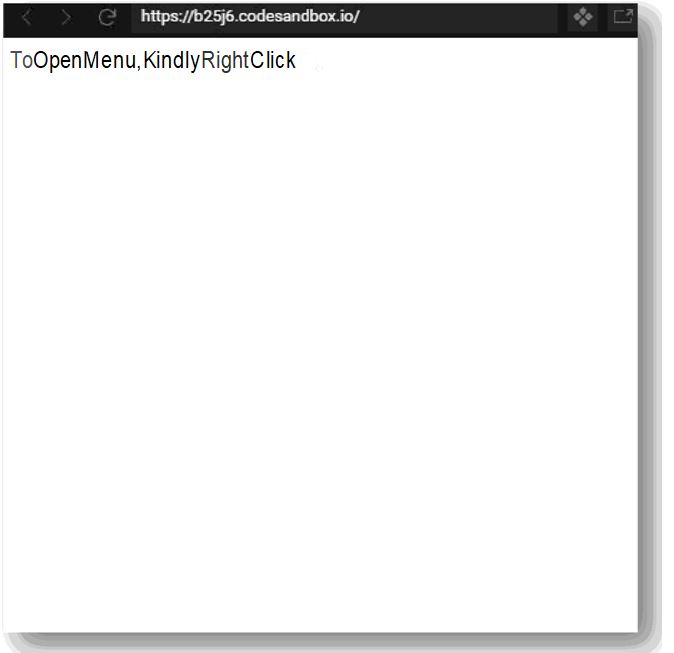
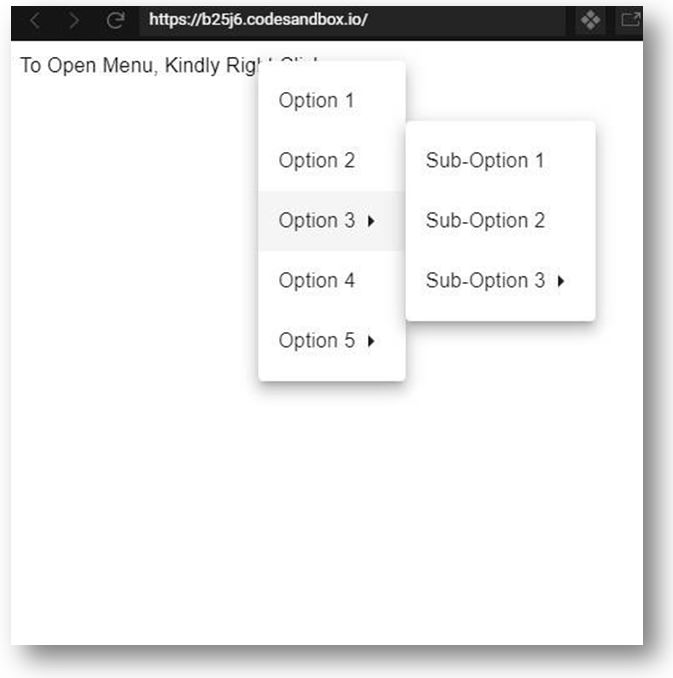
<Typography>To Open Menu, Kindly Right Click</Typography>
<Menu
open={!!menuPosition}
onClose={() =>setMenuPosition(null)}
anchorReference="anchorPosition"
anchorPosition={menuPosition}
>
<MenuItemonClick={handleItemClick}>Option1</MenuItem>
<MenuItemonClick={handleItemClick}>Option2</MenuItem>
<NestedMenuItem label="Option 3"
parentMenuOpen={!!menuPosition}
onClick={handleItemClick}
>
<MenuItemonClick={handleItemClick}>Sub-Option1</MenuItem>
<MenuItemonClick={handleItemClick}>Sub-Option2</MenuItem>
<NestedMenuItem
label="Sub-Option 3"
parentMenuOpen={!!menuPosition}
onClick={handleItemClick}
>
<MenuItemonClick={handleItemClick}>Sub-Sub-Option1</MenuItem
<MenuItemonClick={handleItemClick}>Sub-Sub-Option2</MenuItem>
</NestedMenuItem>
</NestedMenuItem>
<MenuItemonClick={handleItemClick}>Option 4</MenuItem>
<NestedMenuItem
label="Option 5"
parentMenuOpen={!!menuPosition}
onClick={handleItemClick}
>
<MenuItemonClick={handleItemClick}>Sub-Option1</MenuItem>
<MenuItemonClick={handleItemClick}>Sub-Option2</MenuItem>
</NestedMenuItem>
</Menu>
</div>
);
};
export default NestedMenu;
b. index.tsx
import * as React from "react";
import { render } from "react-dom";
import App from "./App";
constrootElement = document.getElementById("root");
render(<App />, rootElement);
c. styles.css
.App {
font-family: 'Times New Roman', Times, serif;
text-align: center;
}
Output:
Conclusion
On the basis of the above article, which includes examples, syntax, and a brief introduction. We can see how a Menu can be created and how we can use it according to our requirements. The first example is of a basic Menu that appears after right-clicking on a text, the second example shows us how to create a Hamburger Menu, which also has a link to our website, and the last one helps us in understanding the creation of a nested Menu.
Recommended Articles
We hope that this EDUCBA information on “React Native Menu” was beneficial to you. You can view EDUCBA’s recommended articles for more information.


