Updated July 1, 2023
Introduction to React Native Permissions
Data privacy is one of the major concerns of internet users presently. As per Google’s privacy policy, every internet user should acknowledge what data an application is trying to access. Sometimes, applications access sensitive data like files, messages, contacts, and many more. So, if a user can give permission to the applications for accessing their data, it would act as a barrier for the applications to access sensitive data without the user’s knowledge. React Native gives the option to the developer to ask the user if they want to permit the app for accessing a file, contact, or any other application.
Syntax:
const requestCameraPermission = async () => {
try {
const granted = await PermissionsAndroid.request(
PermissionsAndroid.PERMISSIONS.CAMERA,
{
title: "Permission for Captureeeee Extraaaodrinary Application",
message:
"For your beautiful pictures, " +
"Grant permission to Captureeeee Extraaaordinary Application",
buttonNeutral: "Not Right Now!",
buttonNegative: "Cancel",
buttonPositive: "Alright"
}
);
....
}
}
Working of React Native Permissions
The syntax for asking for permissions for different files or applications is mentioned below:
- READ_CALENDAR – android.permission.READ_CALENDAR – This is used for asking permission to access the calendar application of an android phone.
- RECORD_AUDIO – android.permission.RECORD_AUDIO – This is used for asking permission to record audio.
- CALL_PHONE – android.permission.CALL_PHONE – This is used for asking permissions to access the calling app.
- WRITE_CALL_LOG – android.permission.WRITE_CALL_LOG – This is used for asking permissions to edit the call log.
- SEND_SMS – android.permission.SEND_SMS – This is used for asking permissions to send SMS.
- READ_SMS – android.permission.READ_SMS – This is used for asking permissions to read the messages of the android phone.
- READ_EXTERNAL_STORAGE – android.permission.READ_EXTERNAL_STORAGE – This is used for asking permissions to read the external storage.
- CAMERA – android.permission.CAMERA – This is used for asking permissions to access the android phone’s camera.
- WRITE_CONTACTS – android.permission.WRITE_CONTACTS – This is used for asking permissions to edit the contacts of the android phone.
These were some of the syntaxes of asking permissions to use the different other applications of the android phone.
Examples
Let us discuss examples of React Native Permissions.
Example #1
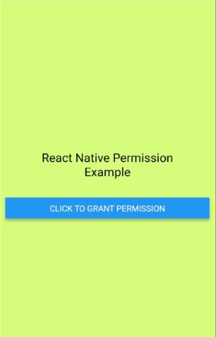
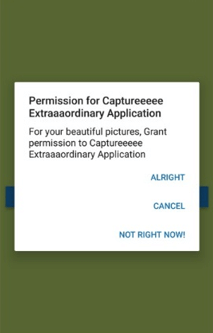
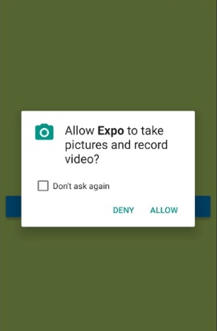
Below examples explains the usage of permissions in React Native. When “Click to Grant Permission” button is clicked, a pop-up window appears asking for permission for the camera access. According to the input chosen in response to the permission, it proceeds further.
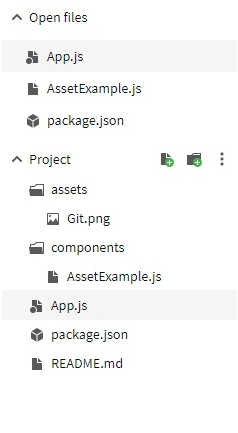
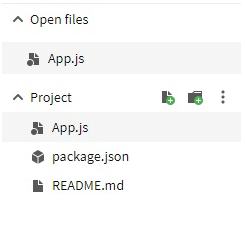
The files used in the code below are:
[i] Git.png
[ii] AssetExample.js
import * as React from 'react';
import { Text
, View
, StyleSheet
, Image } from 'react-native';
export default function AssetExample() {
return (
<View style={styles.container}>
<Text style={styles.paragraph}>
To edit the files simply drang and drop them into the editor.
</Text>
<Image style={styles.logo} source={require('../assets/Git.png')} />
</View>
);
}
const styles = StyleSheet.create({
container: {
alignItems: 'center',
justifyContent: 'center',
padding: 30,
backgroundColor: "#e47eed",
},
paragraph: {
margin: 28,
marginTop: 0,
fontSize: 18,
fontWeight: 'bold',
textAlign: 'center',
},
logo: {
height: 128,
width: 128,
}
});
[iii] App.js
import React from "react";
import { StyleSheet
, Text
, View
, SafeAreaView
, PermissionsAndroid
, Button } from "react-native";
import Constants from "expo-constants";
const requestCameraPermission = async () => {
try {
const granted = await PermissionsAndroid.request(
PermissionsAndroid.PERMISSIONS.CAMERA,
{
title: "Permission for Captureeeee Extraaaordinary Application",
message:
"For your beautiful pictures, " +
"Grant permission to Captureeeee Extraaaordinary Application",
buttonNeutral: "Not Right Now!",
buttonNegative: "Cancel",
buttonPositive: "Alright"
}
);
if (granted === PermissionsAndroid.RESULTS.GRANTED) {
console.log("Camera access is granted");
} else {
console.log("Permission of Camera is denied");
}
} catch (err) {
console.warn(err);
}
};
const App = () => (
<View style={styles.container}>
<Text style={styles.item}>React Native Permission Example</Text>
<Button title="Click to Grant Permission" onPress={requestCameraPermission} />
</View>
);
const styles = StyleSheet.create({
container: {
flex: 1,
justifyContent: "center",
paddingTop: Constants.statusBarHeight,
backgroundColor: "#d6fc7c",
padding: 10
},
item: {
margin: 30,
fontSize: 20,
fontWeight: "italics",
textAlign: "center"
}
});
export default App;
Output:
Example #2
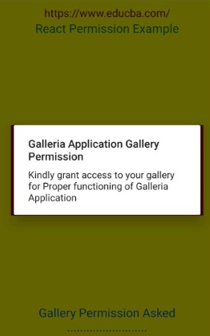
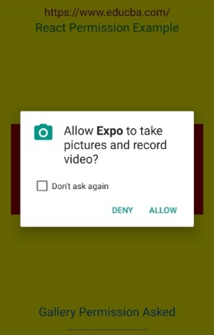
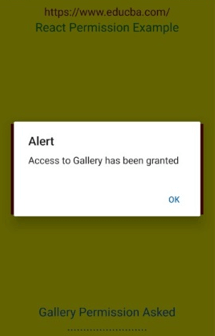
The example below asks permission to access the gallery using the camera window. The files used in the code below are:
[i] App.js:
import React from 'react';
import {
SafeAreaView
, View
, Text
, StyleSheet
, PermissionsAndroid
, TouchableOpacity
, Platform
} from 'react-native';
const App = () => {
const proceed = () => {
alert('Access to Gallery has been granted');
};
const onPress
= async (
) => {
if (Platform.OS === 'android') {
const granted = await PermissionsAndroid.request(
PermissionsAndroid.PERMISSIONS.CAMERA,
{
title: 'Galleria Application Gallery Permission',
message: 'Kindly grant access to your gallery for Proper functioning of Galleria Application',
},
);
if (granted === PermissionsAndroid.RESULTS.GRANTED) {
proceed();
} else {
alert('Access to Gallery Denied');
}
} else {
proceed();
}
};
return (
<SafeAreaView style={{flex: 1}}>
<View style={styles.container}>
<Text
style={{
fontSize: 18,
textAlign: 'center',
color: '#7a1229'
}}>
</Text>
<Text
style={{
fontSize: 20,
textAlign: 'center',
color: '#0d8028'
}}>
React Permission Example
</Text>
<View style={styles.container}>
<TouchableOpacity
style={styles.buttonStyle}
onPress={onPress}>
<Text style={styles.textStyle}>
Click to Grant Gallery Permission
</Text>
</TouchableOpacity>
</View>
<Text
style={{
fontSize: 20,
textAlign: 'center',
color: '#185ea3'
}}>
Gallery Permission Asked
{'\n'}
.........................
</Text>
</View>
</SafeAreaView>
);
};
const styles = StyleSheet.create({
container: {
flex: 1,
backgroundColor: '#f7f71b',
justifyContent: 'center',
padding: 10,
},
textStyle: {
fontSize: 20,
color: '#f8fc83',
},
buttonStyle: {
alignItems: 'center',
backgroundColor: '#a30d1c',
padding: 50,
},
});
export default App;
Output:
Conclusion
We understood the working of React Native permission with two different examples. These examples would explain the application of React Native permissions and their usage according to the different requirements.
Recommended Articles
This is a guide to React Native Permissions. Here we also discuss the Introduction and Working of React Native Permissions along with different examples and its code implementation. You may also have a look at the following articles to learn more –
