Updated March 28, 2023
Introduction to React Native Progress Bar
Progress bar in react native is a component which provides a way to show the amount by which the processing has been done and the amount by which processing is pending. The developer can design a beautiful progress bar which is good waiting for the end user for some events, it is very easy to use if we need any progress bar in react native then we can use the animate class of React Native for interactive designs we only need to initialize the progress bar status as 0 and invoke the method call which will change or update the value of progress bar (0,1,2,3,4…last set value), we can also use progressBarAndroid where we need to write less code for it.
Syntax
Syntax of progress bar:
Syntax #1
In this syntax we are using Animated component of React Native to design progress bars. In the below syntax we are showing syntax for a very simple react native progress bar, here we are performing the below steps.
- We have defined a class with the name Progressbar which is extending the react core component.
- In the second step, we are initializing the progressBarValue with zero.
- In the 3rd step, we are creating the object for the Animated class with the value 0.
- In the 4th step, we are calling the function onAnimation with this.
- In the 5th step, we are defining the function onAnimation where we have written the logic for Animated class where we are defining the duration(6000),toValue(100, this is the final value for the progress bar from 0)
- In the render function, we are displaying the Animated component view for the end user.
- As we know render will get a call each time if there will be any change in the value of states, here each time value progressBarValue will increase and render function will get called and the end user will be able to see the out of with change bar.
import React, {Component} from 'react';
import {Platform, StyleSheet, Text, View, Animated} from 'react-native';
class App ProgressBar Component {
state={
progressBarvalue: 0,
} //initialisation for the progress bar
animation = new Animated.Value(0);
componentDidMount(){
this.onAnimation();
}
onAnimation = () =>{
this.animation.addListener(({value})=> {
this.setState({progressBarvalue: parseInt(value,10)});
});
Animated.timing(this.animation,{
toValue: 100,
duration: 60000,
}).start();
}
render() {
return (
<View>
<Animated.View />
<Animated.Text>
{this.state.progressBarvalue }% //displaying the value of the progress bar
</Animated.Text>
</View>
);
}
}
Syntax #2
In the below syntax we are using ProgressBarAndroid where we are needed to write very minimal code to create a progress bar here. In the styleAttr section, we can define the structure of the progress bar here. We will learn more about it in the example sections.
import React, {Component} from 'react';
import {ProgressBarAndroid, StyleSheet, View} from 'react-native';
class App ProgressBar Component {
render() {
return (
<View>
<ProgressBarAndroid />
<ProgressBarAndroid styleAttr=(“Horizontal,Normal (default),Small,Large,Inverse,SmallInverse,LargeInverse”) />
<ProgressBarAndroid
styleAttr=(“Horizontal,Normal (default),Small,Large,Inverse,SmallInverse,LargeInverse”)
indeterminate={boolean value}
progress={between 0 to 1 any even decimal}
/>
</View>
);
}
}
How does React Native Progress Bar Works?
Working principles are given below:
- There is a class called Animated, at the first step when we initialize the Animated class with new Animated.Value(0) it will be called and will create an initialized valued progress bar.
- Once we start changing the value for the progress bar it will change.
- We have learned, if there will be any change in the value for the state it will call for render function.
- We also know that the render function’s main goal is to display the new changes in the state to UI.
- Here in case of the progress bar also, when the change in the progressBar status happens like (0,1,2,4,5….10) it will display the bar with the change value.
Examples of React Native Progress Bar
Below are the examples of React Native Progress Bar:
Example #1
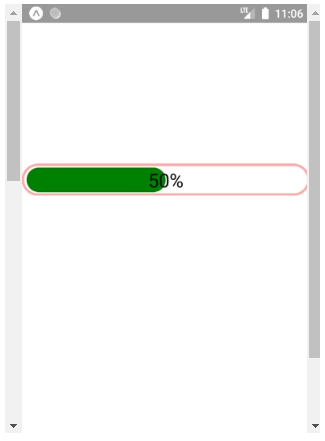
In this example we are using the Animated component. Here we are simply initializing the initial value for the progressStatusValue and in the componentDidMount function when everything is completely loaded then we are calling onAnimation function which will keep changing the value of progressStatusValue (0,1,2,3,4….100), On each increment, it will show the movement of progressbar. Please follow the below code along with the screen of output.
Code:
import React, {Component} from 'react';
import {Platform, StyleSheet, Text, View, Animated} from 'react-native';
export default class ProgressBarExample extends Component {
state={
progressStatusValue: 0,
}
animation = new Animated.Value(0); //initialisation of Animated component to with initial value as the zero for start of the progress bar.
componentDidMount(){
this.onAnimation(); //calling onAnimation function with changing the value of the initial progress status value.
}
onAnimation = () =>{
this.animation.addListener(({value})=> {
this.setState({progressStatusValue: parseInt(value,10)});
});
Animated.timing(this.animation,{
toValue: 100, //value at which it need to reach for end of the progress bar
duration: 60000, //duration till the progress bar will continue
}).start();
}
render() {
return (
<View style={progressStyles.containerStyle}>
<Animated.View
style={[
progressStyles.innerStyle,{width: this.state.progressStatusValue +"%"},
]}
/>
<Animated.Text style={progressStyles.label}>
{this.state.progressStatusValue }%
</Animated.Text>
</View>
);
}
}
//basic styles for creation of progress bar
const progressStyles = StyleSheet.create({
containerStyle: {
width: "100%",
height: 40,
padding: 3,
borderColor: "#FAA",
borderWidth: 3,
borderRadius: 30,
marginTop: 200,
justifyContent: "center",
},
innerStyle:{
width: "100%",
height: 31,
borderRadius: 16,
backgroundColor:"green",
},
label:{
fontSize:24,
color: "black",
position: "absolute",
zIndex: 1,
alignSelf: "center",
}
});
Output:
Example #2
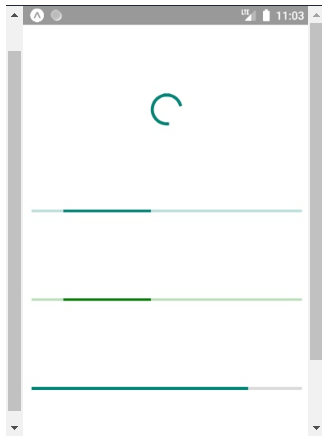
In this example, we are using the ProgressBarAndroid module. In this it is directly made for the progress bar, so we do not have to write too much code for any progress bar. Please follow the below code and screen of output for better clarity.
Code:
import React, {Component} from 'react';
import {ProgressBarAndroid, StyleSheet, View} from 'react-native';
export default class ProgressBarExample extends Component {
render() {
return (
<View style={progressStyles.containerStyle}>
<ProgressBarAndroid />
<ProgressBarAndroid styleAttr="Horizontal" />
<ProgressBarAndroid styleAttr="Horizontal" color="green" />
<ProgressBarAndroid
styleAttr="Horizontal"
indeterminate={false}
progress={0.8}
/>
</View>
);
}
}
const progressStyles = StyleSheet.create({
containerStyle: {
flex: 1,
justifyContent: 'space-evenly',
padding: 11,
},
});
Output:
Conclusion
From this tutorial, we learned two ways to create progress bars in react native, one by using Animated component of react native but here we need to write a little more code, another way is by using the directly ProgressBarAndroid with very less code.
Recommended Articles
This is a guide to React Native Progress Bar. Here we discuss how React Native Progress Bar Works and its Examples along with Code Implementation. You can also go through our other suggested articles to learn more –


