Updated April 5, 2023
Introduction to React Native Router
Routing as the name suggests, it’s a process for creating a pathway. In Mobile Applications, Routing means to create a path for the user through which the user can switch between the different scenes of an application and perform different things. We all are using many applications on our phones and we can understand that Navigation plays a big role in an application. If the application is just one screen then its not needed but if the user clicks and travels through the different screens of the app then a good navigation library is required for the application. There are some options in React Native which helps in the navigation part of an application. We will implement it through the most used React Native Router Flux.
Features of React Native Router
Given below are the different features:
- It identifies the screen and animations at a location.
- The syntaxes for performing different transitions between the screens are quite simple.
- In it there is no need to pass different navigator objects to the screens.
- We use schema to define the properties which are common to different screens or a group of screens.
- It has a feature to show or hide the navigation bar.
- It also supports in handling a Tab Bar using React Native Tabs.
- Each and every tab has its navigator which is nested with a root navigator.
- It also supports nested navigators.
How to Install and Use React Native Router?
React native router can be installed in the following way:
npmi react-native-router-flux--saveIt can be used in the following way:
- Router and the child route elements are defined in the top level index.js.
- Schema should be defined for the screens which has common features.
Examples of React Native Router
Given below are the examples:
Example #1
a. Components inside componentfolder
AssetExample.js
import React, { Component } from 'react';
import { Text
, View
, StyleSheet
, Image } from 'react-native';
export default class AssetExample extends Component{
render(){
return(
<View style={styles.container}>
<Text style={styles.paragraph}>
To import you have to drop and drag assets and Local files into the editor
</Text>
<Image style={styles.logo} source={require("../Image/white.symbol.expo.png")}/>
</View>
);
}
}
const styles = StyleSheet.create({
container: {
alignItems: 'center',
justifyContent: 'center',
},
paragraph: {
margin: 25,
marginTop: 0,
fontSize: 15,
fontWeight: 'bold',
textAlign: 'center',
color: '#994368',
},
logo: {
backgroundColor: "#cc1253",
height: 129,
width: 129,
}
});
b. Components inside Imagefolder
white.symbol.expo.png
c. App.js
import React, { Component } from 'react';
import { StyleSheet
, Button } from 'react-native'; import { Scene
, Router
, Actions
, Stack } from 'react-native-router-flux';
import component from './components/AssetExample';
constPageFirst = () => (
<Button title="Welcome" onPress={() => {
Actions.push('PageSecond');
}}
style={styles.container}
/>
);
constPageSecond = () => (
<Button
title="Thank You for Your Visit" onPress={() =>Actions.push('PageThird')} style={styles.container}
/>
);
export default class App extends Component{
render(){
return(
<Router>
<Stack>
<Scene key="PageFirst" component={PageFirst} />
<Scene key="PageSecond" component={PageSecond} />
<Stack>
<Scene key="PageThird" component={PageFirst} />
</Stack>
</Stack>
</Router>
);
}
}
const styles = StyleSheet.create({
container: {
alignItems: 'center',
justifyContent: 'center',
paddingTop: 101,
backgroundColor: '#f2c7d9',
},
});
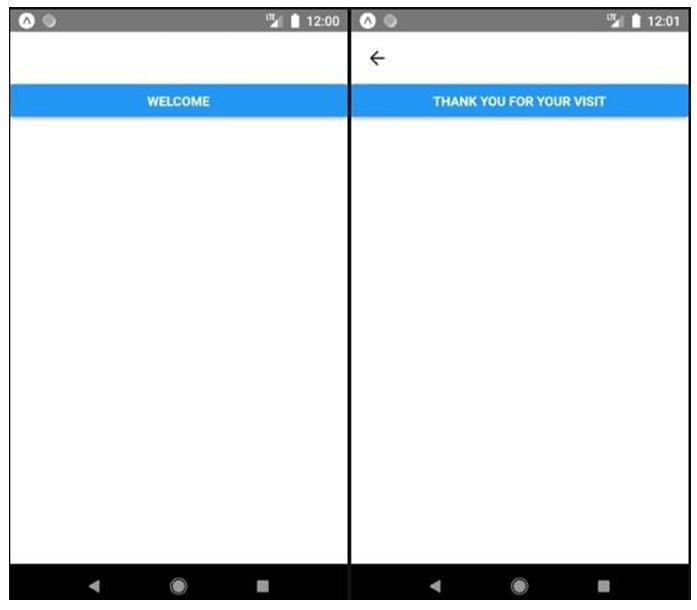
Output:
Example #2
With SideBar.
a. Components inside DisplaysFolder
- Homedisplay.js
import React, {Component} from 'react'; import {View
, Text
, Button} from 'react-native'; import {Body
, Container
, Content
,Drawer
,Header
,Icon
,Left
, Right
, Subtitle
, Title} from 'native-base';
import {Actions} from 'react-native-router-flux';
export default class HomeDisplay extends Component {
constructor(props) { super(props);
}
render() {
return (
<Container>
<Header>
<Left>
<Icon name="menu" onPress={() =>Actions.drawerToggle()}/>
</Left>
<Body>
<Title>HomeDisplay</Title>
<Subtitle>This is Home Screen</Subtitle>
</Body>
<Right/>
</Header>
<Content padder>
<View>
<Text>HomeDisplay</Text>
<Button onPress={() =>Actions.SettingsScreen()}
title="PROCEED"/>
</View>
</Content>
</Container>
)
}
}- Setting.display.js
import React, {Component} from 'react';
import {View
, Text
, Button} from 'react-native';
import {Body
, Container
, Content
,Drawer
,Header
,Icon
,Left
, Right
, Subtitle
, Title} from 'native-base';
import {Actions} from 'react-native-router-flux';
export default class SettingsDisplay extends Component{
constructor(props) { super(props);
}
render() {
return (
<Container>
<Header>
<Left>
<Icon name="menu" onPress={() =>Actions.drawerToggle()}/>
</Left>
<Body>
<Title>SettingsDisplay</Title>
<Subtitle>Welcome to Settings</Subtitle>
</Body>
<Right/>
</Header>
<Content padder>
<View>
<Text>SettingsDisplay</Text>
<Button onPress={() =>Actions.pop()}
title="Proceed"/>
</View>
</Content>
</Container>
)
}
}
b. Components inside Routerfolder
SideRouterBar.js
import React, {Component} from 'react'; import {Text
, SafeAreaView
, View} from 'react-native';
import { Left
, Right
, List
, ListItem
, Icon } from 'native-base';
export default class SideRouterBar extends Component { render() {
return(
<SafeAreaView style={{backgroundColor:'#e0f9ff', height:'100%'}}>
<List>
<ListItem icon="menu">
<Left>
<Text>Screen1: Home</Text>
</Left>
<Right>
<Icon name="arrow-forward" />
</Right>
</ListItem>
<ListItem>
<Left>
<Text>Screen2:  Profile</Text>
</Left>
<Right>
<Icon name="arrow-forward" />
</Right>
</ListItem>
<ListItem>
<Left>
<Text>Screen3: Settings</Text>
</Left>
<Right>
<Icon name="arrow-forward" />
</Right>
</ListItem>
</List>
</SafeAreaView>
);
}
}
c. App.js
import React, {Component} from 'react';
import { Router, Scene, Drawer } from 'react-native-router-flux';
import SideBar from './Router/SideRouterBar'
import HomeDisplay from "./Displays/HomeDisplay";
import SettingsScreen from "./Displays/SettingsDisplay";
export default class App extends Component {
render() {
return (
<Router>
<Scene key="root" hideNavBar>
<Drawer
open={false}
type="overlay"
key="drawer" contentComponent={SideBar}
drawerWidth={300}
>
<Scene key="rootScene" hideNavBar>
<Scene key="HomeScreen" component={HomeDisplay}
initial />
<Scene key="SettingsScreen" component={SettingsScreen} />
</Scene>
</Drawer>
</Scene>
</Router>
);
}
}
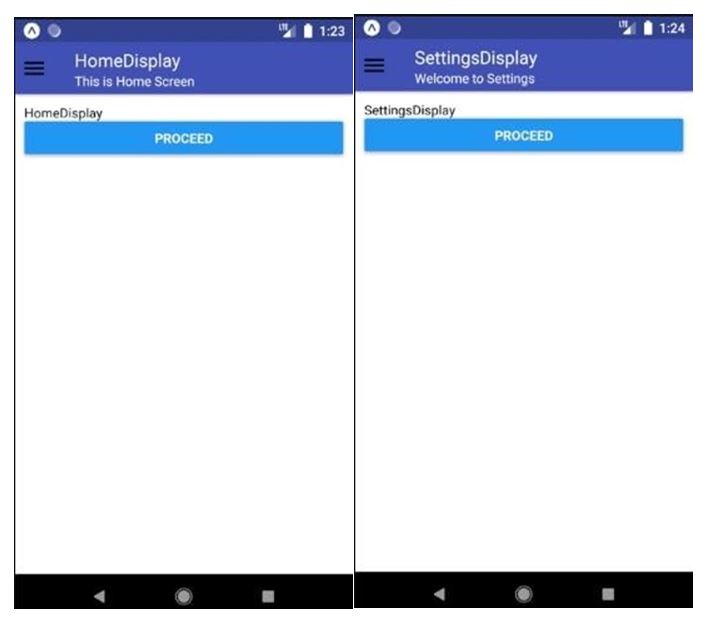
Output:
Limitation
Given below is the limitation:
Nested Routers: When a tab bar is used and each and every tab bar has its own router then the modal screens are displayed from the root navigator for covering the tab bar. For doing this, In the root router the modal needs to be defined.
Conclusion
Routing is a very essential part for basically any app and thanks to React native that it has provided us a very quick way for the routing management. In this article, we saw a basic example of implementing routing using Flux. We saw how to use the Flux and how to implement Side Bar in the Router Folder. We can also do the styling, adding color to navigation bars, adding different icons along with it for beautifying our application. We At the end we also saw a limitation in using Flux.
Recommended Article
This is a guide to React Native Router. Here we discuss the introduction, features, installation and uses of React Native Router along with examples and limitations. You may also have a look at the following articles to learn more –


