Updated April 3, 2023
Introduction to React Native Tabs
In the mobile user interface, tabs are one of the most-used components. With the help of tabs, users can move between a small number of evenly important views very quickly and tabs also help in bringing a real-world element to the mobile application and web applications. When tabs are executed correctly, they are considered as the great UI control which aims towards upgrading usage. Tabs can be found on the top of the screen or on the bottom of the screen. In our day-to-day life, we have seen tabs in various applications like WhatsApp, Pinterest, Facebook, LinkedIn, Instagram, etc. It acts as the best platform to develop these tabs in mobile applications very efficiently.
Syntax:
<TabView
navigationState={{ index, routes }} onIndexChange={setIndex} renderScene={SceneMap({
first: FirstRoute, second: SecondRoute,
})}
/>
How to Create React Native Tabs?
Below are the different examples to create tabs:
Example #1 – Basic Tabs at Top of Screen
Home Screen or FirstPage.js:
import React, { Component } from 'react'; import { Text, View } from 'react-native';
export default class FirstPage extends React.Component { render() {
return (
<View style={{ flex: 1, justifyContent: 'center', alignItems: 'center' }}>
<Text>It is a Home Screen</Text>
</View>
);
}
Chat Screen or SecondPage.js:
import React, { Component } from 'react'; import { Text, View } from 'react-native';
export default class SecondPage extends React.Component { render() {
return (
<View style={{ flex: 1, justifyContent: 'center', alignItems: 'center' }}>
<Text>It is a Chat Screen</Text>
</View>
);
}
}
App.js:
import React from 'react'; import {
createStackNavigator, createMaterialTopTabNavigator, createAppContainer,
} from 'react-navigation';
import FirstPage from './pages/FirstPage'; import SecondPage from './pages/SecondPage';
const TabScreen = createMaterialTopTabNavigator(
{
Home: { screen: FirstPage }, Chats: { screen: SecondPage },
},
{
tabBarPosition: 'top',
swipeEnabled: true,
animationEnabled: true, tabBarOptions: {
activeTintColor: '#f0f0f0', inactiveTintColor: '#fff7f7', style: {
backgroundColor: '#a8395e',
},
labelStyle: { textAlign: 'center',
},
indicatorStyle: { borderBottomColor: '#a6ff6e', borderBottomWidth: 2,
},
},
}
);
const App = createStackNavigator({ TabScreen: {
screen: TabScreen, navigationOptions: {
headerStyle: { backgroundColor: '#369c95',
},
headerTintColor: '#FFFFFF', title: 'Example of Tab',
},
},
});
export default createAppContainer(App);
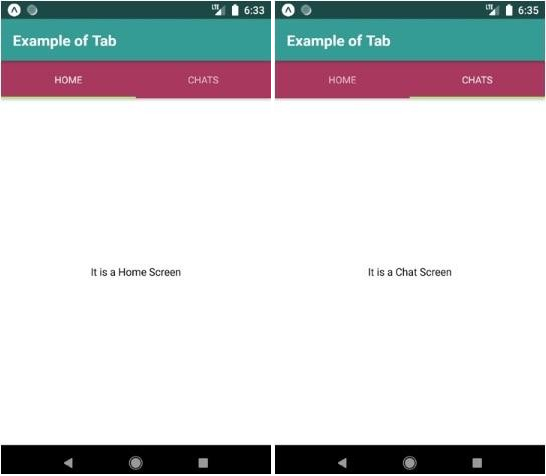
Output:
Image 1 and Image 2
Example #2 – Bottom of the Screen with Vector Icons
Home Screen or FirstPage.js:
import React, { Component } from 'react'; import {Platform, StyleSheet, Text, View, TouchableOpacity, Alert} from 'react-native';
import Icon from 'react-native-vector-icons/FontAwesome';
const instructions = Platform.select({ android:
'Press or Shake menu button for dev menu' + 'To reload Double tap R on the keyboard,\n',
ios: 'Cmd+D or shake for dev menu' + 'Press Cmd+R to reload,\n',
});
type Props = {};
export default class FirstPage extends React.Component { render() {
const home_icon = (
<Icon name="home" size={50} color="#73abff" onPress={()=>{Alert.alert("Home icon is clicked")}} />
);
return (
<View style={styles.MainContainer}>
<View style={{ flex: 1, justifyContent: 'center', alignItems:'center' }}>
<Text>Welcome to Home Screen</Text>
<TouchableOpacity>
{home_icon}
</TouchableOpacity>
</View>
</View>
);
}
}
const styles = StyleSheet.create({ MainContainer: {
flex: 1,
justifyContent: 'center', alignItems: 'center', backgroundColor: '#faf5f8', padding: 25
}
});
Call Screen or SecondPage.js:
import React, { Component } from 'react'; import {Platform, StyleSheet, Text, View, TouchableOpacity, Alert} from 'react-native';
import Icon from 'react-native-vector-icons/FontAwesome';
const instructions = Platform.select({ android:'Press or Shake menu button for dev menu' + 'To reload Double tap R on the keyboard,\n',
ios: 'Cmd+D or shake for dev menu' + 'Press Cmd+R to reload,\n',
});
type Props = {};
export default class SecondPage extends React.Component {
render() {
const phone_icon = (
<Icon name="phone" size={50} color="#acff63" onPress={()=>{Alert.alert("Want to make Call?")}} />
);
return (
<View style={styles.MainContainer}>
<View style={{ flex: 1, justifyContent: 'center', alignItems:'center' }}>
<Text>Welcome to Call Screen</Text>
<TouchableOpacity>
{phone_icon}
</TouchableOpacity>
</View>
</View>
);
}
}
const styles = StyleSheet.create({ MainContainer: {flex: 1,justifyContent: 'center', alignItems: 'center', backgroundColor: '#faf5f8', padding: 25}});
Settings Screen or ThirdPage.js:
import React, { Component } from 'react';
import {Platform, StyleSheet, Text, View, TouchableOpacity, Alert} from 'react-native';
import Icon from 'react-native-vector-icons/FontAwesome';
const instructions = Platform.select({ android:'Press or Shake menu button for dev menu' +
' To reload Double tap R on the keyboard,\n',
ios: 'Cmd+D or shake for dev menu' + 'Press Cmd+R to reload,\n',
});
type Props = {};
export default class ThirdPage extends React.Component { render() {
const setting_icon = (<Icon name="cog" size={50} color="#a35086" onPress={()=>{Alert.alert("Settings icon is clicked")}} />);
return (<View style={styles.MainContainer}><View style={{ flex: 1, justifyContent: 'center', alignItems:'center' }}>
<Text>Welcome to Settings Screen</Text>
<TouchableOpacity>
{setting_icon}
</TouchableOpacity>
</View>
</View>
);
}
}
const styles = StyleSheet.create({ MainContainer: {flex: 1,justifyContent: 'center', alignItems: 'center', backgroundColor: '#faf5f8', padding: 25
}
});
App.js:
import React from 'react';
import { createStackNavigator,
createMaterialTopTabNavigator, createAppContainer,
} from 'react-navigation';
import FirstPage from './pages/FirstPage'; import SecondPage from './pages/SecondPage'; import ThirdPage from './pages/ThirdPage';
const TabScreen = createMaterialTopTabNavigator(
{
Home: { screen: FirstPage },
Calls: { screen: SecondPage },
Settings: { screen: ThirdPage },
},
{
tabBarPosition: 'bottom', swipeEnabled: true, animationEnabled: true, tabBarOptions: {
activeTintColor: '#000000', inactiveTintColor: '#30362a', style: {
backgroundColor: '#a5ff45',
},
labelStyle: { textAlign: 'center',
,
indicatorStyle: { borderBottomColor: '#a6ff6e', borderBottomWidth: 2,
},
},
}
);
const App = createStackNavigator({ TabScreen: {
screen: TabScreen, navigationOptions: {
headerStyle: { backgroundColor: '#ff617e',
},
headerTintColor: '#FFFFFF', title: 'Example of Bottom Tabs',
},
},
});
export default createAppContainer(App);
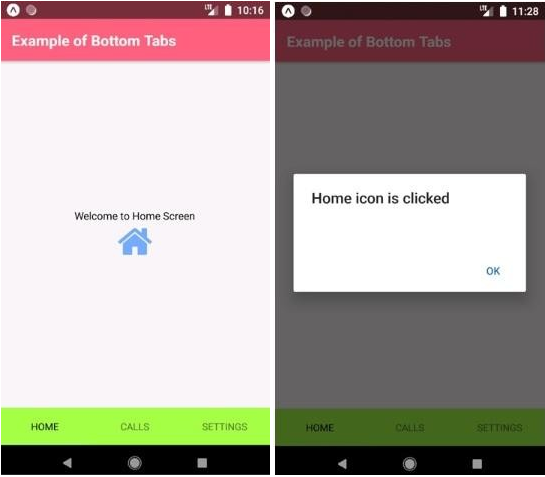
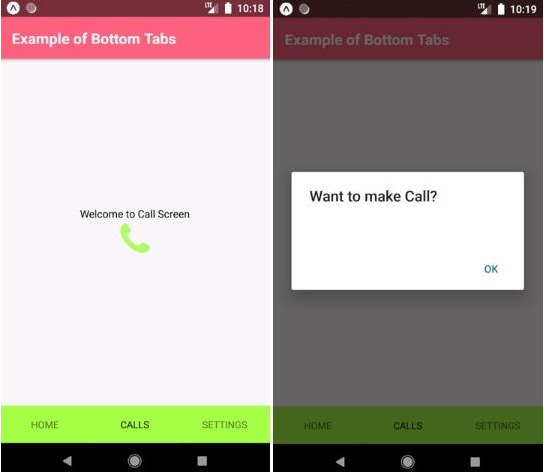
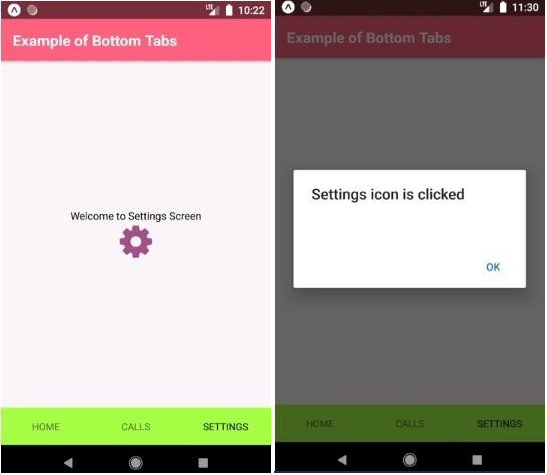
Output:
Image 3 shows the home screen of the application and Image 4 shows the pop-up that will appear when the home icon is clicked. Similarly, Image 5 shows the call screen and Image 6 shows the pop-up window that appears when call icon is clicked. Similarly, Image 7 shows settings screen and Image 8 shows the pop-up window that appears when the setting icon is clicked.
Image 3 and Image 4
Image 5 and Image 6
Conclusion
On the basis of the above discussion, we got to know what importance is the hold of tabs in a particular application. We developed different kinds of tabs in React Native. Tabs can be developed very easily and efficiently to React Native. React Native provides the best platform and wide variety to develop these tabs.
Recommended Articles
This is a guide to React Native Tabs. Here we discuss the Introduction to the Tabs and its Examples along with Code Implementation. You can also go through our other suggested articles to learn more –
