Updated April 11, 2023
Introduction to React Native Transform
The following article provides an outline for React Native Transform. Transforms are used to enhance and make changes in the appearance and positioning of the components. Transforms are properties used for styling and performing transformations in two dimensions or three dimensions. Overlapping is one of the concerns in transforms as the layout remained unchanged after applying transformations to a component which sometimes result in overlapping of the transformed component with the neighbouring components. Margins and Padding can be applied on the transformed components or the neighbouring components and in this way we can prevent overlapping.
Syntax:
transform([{ rotateX: '60deg' }, { rotateZ: '1.0472rad' }]);Or
transform([{ skewX: '45deg' }]);Working of React Native Transform
Transform keeps the transformation objects as an array and each of the objects represents a property which is to be transformed as a key and also the value which will be used for the transformation. The objects can’t be combined and every object should have their own pair of key or value.
For example, if we are using a rotate transform. The rotate transform needs the transform to be provided in degrees or radians.
transform([{ rotateX: '60deg' }, { rotateZ: '1.0472rad' }])Just like rotate, skew transformation also requires the the transform to be provided in degrees.
transform([{ skewX: '60deg' }])Examples of React Native Transform
Given below are the examples mentioned:
Example #1
Rotating Imageview using Animation.
In the example below, we have used transform to rotate the image within the output range from 360deg and 0deg.
Code:
transform: [{ rotate: RotateData }],The whole rotation of the image is displayed in the form of an animation.
The files used to implement the code below are:
App.js
Code:
import React from 'react';
import { StyleSheet
, View
, Animated
, Image
, Easing } from 'react-native';
export default class App extends React.Component {
constructor() {
super();
this.RotateValueHolder = new Animated.Value(0);
}
componentDidMount() {
this.StartImageRotateFunction();
}
StartImageRotateFunction() {
this.RotateValueHolder.setValue(0);
Animated.timing(this.RotateValueHolder, {
toValue: 1,
duration: 4000,
easing: Easing.linear,
}).start(() => this.StartImageRotateFunction());
}
render() {
const RotateData = this.RotateValueHolder.interpolate({
inputRange: [0, 1],
outputRange: ['360deg', '0deg'],
});
return (
<View style={styles.container}>
<Animated.Image
style={{
width: 300,
height: 150,
transform: [{ rotate: RotateData }],
}}
source={{
uri:
'https://images.pexels.com/photos/2480075/pexels-photo-2480075.jpeg?auto=compress&cs=tinysrgb&dpr=2&h=650&w=940',
}}
/>
</View>
);
}
}
const styles = StyleSheet.create({
container: {
flex: 1,
justifyContent: 'center',
alignItems: 'center',
backgroundColor: '#ffea73',
},
});
Output:
Example #2
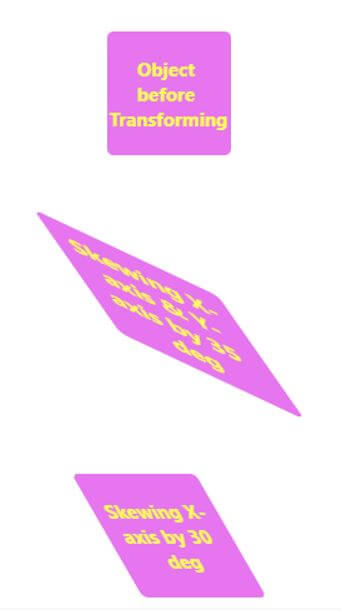
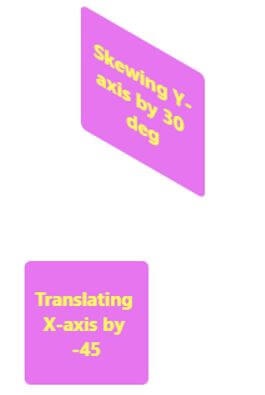
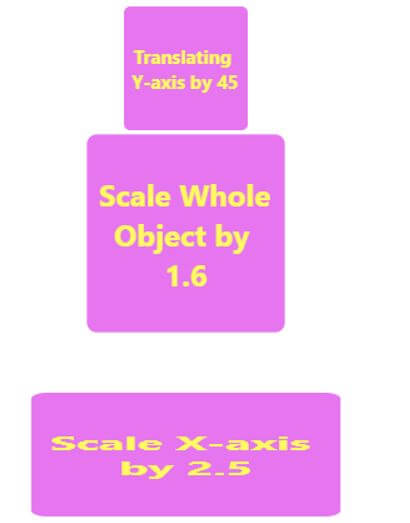
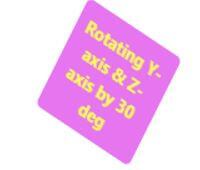
Example with different Transforming Methods.
In the example below, we have displayed the output using different transforming methods.
Code:
transform: [
{ skewX: "35deg" },
{ skewY: "35deg" }
]
And
transform: [{ translateX: -45 }]And
transform: [{ scale: 1.6 }]And
transform: [{ rotate: "30deg" }]The files used to implement the code below are:
App.js
Code:
import React
, { Component } from "react";
import { SafeAreaView
, ScrollView
, StyleSheet
, Text
, View } from "react-native";
class App extends Component {
render() {
return (
<SafeAreaView style={styles.container}>
<ScrollView
contentContainerStyle={styles.scrollContentContainer}
>
<View style={styles.box}>
<Text style={styles.text}>Object before Transforming</Text>
</View>
<View style={[styles.box, {
transform: [
{ skewX: "35deg" },
{ skewY: "35deg" }
]
}]}>
<Text style={styles.text}>Skewing X-axis & Y-axis by 35 deg</Text>
</View>
<View style={[styles.box, {
transform: [{ skewX: "30deg" }]
}]}>
<Text style={styles.text}>Skewing X-axis by 30 deg</Text>
</View>
<View style={[styles.box, {
transform: [{ skewY: "30deg" }]
}]}>
<Text style={styles.text}>Skewing Y-axis by 30 deg</Text>
</View>
<View style={[styles.box, {
transform: [{ translateX: -45 }]
}]}>
<Text style={styles.text}>Translating X-axis by -45</Text>
</View>
<View style={[styles.box, {
transform: [{ translateY: 45 }]
}]}>
<Text style={styles.text}>Translating Y-axis by 45</Text>
</View>
<View style={[styles.box, {
transform: [{ scale: 1.6 }]
}]}>
<Text style={styles.text}>Scale Whole Object by 1.6</Text>
</View>
<View style={[styles.box, {
transform: [{ scaleX: 2.5 }]
}]}>
<Text style={styles.text}>Scale X-axis by 2.5</Text>
</View>
<View style={[styles.box, {
transform: [{ scaleY: 1.8 }]
}]}>
<Text style={styles.text}>Scale Y-axis by 2.5</Text>
</View>
<View style={[styles.box, {
transform: [{ rotate: "30deg" }]
}]}>
<Text style={styles.text}>Rotating whole by 30 degree</Text>
</View>
<View style={[styles.box, {
transform: [
{ rotateX: "30deg" },
{ rotateZ: "30deg" }
]
}]}>
<Text style={styles.text}>Rotating X-axis & Z-axis by 30 deg</Text>
</View>
<View style={[styles.box, {
transform: [
{ rotateY: "30deg" },
{ rotateZ: "30deg" }
]
}]}>
<Text style={styles.text}>Rotating Y-axis & Z-axis by 30 deg</Text>
</View>
</ScrollView>
</SafeAreaView>
);
}
}
const styles = StyleSheet.create({
container: {
flex: 1
},
scrollContentContainer: {
alignItems: "center",
paddingBottom: 55
},
box: {
height: 99,
width: 99,
borderRadius: 5,
marginVertical: 39,
backgroundColor: "#e675f0",
alignItems: "center",
justifyContent: "center"
},
text: {
fontSize: 15,
fontWeight: "bold",
margin: 6,
color: "#fffa5e",
textAlign: "center"
}
});
export default App;
Output:
Example #3
Example with different angle transformation in the different Imageviews.
In the example below, we have used transform for rotating 2 images, 1 clockwise and another anticlockwise, with output range from 0 degree to 360 degree and 360 degree to 0 degree respectively.
Code:
transform: [{ rotate: RotateData }],The files used to implement the code below are:
App.js
Code:
import React from 'react';
import { StyleSheet
, View
, Animated
, Image
, Easing } from 'react-native';
export default class App extends React.Component {
constructor() {
super();
this.RotateValueHolder = new Animated.Value(0);
}
componentDidMount() {
this.StartImageRotateFunction();
}
StartImageRotateFunction() {
this.RotateValueHolder.setValue(0);
Animated.timing(this.RotateValueHolder, {
toValue: 1,
duration: 4000,
easing: Easing.linear,
}).start(() => this.StartImageRotateFunction());
}
render() {
const RotateData = this.RotateValueHolder.interpolate({
inputRange: [0, 1],
outputRange: ['0deg', '360deg'],
});
const RotateData1 = this.RotateValueHolder.interpolate({
inputRange: [0, 1],
outputRange: ['360deg', '0deg'],
});
return (
<View style={styles.container}>
<Animated.Image
style={{
width: 200,
height: 100,
transform: [{ rotate: RotateData }],
}}
source={{
uri:
'https://images.pexels.com/photos/1133957/pexels-photo-1133957.jpeg?auto=compress&cs=tinysrgb&dpr=2&h=650&w=940',
}}
/>
<View style={styles.container}>
<Animated.Image
style={{
width: 200,
height: 100,
transform: [{ rotate: RotateData1 }],
}}
source={{
uri:
'https://images.pexels.com/photos/593655/pexels-photo-593655.jpeg?auto=compress&cs=tinysrgb&dpr=1&w=500',
}}
/>
</View>
</View>
);
}
}
const styles = StyleSheet.create({
container: {
flex: 1,
justifyContent: 'center',
alignItems: 'center',
backgroundColor: '#f78f65',
},
});
Output:
Conclusion
On the basis of the above article we saw the concept of React Native Transform and how it can help us in transforming the components used and making our application look better. We went through the working of React Native Transform and the examples help us to understand how to use it according to the requirements.
Recommended Articles
This is a guide to React Native Transform. Here we discuss the introduction, syntax, and working of React Native Transform along with examples respectively. You may also have a look at the following articles to learn more –


