Updated April 6, 2023
Introduction to React Native WebSocket
For a persistent connection between a client and server that both parties, WebSocket is used. Using WebSocket, users can send data at any time whenever connected to the server. Through the WebSocket handshake process, the client establishes a WebSocket connection. When the client sends a regular HTTP request to the server, the process of WebSocket handshake starts. This request includes an upgrade header that informs the server that the client wants to establish a WebSocket connection. WebSocket URLs use the ws scheme, and for secure WebSocket connections, wss is used, which is the equivalent of HTTPS. Real-time web connection, for real-time data transfer, is provided by WebSocket. In this topic, we are going to learn about React native websocket.
Syntax
Syntax to import WebSocket:
import { webSocket } from "rxjs/webSocket";Using WebSocket:
const WS_SERVER = "wss://echo.websocket.org";
process({ getState, action$, cancelled$ }) {
const wsSubject$ = webSocket(WS_SERVER);
action$
.pipe(
filter(action => action.type === actions.sendMsg.toString()),
tap(x => wsSubject$.next(getState().messageToSend)),
takeUntil(cancelled$)
)
.subscribe();
return wsSubject$.pipe(map(x => actions.msgReceived(x)));
}
});
Examples of WebSocket in React Native
Below is an example:
Example
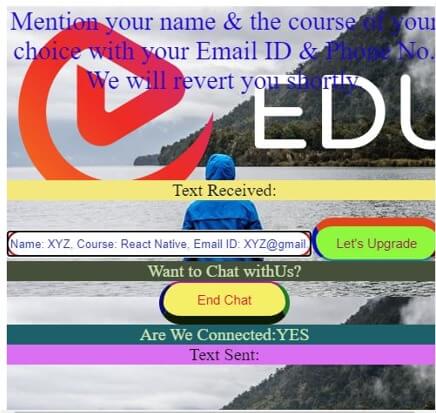
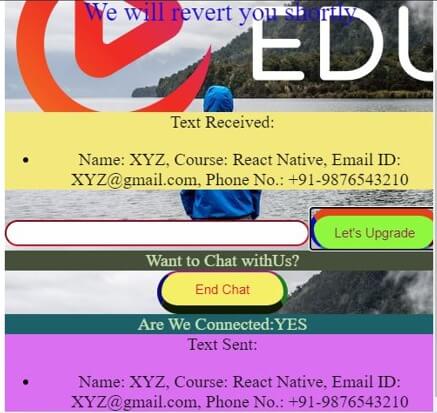
The below example shows the usage of WebSocket in chat application. Where WebSocket establishes the connection between the sender and the receiver. Both sent and received texts get displayed on the screen itself. The application’s different components are styled using different React Native styling tools for a better user experience.
The files used for the proper execution of the code are:
[i] index.js
import React from "react";
import "./styles.css";
import { flow
, set
, update } from "lodash/fp";
import ReactDOM from "react-dom";
import { createStore
, applyMiddleware
, compose } from "redux";
import { connect
, Provider } from "react-redux";
import { filter
, tap
, map
, takeUntil } from "rxjs/operators";
import { createActions
, createReducer } from "@jeffbski/redux-util";
import { createLogic
, createLogicMiddleware } from "redux-logic";
import { webSocket } from "rxjs/webSocket";
function App({
connected,
inputMsg,
sentMsgs,
receivedMsgs,
connect,
disconnect,
inputMsgChanged,
sendMsg
}) {
return (
<div style={{
backgroundImage: `url("https://images.pexels.com/photos/433142/pexels-photo-433142.jpeg?auto=compress&cs=tinysrgb&dpr=1&w=500")`
, height:'480px'
, width: '500px'
}}>
<div>
<div style={{
textAlign: 'center'
, height: '200px'
, color: '#1907de'
, fontSize: '30px'
, backgroundImage: `url("https://cdn.educba.com/academy/wp-content/uploads/2020/05/cropped-website_logo_transparent_background_white.png")`
}}>
Mention your name & the course of your choice with your Email ID & Phone No. We will revert you shortly.
</div>
<div style={{
height:'100px'
, fontSize: '20px'
, textAlign: 'center'
}}>
<div
style={{
color: '#0a0a0a'
, fontSize: '20px'
, background: '#f2e87c'
}}>
Text Received:
<ul>{receivedMsgs.map(x => <li>{x}</li>)}</ul>
</div>
<form onSubmit={sendMsg}
>
<input name="inputMsg"
value={inputMsg}
onChange={inputMsgChanged}
style={{
color: '#212dcf'
, height: '30px'
, width: '350px'
, textAlign: 'center'
, borderColor: '#de071c'
, borderRadius: '50px'
}} />
<button
type="submit"
disabled={!connected}
style={{
color: '#991450'
, height: '50px'
, width: '150px'
, backgroundColor: '#8ef73e'
, borderRadius: '50px'
, borderRightWidth: '5px'
, borderRightColor: '#b30b1b'
, borderLeftWidth: '5px'
, borderLeftColor: '#0b0ebd'
, borderTopWidth: '10px'
, borderTopColor: '#e3431b'
, borderBottomColor: '#22c0f5'
, fontSize: '15px'
}}>
Let's Upgrade
</button>
</form>
<div
style={{
color: '#cbe3b1'
, fontSize: '20px'
, background: '#454f3a'
}}>Want to Chat withUs?</div>
<div>
{connected ? (
<button
onClick={disconnect}
style={{
color: '#e30b1d'
, height: '50px'
, width: '150px'
, backgroundColor: '#f5ee67'
, borderRadius: '50px'
, borderRightWidth: '5px'
, borderRightColor: '#31cc43'
, borderLeftWidth: '5px'
, borderLeftColor: '#0c0c70'
, borderBottomWidth: '10px'
, borderTopColor: '#ad1599'
, borderBottomColor: '#3e700c'
, fontSize: '15px'
}}>End Chat</button>
) : (
<button
onClick={connect}
style={{
color: '#0d0c0d'
, height: '50px'
, width: '150px'
, backgroundColor: '#f57ff3'
, borderRadius: '50px'
, borderRightWidth: '5px'
, borderRightColor: '#f58c58'
, borderLeftWidth: '5px'
, borderLeftColor: '#f50c18'
, borderTopWidth: '10px'
, borderTopColor: '#140ddb'
, borderBottomColor: '#ba1658'
, fontSize: '15px'
}}>Connect Chat</button>
)}
<div
style={{
color: '#cbe3b1'
, fontSize: '20px'
, background: '#1c6169'
}}>Are We Connected:{connected ? "YES" : "NO"}</div>
<div
style={{
color: '#0a0a0a'
, fontSize: '20px'
, background: '#da6ff2'
}}>
Text Sent:
<ul>{sentMsgs.map(x => <li>{x}</li>)}</ul>
</div>
</div>
</div>
</div>
</div>
);
}
const actions = createActions(
{
sendMsg: ev => {
ev.preventDefault();
},
inputMsgChanged: ev => ev.target.value
},
"msgReceived",
"connect",
"disconnect"
);
const WS_SERVER = "wss://echo.websocket.org";
const initialState = {
connected: false,
inputMsg: "",
messageToSend: "",
sentMsgs: [],
receivedMsgs: []
};
const wsListenLogic = createLogic({
type: actions.connect,
cancelType: actions.disconnect,
latest: true,
warnTimeout: 0,
process({ getState, action$, cancelled$ }) {
const wsSubject$ = webSocket(WS_SERVER);
action$
.pipe(
filter(action => action.type === actions.sendMsg.toString()),
tap(x => wsSubject$.next(getState().messageToSend)),
takeUntil(cancelled$)
)
.subscribe();
return wsSubject$.pipe(map(x => actions.msgReceived(x)));
}
});
const composeEnhancers = window.__REDUX_DEVTOOLS_EXTENSION_COMPOSE__ || compose;
const reducer = createReducer(
{
[actions.inputMsgChanged]: (state, action) =>
flow(
set("inputMsg", action.payload),
set("messageToSend", action.payload)
)(state),
[actions.sendMsg]: (state, action) =>
flow(
update("sentMsgs", arr => arr.concat(state.inputMsg)),
set("inputMsg", "")
)(state),
[actions.msgReceived]: (state, action) =>
update("receivedMsgs", arr => arr.concat(action.payload), state),
[actions.connect]: (state, action) => set("connected", true, state),
[actions.disconnect]: (state, action) => set("connected", false, state)
},
initialState
);
const injectedDeps = {};
const arrLogic = [wsListenLogic];
const logicMiddleware = createLogicMiddleware(arrLogic, injectedDeps);
const store = createStore(
reducer,
initialState,
composeEnhancers(applyMiddleware(logicMiddleware))
);
const ConnectedApp = connect(
state => ({
connected: state.connected,
inputMsg: state.inputMsg,
sentMsgs: state.sentMsgs,
receivedMsgs: state.receivedMsgs
}),
{
connect: actions.connect,
disconnect: actions.disconnect,
inputMsgChanged: actions.inputMsgChanged,
sendMsg: actions.sendMsg
}
)(App);
ReactDOM.render(
<Provider store={store}>
<ConnectedApp />
</Provider>,
document.getElementById("appContainer")
);
[ii] styles.css
.App {
font-family: 'Gill Sans'
, 'Gill Sans MT'
, Calibri
, 'Trebuchet MS'
, sans-serif;
text-align: center;
}
.Heading {
height: 300px;
padding: 0px;
color: #f5e942;
}
.Titling {
font-size: 2em;
}
.menu-item.active {
border-bottom-left-radius: 50px;
border-bottom-right-radius: 50px;
border-top-left-radius: 50px;
border-top-right-radius: 50px;
border: 5px #ff0015 solid;
}
.menu-item {
border-bottom-left-radius: 50px;
border-bottom-right-radius: 50px;
border-top-left-radius: 50px;
border-top-right-radius: 50px;
padding: 0 10px;
margin: 1px 1px;
user-select: none;
cursor: pointer;
color: #9af241;
border: 1px transparent solid;
}
* {
box-sizing: border-box;
}
.menu-item-wrapper {
border-bottom-left-radius: 50px;
border-bottom-right-radius: 50px;
border-top-left-radius: 50px;
border-top-right-radius: 50px;
border: 1px transparent solid;
}
Output:
- On Code execution –
- On clicking “Connect Chat” –
- On entering inputs in a chatbox –
- On clicking “Let’s Upgrade” after data input –
Conclusion
Based on the above article, we understood the concept of WebSocket. WebSocket is very much necessary for establishing the connection between the sender and the receiver through the server. This article will help the readers to understand and apply WebSocket in their own networking-based applications.
Recommended Articles
This is a guide to React native WebSocket. Here we discuss the introduction, syntax, and examples of WebSocket in React native along with an example. You may also have a look at the following articles to learn more –


