Introduction to Ruby On Rails Language
Have you ever heard of the Ruby on Rails language? If you are interested in web development or have been studying it for a while, you would have heard about it. It is, put, a popular language for web development. If you are a seasoned or budding web developer curious about the Ruby on Rails language, this could be a good starting point for your journey into this beautiful language. You may also know other web development forms like PHP, Perl, Java, and Python.
History of Ruby on Rails Language
Ruby on Rails language was developed in 2004 by David Heinemeier Hansson, who chose a relatively obscure programming language called Ruby because he thought that Java and PHP were not flexible or powerful enough. He developed Rails, his web development framework using Ruby based on simple, existing, and proven ideas instead of brand-new, experimental ones. The Ruby on Rails language’s success has primarily been based on these well-established paradigms.
What is Ruby on Rails Language?
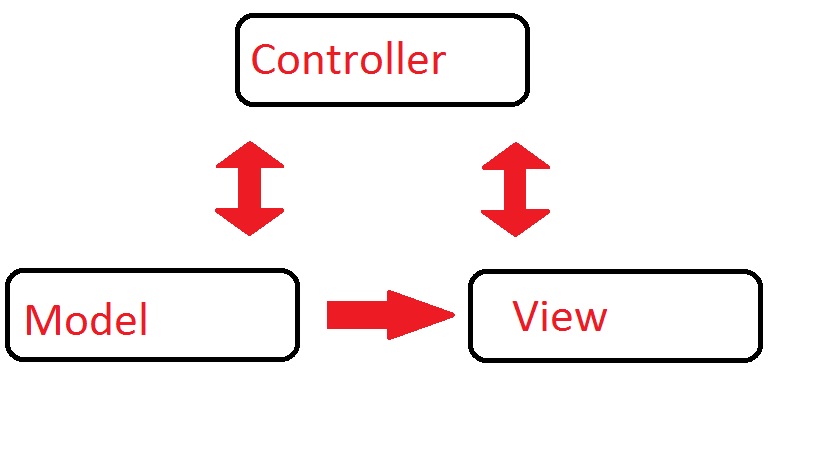
It is a framework based on the model-view-controller pattern that splits an application into three parts:
1. Model
Models are business objects that describe the behavior or structure of the problem that is being solved by your application. They are typically backed by an object-relational mapping framework persisting your objects to a database in the back.
2. View
Views are essentially templates rendering data to the user and the logic of the presentational parts of your app.
3. Controller
At the heart of it all is the controller, which processes client requests, starts changes in the models, and triggers the rendering of the templates.
So, simply put, the model is your backend application function, the view is the template and representational aspect that the user sees, and the controller determines what does what and when. So if you choose to build on Rails, you have to do it the Rails way. You could do things differently, but it could be a little troublesome. All this makes it seem rather limited in its approach, but the fact is that this way is actually similar to what most programmers do. In fact, Rails was developed for programmer productivity first rather than outright performance.
Of course, this also means that it can be a little slower than comparable stacks on Python or PHP. Now, to use this, you need to have some things already installed.
- The latest version of Ruby.
- The RubyGems packaging system, which comes with Ruby.
- A working SQLite3 Database installation.
Creating a New Rails Project
Follow the steps given below, one by one, to create an example application on Ruby on Rails language.
The example application here is a simple weblog (blog). Before you begin, you need to have Rails installed on your system. Speaking of your system, the examples given below use $ to represent the terminal prompt. Your system may display it differently. Ruby on rails for Windows, the prompt would be C:\source_code>.
Step 1: Installation of Ruby on Rails Language
There are lots of tools available to install Ruby on Rails or Ruby on your system quickly. If you use Mac OS X, you can use Tokaido. Ruby Rails for Windows users, Rails Installer is a good choice.
Start by opening a command-line prompt. Select Run from the Start Menu and type cmd.exe if you are on Windows or open Terminal.app, if you use Mac OS X. As for SQLite3, many UNIX-like systems come with an acceptable version. Windows users and others without SQLite3 can install it from the SQLite3 website. Now, verify that you have both installed:
$ ruby –vThis should return you the version of Ruby installed.
$ sqlite3 –versionThis should return you the version of SQLite3 installed.
Now, it’s time to install Rails using the gem install command by RubyGems.
$ gem install railsNow, type the following to verify the installation:
$ rails --versionThis should return the version of Rails installed, and you are ready to continue.
Step 2: Creating the Application
Now that you are all set with Ruby on Rails programming language and SQLite3, it’s time to step up and start making the application. Rails has a lot of scripts called ‘generators,’ designed to make development much more accessible. These generators create everything needed to start working on a task. One such generator is the ‘new application generator.’ This one provides the foundation for making a new Rails application, so you do not have to write one all by yourself.
To use this generator, you need to open a terminal and navigate to a directory where you can create files. Once there, it would help if you typed the following:
$ rails new blogThis creates a Rail application named ‘Blog’ in a blog directory. You can see these command-line options by running the rails new –h command.
Once the blog application is made, switch to its folder:
$ cd blogThe blog directory has several auto-generated folders and files, and that makes the structure of the Rails application. Most of this Ruby on Rails programming language tutorial will happen in the app folder, but here is a quick look at what each folder does:
- App: This contains the controllers, views, models, helpers, assets, and mailers for the application.
- Bin: This folder has the rails script that starts the app and other scripts to use for setting up, deploying, or running the application
- Config: This folder has the application database, routes, and more.
- ru: This is the rack configuration for rack-based servers used to start an application.
- Db: This one has your database schema and database migrations.
- Lock: These files enable you to specify the necessary gem dependencies for your Rails application. The Bundler gem uses them.
- Lib: These are extended application modules.
- Log: These are application log files.
- Public: The only folder that will be seen by the world, containing compiled assets and static files.
- Rakefile: This file loads and locates tasks runnable from the command line, and the tasks are defined through Rails components. You can add your own tasks by adding files to the lib/tasks directory instead of editing existing Rakefiles.
- Doc: This is an instructional manual you can edit for your application.
- Test: It has test apparatus like unit tests and fixtures.
- Tmp: They have paid, cache, and session files.
- Vendor: This is where the third-party code goes.
Step 3: Starting Off
Let’s start off by putting up some text real quick. You need first to get your Rails applications server up and running.
Here is how you do it:
Starting the webserver:
You actually already have a functional app set up, but you need to start the webserver on your development machine to start it up.
To do this, you need to run the following command in the blog directory:
$ bin/rails serverIf running Ruby on Rails for Windows, you need to directly pass the scripts in the bin folder to the Ruby bin/rails server. To compile JavaScript or CoffeeScript asset compression, you must first have a JavaScript runtime on your system. If you do not have a runtime, you will see an ExtJS error while compiling assets. Windows and Mac OS X machines typically come with a runtime installed, though.
Running ExeJS will start up the web server WEBrick, which is the default distributed server with Ruby. You can see your application in action by opening up a browser and navigating to localhost:3000. You will see the Rails default information page here.
Use Ctrl+C on the terminal window to stop the web server. You should be able to see your command prompt cursor if the server has stopped. Rail in development mode does not generally require a server restart. All the changes made in the files are usually picked up automatically by the server.
The information page you see is your first test for your new application. Everything is in the right place. You can also find a summary of your application environment by selecting the About your application’s environment link.
Step 4: Next Step
In many cases, there is more than one route for each controller, and routes can serve different actions, too, to collect information for putting out a view. A view aims to display the information in a format that is easy for the user to understand. Remember that the information is collected in the controller and not the view; the view is just displaying the information. View templates are written in Embedded Ruby or eRuby by default.
To make a new controller, you need to run the controller generator and name it ‘welcome’, with an action named ‘index’.
Here is the code for setting this up:
$ bin/rails generate controller welcome index
create  app/controllers/welcome_controller.rb
route  get 'welcome/index'
invoke  erb
create    app/views/welcome
create    app/views/welcome/index.html.erb
invoke  test_unit
create    test/controllers/welcome_controller_test.rb
invoke  helper
create    app/helpers/welcome_helper.rb
invoke  assets
invoke    coffee
create      app/assets/javascript/welcome.js.coffee
invoke    scss
create      app/assets/stylesheets/welcome.css.scss
Keep a note of where the controller and view are located because that is important information. Now, open the file app/views/welcome/index.html.erb file in your text editor and remove all existing code.
Replace it with just this one:
<h1>Hello, Rails!</h1>At this stage, you must set up Rails to display the Hello message when you want it. In this example, it needs to come up when you visit localhost:3000. Next, you have to tell Rails the location of your actual home page. To do this, open the config/routes.rb file in your text editor and type the following:
Rails.application.routes.draw do
get 'welcome/index.'The file that we opened just now is the routing file for your application, holding entries in a domain-specific language that tells how Rails connects requests to actions and controllers. The file has several sample routes on commented lines. Find the line beginning with the root and remove the comment. It should be similar to the following:
root 'welcome#index'Now, relaunch the webserver if you stopped it and navigate to the localhost URL. You should see the Hello message that you just wrote.
Step 5: Going Forward
Now it’s time to make something a bit more complex. You will now make a new resource in the Blog application. The resource is a collection of similar articles or objects. Rails have a resource method to declare a standard REST resource.
Here is how you do it:
Rails.application.routes.draw do
resources :articles
root 'welcome#index.'
end
If you are running bin/rake routes, you will see that it already has routes for standard REST options. You will also see that Rails has already inferred the formed article and used the distinctions.
$ bin/rake routes
Prefix Verb   URI Pattern                  Controller#Action
articles GET    /articles(.:format)          articles#index
POST   /articles(.:format)          articles#create
new_article GET    /articles/new(.:format)      articles#new
edit_article GET    /articles/:id/edit(.:format) articles#edit
article GET    /articles/:id(.:format)      articles#show
PATCH  /articles/:id(.:format)      articles#update
PUT    /articles/:id(.:format)      articles#update
DELETE /articles/:id(.:format)      articles#destroy
root GET    /                            welcome#index
The Rails philosophy has two major principles:
- Do not repeat yourself: Do not repeat yourself or DRY is a software development principle that states, ‘Every piece of knowledge must have a single, unambiguous, authoritative representation within a system’. This means not writing the same code over and over again. It makes the overall program less buggy and more extensible and maintainable.
- Convention over configuration: Remember when we mentioned the Rails Way? Rails assume that its own set of conventions on web application function is the best way to do things. It defaults to these conventions, so you do not have to specify each and everything through configuration files.
Conclusion
Rails are designed to make web application programming easier by assuming certain things that every developer needs to get started. You can write an application on Rails with less coding while accomplishing more than other frameworks or languages.
Recommended Articles
We hope that this EDUCBA information on “Ruby on Rails Language” was beneficial to you. You can view EDUCBA’s recommended articles for more information.


