Updated April 10, 2023

Definition of Spring Boot application.properties
In Spring boot application, we have application properties file which is used to write the application-related property into that file. This file contains the different configuration which is required to run the application in a different environment, and each environment will have a different property defined by it. Inside the application properties file, we define every type of property like database, toke, different URL if we are using any interrogation within our application, and many more. We can use this value into the program also if we want by using the annotation provide by spring boot. In the coming section of the tutorial, we will see the internal working and its implementation in detail in order to use this while designing our application.
Syntax:
As we have discussed that this file contains a different property for different configuration, let’s take a closer look at the syntax of how we can write these properties inside the file for beginners to understand it better see below;
spring.application.name = name_applcationIn this way we can define the name of our application, this represents the property as key-value pair here, every key associated with a value also. Let’s take a closer look at the practice syntax for this to get a better idea for this see below;
e.g. :
spring. application.name = demoserviceAs you can see in the above property that we have define the name of our application by this property i.e. spring. application. name we have severed or we can say ‘Number of property to make use of. In the coming section, we will see how we can create this file inside our program and configure the required changes for our application.
How Spring boot application.properties works?
As of now we already know that the application.properties file contains the property for the application which helps the application to run in the different environment if we have any. Spring boot provides us standard to create the application file for our different environment where we can mention the different property for each of our environment. This file contains the value as key-value pair, where we have a key for each configuration that we want to make for the application. There is no limit for these property inside this file, we can mention ‘N’ numbers of configuration inside our file. You ca see, when we cared the spring boot project from any web tool from scratch this file get automatically added at the class path, and if you setting up the project manually then you have to create one application.properties file at the class path only, with the same name. In this section we will see how we can create it a what are the different properties we have to mentioned inside this file let’s get started;
1) The first step we need to make the application file for every environment we have. In spring boot we have to follow some standard given by it, we can create the application file in the below format;
application-{profile}.properties
As you can see you can create the application file like above, in the profile part you can mention the name of the profile you want.
2) Inside the application file we can give the name for the profile by using the key and properties defined by the spring boot application. Below see the syntax how we can do this in our application see below;
e.g. :
spring:
application:
name: DemoProfiles
profile: local
3) For the name part of the application properties file we can have this in place see below;
a) application-local. properties: This properties file will be responsible to add the set of the environments for local.
b) application-dev.properties: This properties file will be responsible to add the set of the environments for development.
c) application-prod.properties: This properties file will be responsible to add the set environment for production.
d) application-test.properties: This properties file will be responsible to add the set of the environments for test.
In this way, we can create the application property for the different environments we have.
Let’s look at some of the properties now;
a) server.port = 8080
This property is used to set the port for our application, here we have set the 8080 as the port on which our application will run, we can specify any port but it should we different in every service if we have multiple.
b) spring.application.name = demo-application
This property is used to give any meaningful name to the application, we can specify any name and it should be unique in case we have multiple service in our project.
c) spring.config.name: This will tell the config name
d) spring. config.location: This will tell the config file location
e) spring.info.build.location: Will tell the location to the build file
f) spring.info.build.encoding: Tell the build encoding
g) spring.info.git.encoding: File encoding
h) spring.jmx.default-domain: Will tell the JMX default domain
i) spring.jmx.server: JMX server name
j) spring. main.banner-model: Tell the mode to display the banner
Now comes the part when we want to access this vales inside the class of our program let’s take a look;
To access this we can use the @Value annotation from the spring boot framework, which will give us the value for the key from the property file. Let’s take a look at the syntax for this see below;
e.g. :
@Value("${property_key_name:default_value}")In this way, we can access the value from the application properties file in spring boot framework. Also, we can use this value inside the program to access resources. Let’s get started with steps needed to perform this ;
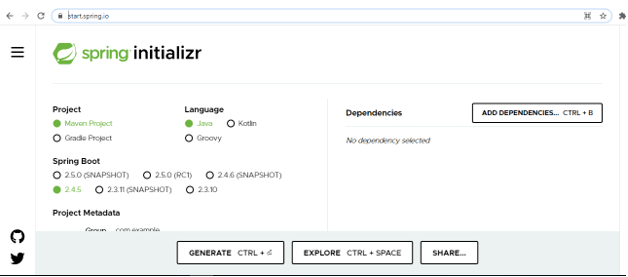
1) First we have to make one project if you do not have already, follow the below URL to get the zip of the project and extract it into the editor after filling all the required fields there.
URL:
https://start.spring.io/
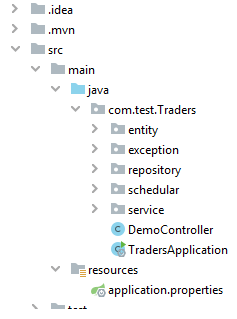
2) we check for the application.properties file at the class path if you cannot find it then create a file at the class path with the same name. For reference, I am attaching one screenshot where to create it if not found.
Output:
3) If you found it already then it must be blank without contain any configuration, now make some changes to make it work see ;
e.g. :
server.port = 8081
spring. application.name = demo-application
Now our application will run on the 8081 port, not on the default port remember.
4) check the main class of the application it should contain the below code to run the application. check it once.
e.g. :
package com.test.Traders;
import com.test.Traders.entity.Student;
import org.springframework.boot.SpringApplication;
import org.springframework.boot.autoconfigure.SpringBootApplication;
import java.util.*;
@SpringBootApplication
public class TradersApplication {
public static void main(String[] args)
{
SpringApplication.run(TradersApplication.class, args);
}
}
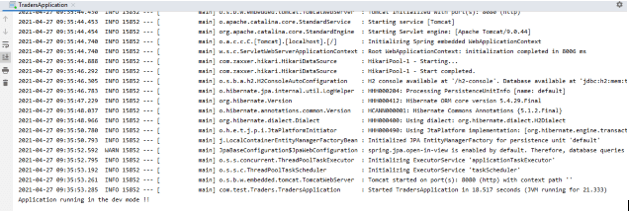
5) Now if you run the application you will see the below output on the screen;
Output:
Conclusion
By the use of it, we can make the required configuration which is required to make our application dev and prod ready. All the changes that we have made it easy to implement and do not require any heavy changes before using it, it is quite easy to use and handle as well by the developers.
Recommended Articles
This is a guide to the Spring Boot application. properties. Here we discuss the definition, syntax, How the Spring boot application.properties works? examples with code implementation. You may also have a look at the following articles to learn more –


