Updated April 6, 2023

Introduction to Spring Boot Initializr
Spring boot initializr is an online web-based tool that helps us create the spring boot application. It is very easy to use, understandable and very quick. It provides us with all the functions and options which is required in the basic spring boot application; after creating the application from spring in, we just have to run this in our editor. It will download the zip file for us of the spring boot application; we just have to unzip it and import it into our local environment. Here we will see its internal working and how we can use it to get our first spring boot project.
Syntax:
It is an online-based tool that helps us create the spring boot project; we will see what we require to access it and on the web where you can access it.
As you can see in the above URL, we have to type this in our browser and press enter. Then we are good to start with it. Here we will see how we can start using spring initializer to generate our spring boot application; it is useful for beginners and experienced developers because it saves a lot of time to configure and develop the spring boot application manually.
How Initializr Works in Spring Boot?
As we already know that now spring boot initializer is used to create the spring boot project from scratch. It also helps us fasten the development process a lot because, in the spring framework, we remember we spend a lot of time configuring the things required for it, and it creates a lot of problem for the developers and consumes a lot of time. But in the case of spring boot, we can use a spring initializer to create the project in a very less amount of time, like 10 to 5 min. But before using the spring initializer, we have to have some required things in our local machine in order to run the spring boot project without hustle. Here we will first see the required things, their advantages and steps to follow to use spring initializr to create our very first spring boot project from scratch.
1. Things we need on our machine
To run the spring boot project on our machine, we have to have below required things on our machine, which are as follow:
- Java 1.8 or above: To run the spring boot project from the spring initializer, we require the java 1.8 version or above. So we have to install the java on our machine and set the required path on the environmental variable as well.
- Build tool: We should also have any build tool installed on the machine in order to build the spring boot project. It should be Maven or Gradle based on the requirement.
- We just need to spend 15 minutes to spring the initializer to create our first spring boot project.
- Any editor or IDE we use. else we can directly import or open the project in the Intellij idea to run and test the application.
As you can see above are the points and requirement to use the spring initializer to run and test our spring boot application after being downloaded from the spring initializer.
Now we will see what are the usage of using spring initializer in the project creation for spring boot application.
2. Usage
By using spring initializer, we can easily generate the build, modify the packaging, add remove dependency from the search option, select the java version, build tool, and everything which is needed to generate a JVM-based project easily and quickly.
3. Different modules which are available in spring initializer
- initializr-generator: This module helps us to generate the core project library.
- initializr-docs: This module is responsible for creating the documentation for the application.
- initializr-generator-test: This module is responsible for generating the test infrastructure, which will help us for project generation.
- initializr-service-sample: This module helps us to generate the basic custom instance.
- initializr-web: This module helps us generate the wen points for the third party.
- initializr-actuator: This is an optional one; we can include it if we want to get the additional information of the server or application; it gives us statistics and further information on project generation.
- initializr-metadata: It helps us to generate the metadata infrastructure for various aspects.
- initializr-version-resolver: It is also an optional module that helps us retrieve the POM version numbers.
- initializr-generator-spring: This is also an optional module which helps us to define the conventions for our spring
- boot project.
- initializr-bom: This basically stands for Bill of Materials, which helps us in dependency management for our project.
4. Steps for getting started with spring initializer
a. First, we have to type in the below URL in the Browser to use the spring initializer.
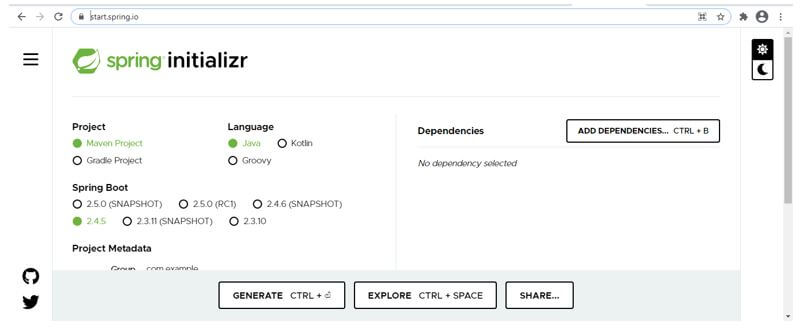
b. After this, we will see so many different options available; we are attaching a screenshot for reference.
c. First, select the project type, whether it is maven or gradle. After that, we can select the language from the language option we have.
d. Immediately after that, we have to select the spring version as well; we can select them as per the requirement.
e. Inside the project metadata, we can provide the basic details like group name, artifact, name, description for the project, base package name, packaging for the project, and java version last.
f. On the right-hand side, we can type in the required dependency if we need anymore. If you are certain the web application does not forget to add web dependency into the project; otherwise, you will get the error while running it.
g. In the last, we can click on the generate button to get the zip file. This zip we can extract and import or open to our editor.
Conclusion
As you can see, the spring initializer is very easy to use for everyone who is either a beginner or experienced. By the use of it, we can develop the basic spring boot project without any hustle just by clicking the option we can see on the web tool.
Recommended Articles
This is a guide to Spring Boot Initializr. Here we discuss the introduction and how initializr works in spring boot? respectively. You may also have a look at the following articles to learn more –

