Updated March 29, 2023

Introduction to Spring Boot Webflux
Spring Boot WebFlux is a parallel of Spring MVC Version that supports a full non-blocking reactive stream. Spring Boot WebFlux uses the project reactor as the reactive library, where Reactor is the Reactive Streams Library, and hence all the operators support non-blocking back pressure which is developed in close collaboration with Spring. The reactive system needs developers and tools specially trained in implementing unique programming architectures. To get started with Spring Boot WebFlux, there are a few more concepts we need to look into. Let us look into those concepts at first and then get into WebFlux.
Getting Started with Spring Boot WebFlux
Reactive System:
Here, the term “reactive” refers to the programming models built around reacting to changes.
- It supports asynchronous, and is event-driven, and provides a non-blocking approach to data processing. Also organizes data and events as streams.
- In the Reactive system, when the user makes a request, other tasks will be executed, waiting for results.
- When data is made available, notification is sent along with results via a callback function.
- Hence the Reactive system is suitable for data-driven applications.
- A reactive architectural pattern in a reactive system prioritizes the usage of loosely coupled, scalable, and flexible components.
- In non-blocking code, back pressure, i.e., rate of events, needs to be controlled such that fast producer will not overwhelm the destination.
- Reactive programming is good for applications that have streaming data, clients that consume and stream to users.
- Reactive systems generally focus on Reactiveness, Resilience, Elasticity, and Message Driven communication.
Spring Boot WebFlux features:
Some of the features of WebFlux are listed below,
- WebClient: It is WebFlux’s reactive web client that is built from a well-known Rest Template. It’s an interface representing the main entry point for web requests and supports both asynchronous and synchronous operations. WebClient can be built and created by importing the standard WebFlux dependencies. It is mainly used for reactive backend communication.
Maven Dependency:
<dependency>
<groupId>org.springframework.boot</groupId>
<artifactId>spring-boot-starter-webflux</artifactId>
</dependency>
WebClient Instance:
WebClient client = WebClient.create();- Router functions: It is a functional alternative to Request mapping and the Controller annotation used in Spring MVC. The user uses the route() for creating routes instead of writing the complete router function. These router functions are registered as Spring beans and can be created in any configuration classes. Router functions also avoid side effects that are caused by the multi-step process for request mapping and streamline to direct handler/ router chain; this allows for functional programming.
Annotations:
RequestMapping
Controller
RouterFunctions- Servers: Spring Boot WebFlux is supported on Jetty, Tomcat, Servlet, and non-Servlet containers like Netty, Undertow. Users can easily switch between asynchronous and non-blocking designs with a simple change in Gradle or Maven build software.
- Reactive Steam API: It is a collection of imported functions that allow smart stream data flow and has built-in support for asynchronous processing and back pressure, which ensures application making most efficient use for both computer and component resources. 4 major interfaces in Steam API are: Publisher, Subscriber, Subscription, and Processor
- Concurrency Model: Spring Boot WebFlux uses a different concurrent programming model from Spring and assumes threads will be blocked by using a large thread pool at the instance of blocking. The large thread pool makes MVC resource-intensive as hardware keeps threads spun at once. Hence WebFlux uses a small thread pool as it assumes users never need to pass off the work avoiding blockers, and are called as Event Loop Workers.
- Spring WebFlux Security: It uses Spring Security for implementing authentication and authorization protocols. It uses Web Filter to check requests against an authenticated user list or can be sent to refuse requests automatically that fit origin or request type criteria. It is a minimal implementation to set all settings to default.
Spring Boot WebFlux Example:
Different examples are mentioned below:
Step 1: Include Maven Dependencies required for Spring Boot WebFlux application.
<project xmlns="http://maven.apache.org/POM/4.0.0"
xmlns:xsi="http://www.w3.org/2001/XMLSchema-instance"
xsi:schemaLocation="http://maven.apache.org/POM/4.0.0 http://maven.apache.org/xsd/maven-4.0.0.xsd">
<modelVersion>4.0.0</modelVersion>
<parent>
<groupId>org.springframework.boot</groupId>
<artifactId>spring-boot-starter-parent</artifactId>
<version>2.1.1.RELEASE</version>
<relativePath />
</parent>
<groupId>com.sample</groupId>
<artifactId>spring-webflux-demo</artifactId>
<version>0.0.1-SNAPSHOT</version>
<packaging>jar</packaging>
<name>spring-webflux-demo</name>
<url>http://maven.apache.org</url>
<properties>
<project.build.sourceEncoding>UTF-8</project.build.sourceEncoding>
<java.version>1.8</java.version>
</properties>
<dependencies>
<dependency>
<groupId>org.springframework.boot</groupId>
<artifactId>spring-boot-starter-webflux</artifactId>
</dependency>
<dependency>
<groupId>org.springframework.boot</groupId>
<artifactId>spring-boot-starter-data-mongodb-reactive</artifactId>
</dependency>
<dependency>
<groupId>org.springframework.boot</groupId>
<artifactId>spring-boot-starter-test</artifactId>
<scope>test</scope>
</dependency>
<dependency>
<groupId>io.projectreactor</groupId>
<artifactId>reactor-test</artifactId>
<scope>test</scope>
</dependency>
<dependency>
<groupId>javax.xml.bind</groupId>
<artifactId>jaxb-api</artifactId>
<version>2.3.0</version>
</dependency>
<dependency>
<groupId>javax.servlet</groupId>
<artifactId>javax.servlet-api</artifactId>
<version>3.1.0</version>
<scope>provided</scope>
</dependency>
</dependencies>
</project>
The main dependencies that are required to be added are spring-boot-starter-webflux, spring-boot-starter-data-mongodb-reactive, and spring-boot-starter-test and reactor-test dependencies.
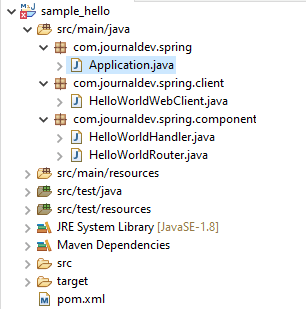
Step 2: Below is the Project Structure,
Create the above files to have a sample WebFlux example.
Step 3: In Application.java
package com.journaldev.spring;
import org.springframework.boot.SpringApplication;
import org.springframework.boot.autoconfigure.SpringBootApplication;
@SpringBootApplication
public class Application {
public static void main(String[] args) {
SpringApplication.run(Application.class, args);
}
}
Step 4: In HelloWorldWebClient.java
package com.journaldev.spring.client;
import org.springframework.http.MediaType;
import org.springframework.web.reactive.function.client.ClientResponse;
import org.springframework.web.reactive.function.client.WebClient;
import reactor.core.publisher.Mono;
public class HelloWorldWebClient {
public static void main(String args[]) {
WebClient client = WebClient.create("https://localhost:8080");
Mono<ClientResponse> result = client.get().uri("/helloWorld").accept(MediaType.TEXT_PLAIN).exchange();
System.out.println("Result = " + result.flatMap(res -> res.bodyToMono(String.class)).block());
}
}
Step 5: In HelloWorldHandler.java
package com.journaldev.spring.component;
import org.springframework.http.MediaType;
import org.springframework.stereotype.Component;
import org.springframework.web.reactive.function.BodyInserters;
import org.springframework.web.reactive.function.server.ServerRequest;
import org.springframework.web.reactive.function.server.ServerResponse;
import reactor.core.publisher.Mono;
@Component
public class HelloWorldHandler {
public Mono<ServerResponse> helloWorld(ServerRequest request) {
return ServerResponse.ok().contentType(MediaType.TEXT_PLAIN).body(BodyInserters.fromObject("Hello World!"));
}
}
Step 6: In HelloWorldRouter.java
package com.journaldev.spring.component;
import org.springframework.context.annotation.Bean;
import org.springframework.context.annotation.Configuration;
import org.springframework.http.MediaType;
import org.springframework.web.reactive.function.server.RequestPredicates;
import org.springframework.web.reactive.function.server.RouterFunction;
import org.springframework.web.reactive.function.server.RouterFunctions;
import org.springframework.web.reactive.function.server.ServerResponse;
@Configuration
public class HelloWorldRouter {
@Bean
public RouterFunction<ServerResponse> routeHelloWorld(HelloWorldHandler helloWorldHandler) {
return RouterFunctions.route(RequestPredicates.GET("/helloWorld")
.and(RequestPredicates.accept(MediaType.TEXT_PLAIN)), helloWorldHandler::helloWorld);
}
}
On Running the Application,
Console Output:
Conclusion
With this, we shall conclude the topic “Spring Boot WebFlux.” We have seen what is Spring boot webflux and what it means in Java Spring. We have also seen how WebFlux works along with features. Had a clear overview of “Reactive System,” Based on the example shown above, have displayed a small text message, based on the requirement, functionalities can be added. I hope this helps. Thanks! Happy Learning!!
Recommended Articles
This is a guide to Spring Boot Webflux. Here we discuss what is webflux and what it means in Java Spring and also see how WebFlux works along with features. You may also have a look at the following articles to learn more –


