Updated April 1, 2023

Introduction to Spring Cloud Microservices
The following article provides an outline for spring cloud microservices. Microservice is an architecture that helps us to divide our application into small modules and makes it easy to manage and handle. We have a Spring cloud framework that helps us to implement this architecture in our application. It is a modern approach to develop the application in which we basically divided and separate the application code from each other and make it an independent, manageable module, etc. By the use of this, we can significantly increase productivity, easy to maintenance, greater fault tolerance etc. Furthermore, by the use of spring boot, we can make these microservices really very fast and small; we have spring cloud, which can be used with spring boot application to build this. The spring cloud has so many components that help us build the microservice quick and fast; some of them are discovery service, client registry, circuit breaker, and many more. In the coming section, we will have a closer look at the spring cloud microservice in detail for better understanding and implementation.
Annotations
In spring cloud, we have a few annotations which can make our spring boot project to act as the microservice after adding of the dependency; let have a quick look at the annotations which we are going to use later see below;
1) @EnableDiscoveryClient
2) @EnableEurekaServer
3) etc
As you can see, we will be going to use some of the annotations from these; in the coming section, we will have a closer look at the internally working of the spring cloud microservice, which is the flow chart itself.
How does Spring cloud microservices works?
As now we already know what microservices are, now we will see how it actually works with spring cloud; in this section, we will discuss in detail wits internal working let’s get started to see below;
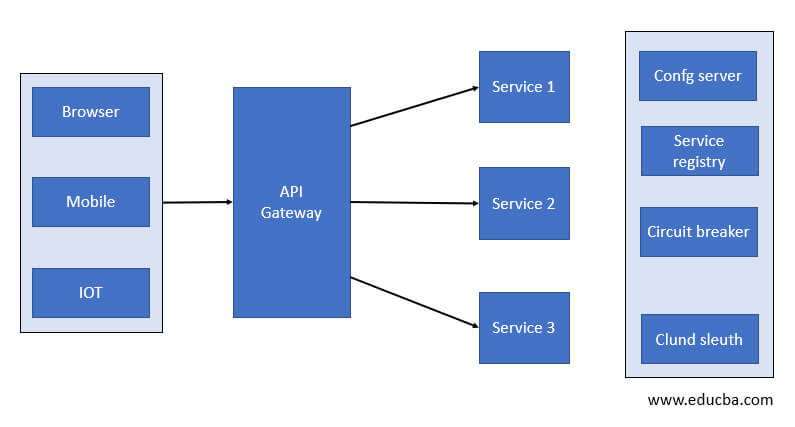
1) As you can see from the below flowchart, we have API gateway as the first component or layer we can say. This API gateway is responsible for performing the authentication part for all the request that is coming from the client. It acts as the entry point for our microservice. It helps us to map our request to the appropriate microservice and handle the request to them.
2) After this, we have different microservice which are deployed on the server as the independent service. Interact with the API gateway also. Once they process the request and get the response, they hand it over to the API gateway.
3) On top of these microservices, we used different components of the spring cloud framework, which helps us make our normal spring boot project as the microservice; if we do not make use of this, we cannot say it is microservice architecture.
4) We have used like, circuit breaker here for fault tolerance, config server, service registry, spring cloud sleuth and many more we can use as per the requirement.
Flowchart
Working of Microservice
1) we can create the different services per our need; first, we need to identify the modules that can act as the independent module for our application.
2) after this, we can register our service to discovery service in order to make them found. Below are the main component of the spring cloud microservice;
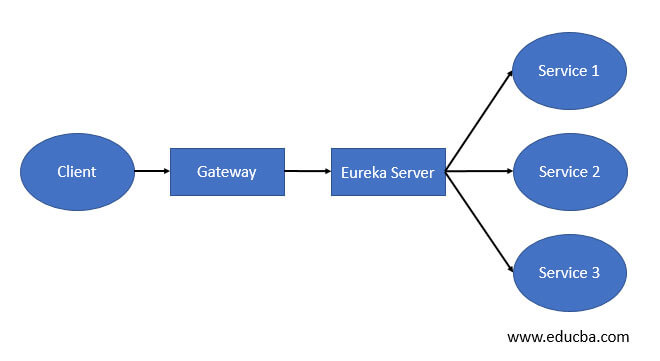
a) Discovery service: this is the main service of spring cloud, which helps us discover our different services and let us communicate with one another. As the name suggests, it helps to discover the service. It is also known as the registered service, where all other services register themselves in order to get found by it. For this, we have to make few configurations into our application and keep in mind that it will be a separate spring boot project running on the server. We need this to keep track of our registered service, and also, it does not register itself; in the coming section, we will see the configuration required to enable this.
b) Client service: This is another form of service, but this service represents the module from our application responsible for performing some business logic and returning the result. Basically, this service provides data, or we can say actual data for the application. We can have multiple client services in our application, and this multiple services will represent the different functionality of the application. We have to register these services with the discovery service.
c) Gateway service: This service act as the entry point for our application; it can contain the common logic for our application or centralized configuration, which is needed by all the different services we have. Basically, it does the authentication part for us; we can also place our centralized logging part here; it can be anything depending on the requirement of the application.
Examples of Spring cloud microservices
Given below are the example of Spring cloud microservices:
1. Create the spring boot project from the spring initializer and add the required dependency as well. from the below URL: https://start.spring.io/
2. After this, import it to your IDE and add the below dependency for creating the eureka server,
Example:
<dependency>
<groupId>org.springframework.cloud</groupId>
<artifactId>spring-cloud-starter-netflix-eureka-server</artifactId>
</dependency>
<dependency>
<groupId>org.springframework.boot</groupId>
<artifactId>spring-boot-starter-web</artifactId>
</dependency>
3. After this, we have to add only one annotation to our main spring application class to enable the eureka server, and we can run the application to see the output:
Example:
import org.springframework.boot.SpringApplication;
import org.springframework.boot.autoconfigure.SpringBootApplication;
import org.springframework.cloud.netflix.eureka.server.EnableEurekaServer;
@SpringBootApplication
@EnableEurekaServer
public class EurekaServerApplication{
public static void main(String[] args) {
SpringApplication.run(EurekaServerApplication.class, args);
}
}
4. Add the below configuration to the application file so the register will not register itself to the service, see below;
We are using a .yml file to make the configuration so that syntax will be but different for this; for reference, I am attaching the code.
Example:
server:
port: 8989
eureka:
client:
register-with-eureka: false
fetch-registry: false
5. Run the application and see the logs, as below;
Output:
Conclusion
This article has seen microservice using the spring cloud framework, which makes it easy for us to build and configure. Moreover, we can easily monitor, handle, maintain it using the eureka server we have. Already we have seen the internal working as well for better understanding for beginners.
Recommended Articles
This is a guide to Spring cloud microservices. Here we discuss the working of Spring cloud microservices with a flowchart along with Examples. You may also have a look at the following articles to learn more –


