Updated March 16, 2023

Introduction to SQLAlchemy Filter in List
The SQLAlchemy filter in list is one of the features that is. At the same time, we used to filter() method in most of the queries that are equivalent to the SQL statements, especially for the conditional statements like where and other clauses will return only the huge number of rows that will be matched by using the specific criteria that call the queries with the filter() and filter_by() method are in the list with keyword arguments.
Overview of SQLAlchemy Filter in List
The SQLAlchemy ORM is the object-relational mapper focusing mainly on the filters created and applied in the file. We get the data results in the Resultset, represented using the Query object and subjected to specific criteria. At the same time, we call the filter() method in any of the application code areas. Each query has its user session that can be stored and retrieved in the datas in the specific user table with certain filter conditions. Inbound and Outbound parameters are called and operate the user functions in the application backend stage that will result in the aggregate value with the essentials like GROUP BY for arranging the order in specific attributes columns in the collection list of the sqlalchemy.
How to SQLAlchemy Filter in List?
SQLAlchemy filter() is the method that helps to filter the datas from the backend to the front end UI. Here, we can use the ORM technique, Object Relational Mapper, to create the user and database session. It also operates and approaches the alternative method called raw SQL; the mode will calculate the SQLAlchemy table columns based on certain filter conditions. Finally, the query columns are called upon each user session that handles the separate user session manager to execute the datas from the front end to the back end.
SQL Alchemy ORM presents the default method to associate with the user-defined classes that may be the Python-based scripting language along with the database tables and object instances of the classes and other default rows in the corresponding tables, which include the system availability and transparently for synchronizing the object state changes and their default rows in the database queries. We may use the successful application for more constructed ways for the ORM, which exclusively affected the application with the ORM database areas.
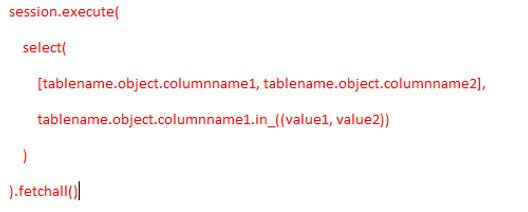
In the above screenshot, we used session instance to call the user session areas already executed in the sqlalchemy database tables. In default, the session will be used as the default classes and imported packages, and using execute() method, the table name, object, and column names already used by the backend database tables. Therefore, we can separate and call the two different parameters or arguments in the same table name with specific columns that will be stored and retrieve all the records associated with the sqlalchemy database schema. Therefore, a keyword like In is vital for comparing and calling the different values of the same tablename with corresponding column names.
SQLAlchemy Columns Filter in List
The sqlalchemy-oso is one of the libraries that can be enforced and over the policies for the sqlalchemy models that can be mainly drawn back to the object collections and needing the particular objects for authorizing the datas individually on the filter conditions. In existing sqlalchemy ORM models, without modification, the datas can be aware of the model types and the session for authorizing the datas during the access permissions. Datas are authorized and integrating the sqlalchemy sessions using the sqlalchemy_oso.authorized_sessionmaker() is the default classes of the sqlalchemy imports with the session factory of the default sqlalchemy sessionmakers. But before executing the queries, the data policy and other creating lists of conditions are satisfied with the data model while authenticating the user datas. We can create the sqlalchemy filter columns in the list collection with steps by step procedure.
1. First, we must install the sqlalchemy-oso, and other default required import packages.
2. With the help of the above command, the pip is the python-based install command to install the required util packages.
3. We must create and connect the database engine using the default method, the create_engine() method, with suitable parameters.
4. Here, we first import the required create_engine classes of the sqlalchemy and use the reference called eng for creating the database engine and call the required parameters like database drivers.
5. Then, we can create the classes to declare the base classes and the table name. Also, columns and rows are joined together with the single instance that will be called throughout the codes.
6. We can use the filter() method in the session .query(className).filter(className.columnName.in(value1,value2).all()) these coding lines are called the user session with the tablename and column names.
Examples of SQLAlchemy Filter in List
Given below are the examples mentioned:
Example #1
Code:
from sqlalchemy.engine import result
import sqlalchemy
from sqlalchemy import create_engine, MetaData,Table, Column, Numeric, Integer, VARCHAR, update
eng = create_engine(
'sqlite:///Mar9.db', echo = True)
varss = MetaData(bind=eng)
MetaData.reflect(varss)
employees = varss.tables['employees']
a = update(employees)
a = a.values({"'name'": "sivaraman"})
a = a.where(employees.c._id' == 3)
eng.execute(a)
res = text("SELECT * from employees")
outs = eng.execute(res).fetchall()
for x in outs:
print("Welcome To My Domain \n", x)
conclu = session.query(employees).filter(employees.id.in_([2,3]))
for y in conclu:
print ("ID:", y.id, "Name: ",y.name)
Output:
1. In The above example, we first create the database engine and the required drivers to execute the specific table like employees.
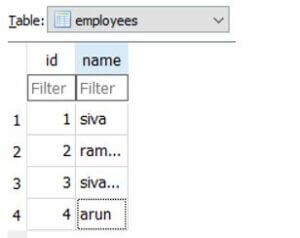
2. After database connection, we call the existing table called employees, which is already created on the sqlite database.
3. Then, we can do the update operations by using the update query statements, and finally, we can execute the same in the results.
4. a = update(employees)
5. Finally, we can filter the tablename columns along with the list formats with default keywords like In for mapping and fetching the results with the specific conditions.
Example #2
Code:
import sqlalchemy
from sqlalchemy import create_engine, MetaData,Table, Column, Numeric, Integer, VARCHAR, update
from sqlalchemy import update
from sqlalchemy import and_
eng = create_engine(
'sqlite:///Mar9.db', echo = True)
varsq = MetaData(bind=eng)
MetaData.reflect(varsq)
std = Table(
'studenst', vars,
Column('rollno', Integer, primary_key=True),
Column('name', VARCHAR),
Column('city', VARCHAR)
)
res = session.query(studenst).filter(and_(studenst.rollno>2, studenst.name.like('ca%')))
for i in res:
print ("Rollno:", i.rollno, "Name: ",i.name, "City:",i.city)
Output:
1. In the above scenario, we followed the database engine connection as per the previous example.
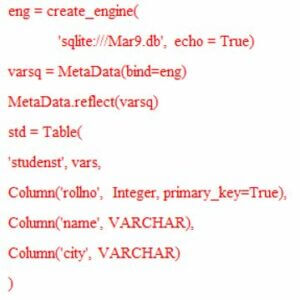
2. But here we will create the table called ‘studenst’ with the help of creating a table query in the sqlalchemy ORM
3. Additionally, I can use them and_ as the list’s filter conditions to display the datas from the backend database with certain conditions.
4. Here, I mentioned rollno>2, and the name will start with ‘ca’ it creates and calls the two different conditions with a single instance.
Conclusion
SQLAlchemy has many features to access the user datas and the python import libraries to perform the operations from the UI to the backend and vice versa. The filter conditions are more required to satisfy the user data operations with certain conditions to view the table datas from the backend to UI.
Recommended Articles
This is a guide to SQLAlchemy Filter in List. Here we discuss the introduction, SQLAlchemy columns filter in list and examples. You may also have a look at the following articles to learn more –


