Updated June 9, 2023

Introduction to Swift guard
Swift guard is used to transferring control in the program, it is very simple to use just like if and else in programming. We can use a guard inside any loop, function, etc. Guard statement falls under the control flow statement which is used to transfer the control within the program when passing conditions do not match. If we want to exit the program early or want to redirect the program then we can use the guard statement in Swift.
Syntax:
As we saw guard statement falls under the category of control flow statement, they are easy and simple to use just like if else.
guard condition else {
//logic here ..
statements
}
This is the official syntax for using the guard statement as per the apple documentation. To define the guard statement in Swift we are just using ‘guard’ keyword. Also, we are passing the condition here. Based on the result we can write our own logic to it whether we want to break, continue or want to throw any exception, etc.
Syntax:
guard let abc = obj.abc else {
break
}
As you can see in the above piece of syntax we are just using ‘guard’ keyword to implement the guard statement in Swift.
How guard Statement Works in Swift?
As we know the guard statement is used to transfer the control flow of the program if the condition does not match or satisfy. To implement this statement in our program we just need to use the ‘guard’ keyword followed by the condition. They are pretty much the same as if and else statement and very easy to use and implement.
Here we will first discuss their internal working followed by the sample example.
1. guard
This keyword is used to make the guard statement in Swift, after this statement we can mention our condition. Guard statements are fast and have their own benefits over other control flow statements. By the use of them, we can easily break the statement eerily or we can redirect it to another part of the program. Always remember the ‘guard’ statement is should have someone else blocked associate with it otherwise it will give us an error. Also, the else block should return something from it.
Let’s see points about how the else block of guard statement has some restriction with it that needs to be followed.
2. else block in guard statement
This else block is a mandatory block that should be present with the guard statement in Swift. Inside this block, we should call a function or return something from it. It should not be empty.
Also, we can pass the control outside the guard statement for which we can use any of the following inside the else block of guard statement:
- break: This keyword is used to break the current execution of the program and return back the control to the calling one.
- return: This keyword is used to return any value from the block which can be anything like int, string, nil, etc
- throw: This keyword is used to throw any error, if we want to throw any error inside the else block then we can use this.
- continue: This keyword is used to continue the current execution of the program.
3. return type
while writing the guard statement condition in swift it should return the bool type in Swift. That means the condition should return the bool type otherwise we will receive an error in the program. We can also define the condition of the guard statement as Optional Binding.
Now we will see one sample example of the internal flow of guard statement in swift
Example:
Code:
func demo(sample: String) -> String {
guard sample == "hello" else {
print("password is blank")
return "not found"
}
return "its a match !!"
}
print(demo(name: "hello"))
print(demo(name: "Hello not "))
In the above lines of code, we are trying to use a guard statement in Swift. First, we are creating one function named as ‘demo’. Inside this, we are passing one input param as the parameter and the return string as the result. Inside the function, we are using a guard statement and have written one condition to match the passing param value. If the value passed is matched then we return the result otherwise we are returning ‘Not found’ as the message. Now it is somewhat clear how we can use and call the guard statement in Swift.
Example of Swift guard
Given below is the example mentioned:
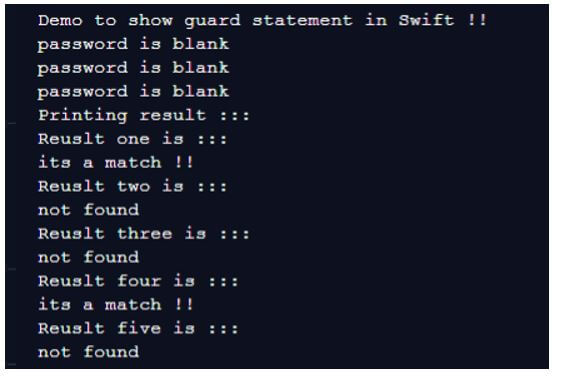
In this example we are trying to use a guard statement in Swift, we are trying to match a string passed in the function. based on it we are returning the result as not or not found.
Code:
func demo(name: String) -> String {
guard name == "hello" else {
print("password is blank")
return "not found"
}
return "its a match !!"
}
print("Demo to show guard statement in Swift !!")
let result1 = demo(name: "hello")
let result2 = demo(name: "bye")
let result3 = demo(name: "world")
let result4 = demo(name: "hello")
let result5 = demo(name: "123")
print("Printing result :::")
print("Reuslt one is :::")
print(result1)
print("Reuslt two is :::")
print(result2)
print("Reuslt three is :::")
print(result3)
print("Reuslt four is :::")
print(result4)
print("Reuslt five is :::")
print(result5)
Output:
Conclusion
By using the guard statement we can redirect the flow of the program at a very early stage. They are easy to use and implement in Swift just like if and else statement. But they have some benefits over them.
Recommended Articles
We hope that this EDUCBA information on “Swift guard” was beneficial to you. You can view EDUCBA’s recommended articles for more information.

