Updated March 15, 2023

Introduction to talend tMAP
As the name suggests, this tmap is used to map the input and output values. This is one of the core components of talend, and this is basically used for mapping purposes. As tmap is often used in jobs, in short, basically what it does is it map the input field with the output field and helps us to transform the data of input file to the corresponding output column. It is a graphical tool that makes the mapping for us easily by providing the UI to the developers. As we know, it is used to map one schema to the other schema. And this component is basically part of the processing family because it processes our input to the corresponding output. With the help of this, we can also join multiple inputs; in the coming section, we will see in detail how it internally works and how we can use it to map our input and output values correctly for better understanding and clarity.
What is talend tMAP?
As we have already discussed and known, the talend tmap is used to map the data; with the help of this, we can do the following things, which are mentioned below, to get more detailed knowledge about it;
1) It maps our input filed to the corresponding output filed.
2) By using this, we can not only map single input to the output but also join multiple inputs to the multiple outputs.
3) Other than that, we can also filter our data inside the tmap component.
4) To map the values here, we use the mapping expression.
5) It is a more advanced component than Tjoin, which can be used in more complicated scenarios.
In the coming section of the article, we will have a detailed look at the working and creation of input and output expressions to transform the data for more understanding.
How to create a talend tMAP?
In this section, we will see the creation of the talend tmap; for this, we will follow a few steps mentioned below. So let’s get started;
1) For this, first, we will be going to create the job, which a b named as ‘tMapFilter.’
2) Now, we can add the metadata file to it in the second step. This will act as the input here.
3) In the third step, we will add the tmap component, which will help us modify the component by providing the and output values. Also, we can filter out the columns.
How to Connect and talend tMAPAdding
In this part, we will see how we can configure our component in tmap, so we will see the step that needs to follow. Let’s get started to see below;
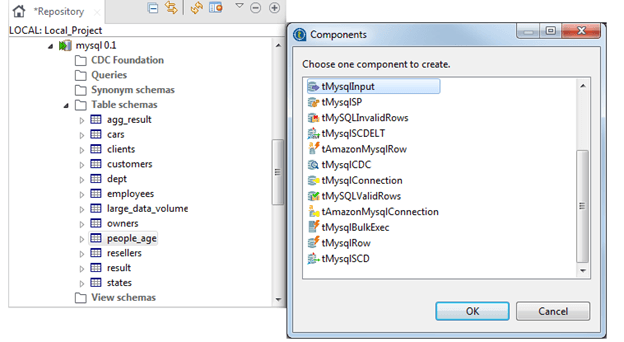
1) The first step is to load the metadata to the workspace. Here the source table is called people_age
2) On dropping the component, it will popup one list form, selecting the first option: tMySqlInput.
3) Now create the second one by drooping the metadata to the workspace again; it will open one popup which will display the list of options; select the above one as ‘tMySqlInput’ and name it; as ‘large_data_volume.’
4) Now, we have to perform the same step by drooping the metadata to the workspace, and it will give us one popup; from that, we have to select one option, that is ‘tMysqlConnection,’ now it will generate a permanent connection for us.
5) Now, in this step, as we already know that tmap is the part of the processing family, so pick it; the other two are ‘tMysqlOuput’ and ‘tMySqlCommit,’ which belongs to the database family to the right-hand side of the pallet.
6) In this step, we have all the necessary components which are required so that we will connect them together
7) Now, we have to release the link on the tmap component; it will set up the main flow for us.
8) Now, we can rename this main flow to any name we want or remember easily, as per the requirement.
9) Now, we can repeat the same process and create the tmap; also main flow link will be automatically created, which can be renamed afterward if we want.
So all these steps we have to follow to connect or configure the components inside the tmap, which can then be used to filter and map data.
<image>
Talend tMAP Component
If we talked about the tMap, it comes up with so many different properties which we can discuss this section so let’s get started with it,
1) Map editor: this property of tMap allows us to define the tMap transformation and routing properties.
2) Temp data directory path: here, we entered the temp path where we wanted to store our data.
3) Mapping links: we have three different types of mapping, which are as follows;
- a) Lines: this mapping represents straight lines
- b) Auto: it shows default mapping, which is curves.
- c) Curves: this mapping represents curves
4) Preview: This helps us view our mapper data’s instant view. It will be in action once the mapper has been filled with data. This can only be done once the actions are saved.
5) Replicated join: this is a checkbox that is used to perform the join between input flows.
Talend tMAP metadata
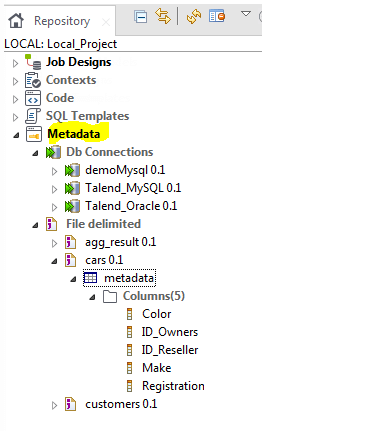
Metadata provides information, and documentation of other data within talend. This present inside the repository is a folder that stores the useful information stored on the database, files, and systems needed by us o create the job in tMap. We can store this information which can be used later, which will be helpful in setting up the connection parameter or any relevant information needed for input and output fields. See the below image to view the metadata in talend see below;
Conclusion
As we have covered all the points related to tmap, which can help beginners start with tmap, it helps us map our values, single or multiple, also an advanced component than tjoin. So go through the whole article to get a better idea and working knowledge of tmap in talend.
Recommended Articles
This is a guide to talend tmap. Here we discuss how it internally works and how we can use it to map our input and output values correctly. You may also have a look at the following articles to learn more –


