Updated August 28, 2023
Introduction to Text Effects in After Effects
Adobe After Effects is a video editing and motion graphics program used in the post-production process. The program has a lot of features and tools that make the application demanding and interesting to get hands-on. The software can be used by motion graphics editors, animators, and graphic designers. After-effects are mostly used for 2D purposes and artworks. Though, we can use the software for basic 3D editing. The program has camera tracking, and animation presets with plugins and functions that help the user to work smoothly and easily on the program. Text animation in After effects can be done by different methods and techniques. We can either achieve this by animating the transform properties or applying a certain text animation preset to the text. The text can also be animated by using selectors and other techniques. These selectors are used as masks and can be helpful in-text animations.
Examples to Depict Different Text Animation Effects
Here we are going to see the different text Animation Effects.
1. Using the Text Animation Presets
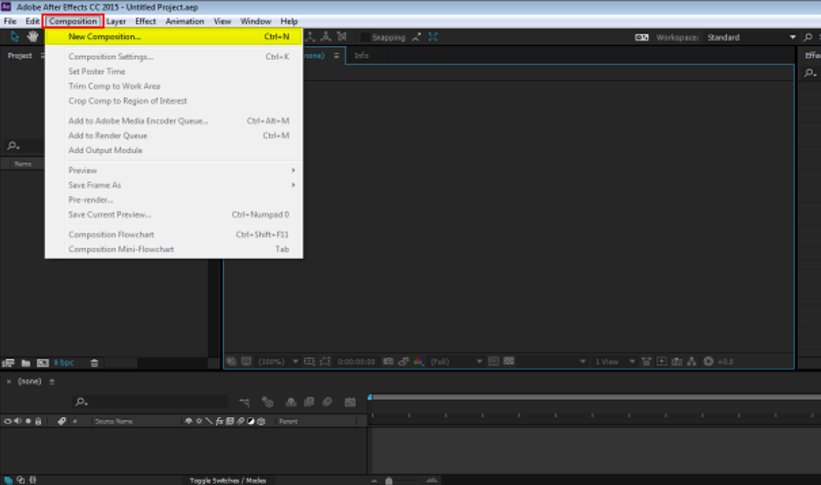
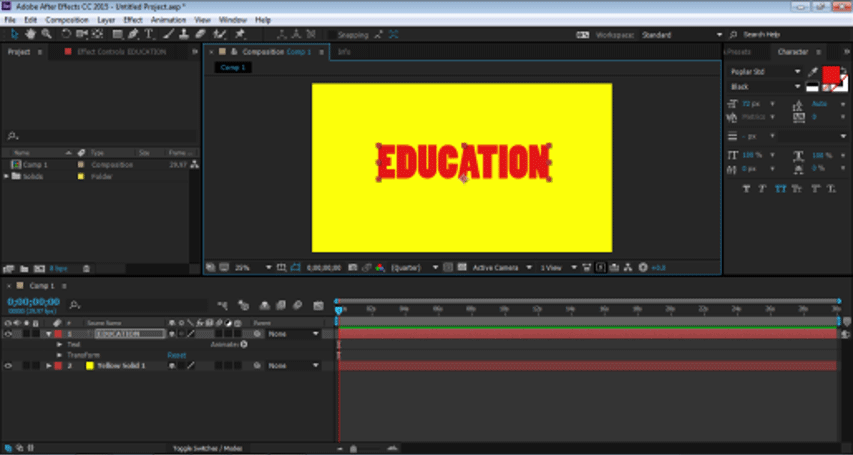
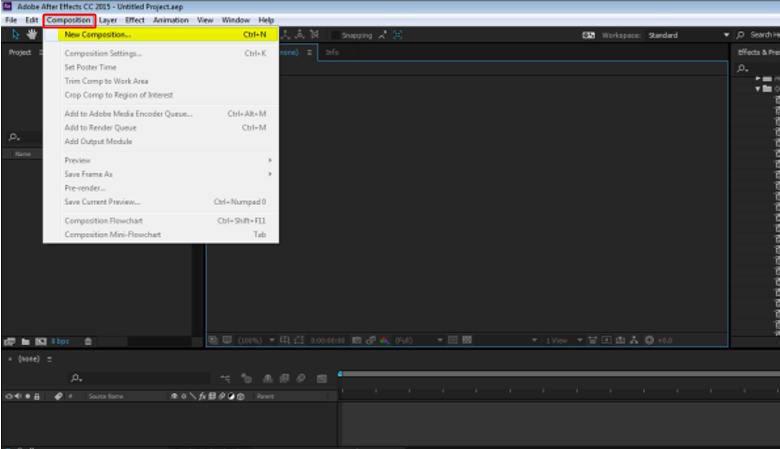
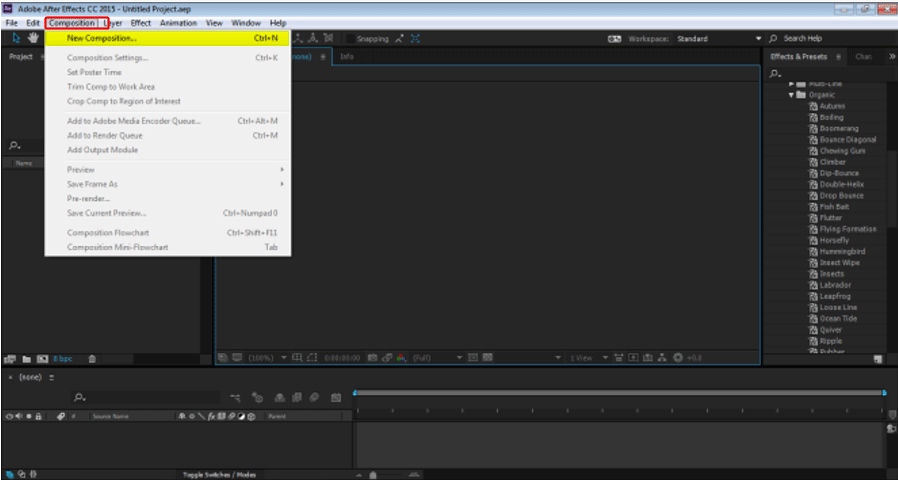
Step 1: Open a new project on After effects. Select Composition and create a new composition of 1920 * 1080 pixels.
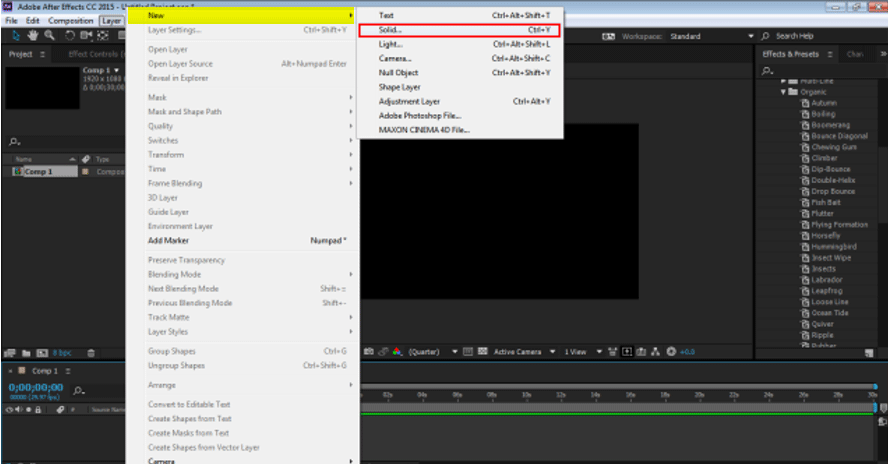
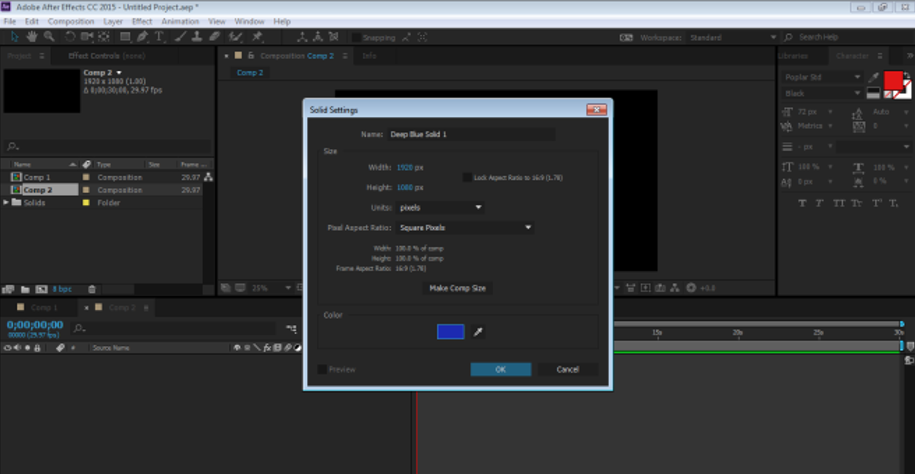
Step 2: Go to LAYER and create a new solid layer.
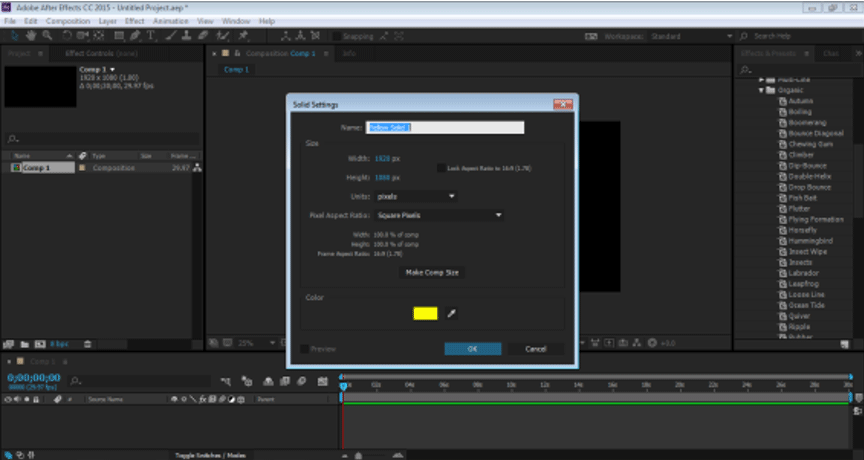
Step 3: Take a Layer with Yellow color background
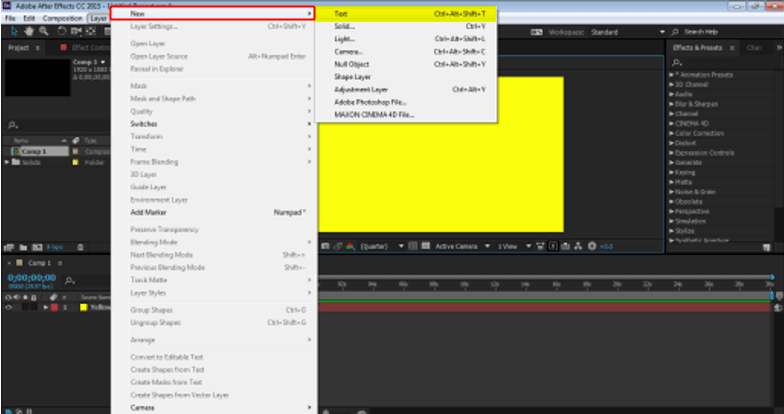
Step 4: Go to Layer and create a new Text Layer
Step 5: Now the layer which we have to create put some input lets take an example“ EDUCATION”
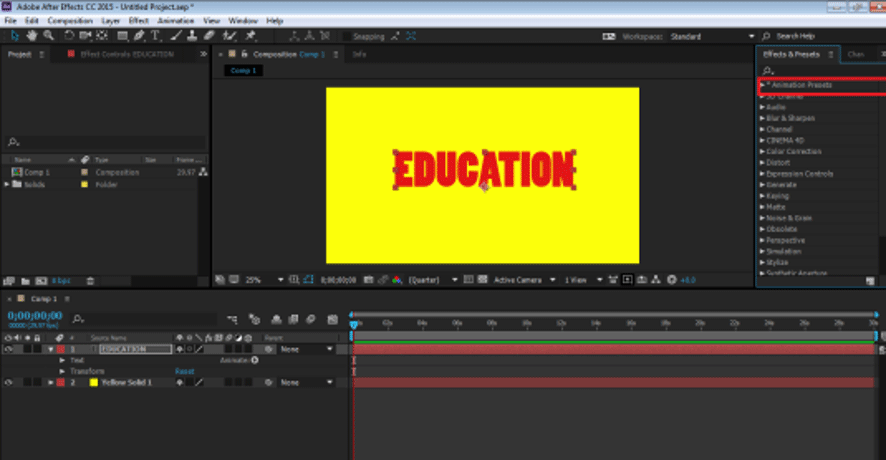
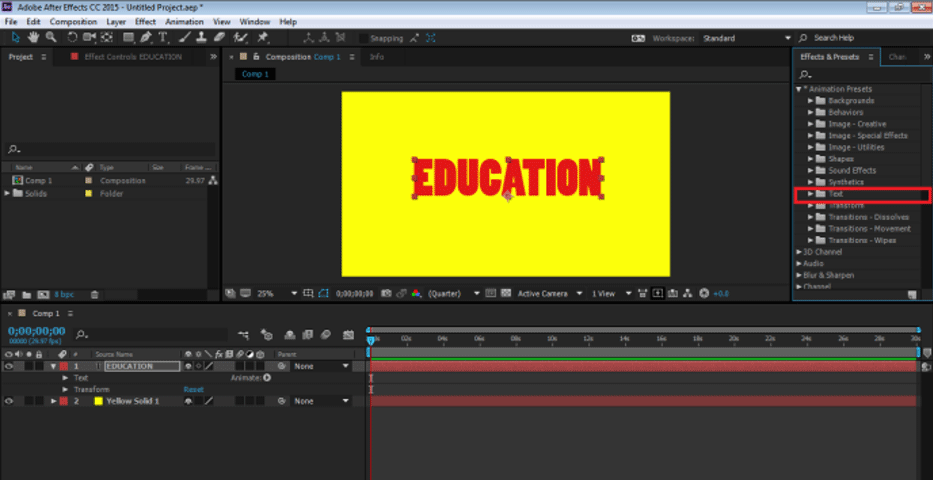
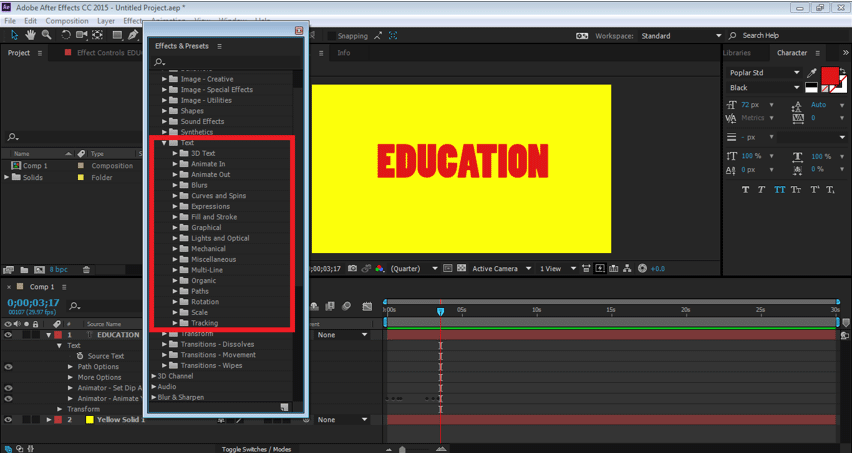
Step 6: Now, we put animation effects on the text and see how it works. Go to the effects and presets panel and select Animation Presets. Under Animation Presets, we have TEXT Option. We can add any Effect and preset on the text from this menu and see how the text animates.
Step 7: Now, click on TEXT and then click on ORGANIC.
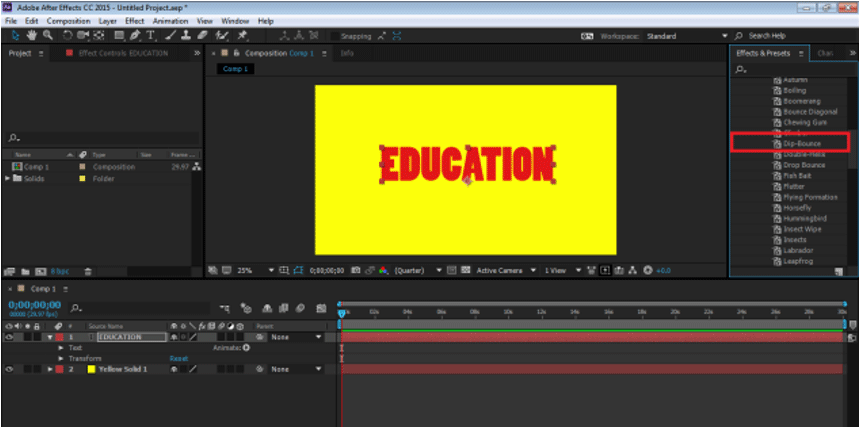
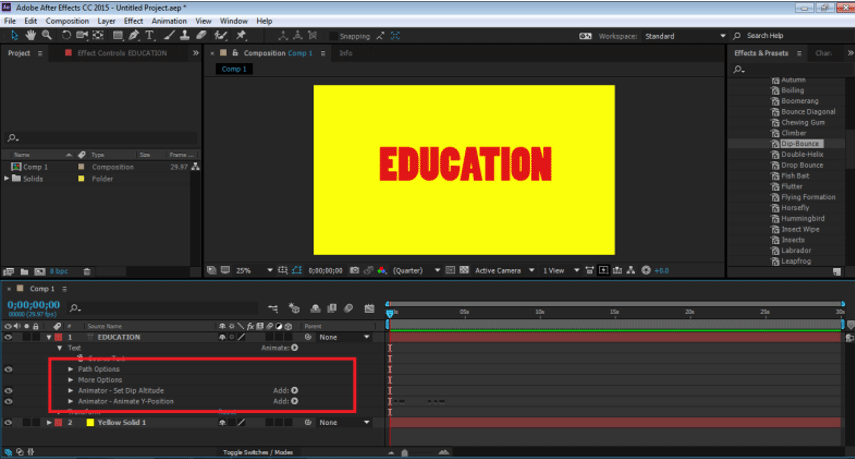
Step 8: After this, use the DIP- BOUNCE Effect on the Text. Drag and drop the effect on the Timeline.
Step 9: We can edit the effect as per our needs by clicking the drop-down menu of the effect ad modifying the animation, respectively.
Step 10: Similarly, there are numerous other effects present in the same panel which can be applied when required.
To preview the animation, press the spacebar, and you can see the animation of the text.
Using the Selectors from the animate option. Animation letter to letter
Step 1: Open a new project. Click on Composition ad create a new composition
Step 2: Go to Layers and create a new Solid layer with Background
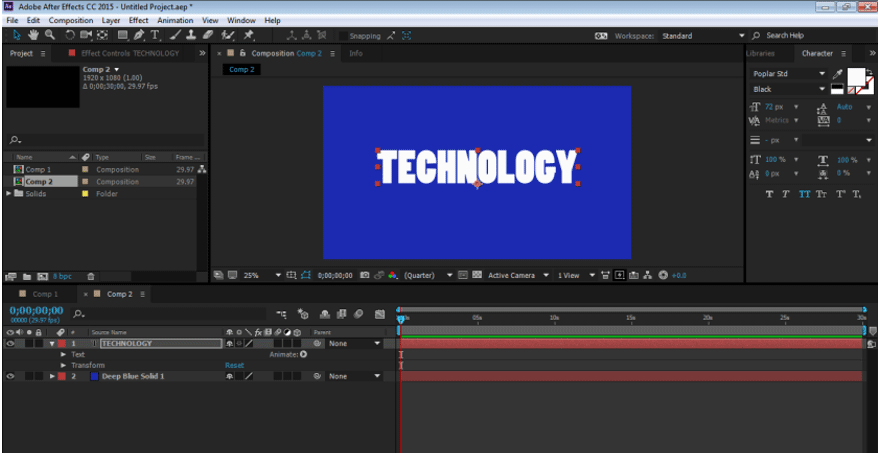
Step 3: Go to Layers and Create a new Text Layer “ TECHNOLOGY”
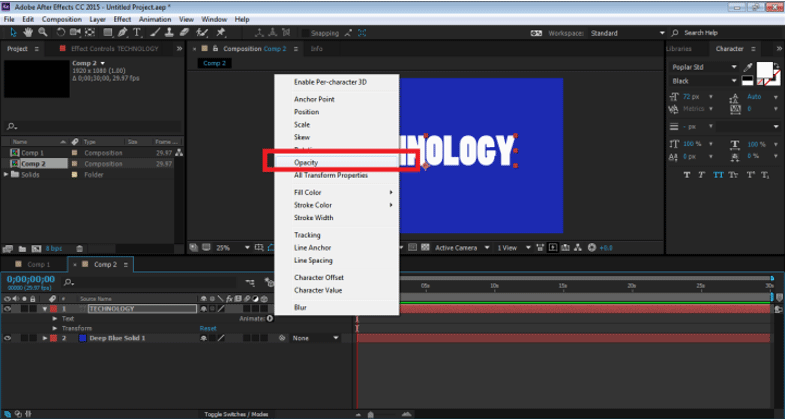
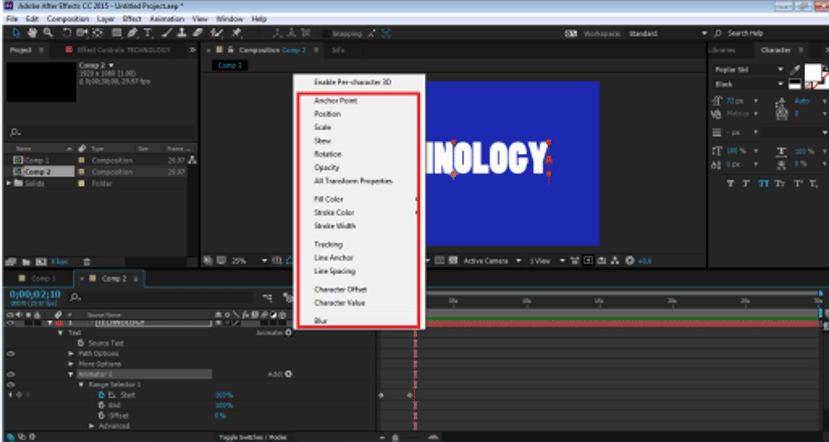
Step 4: On the Timeline Panel, click on the Animate option and go to the Opacity option
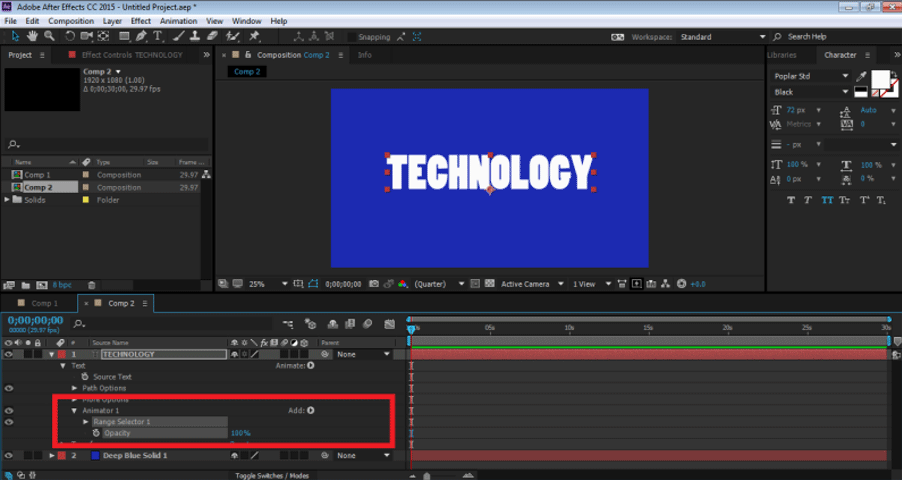
Step 5: As soon as we click on the Opacity option, an Animator 1 option is created with Range Selector and Opacity.
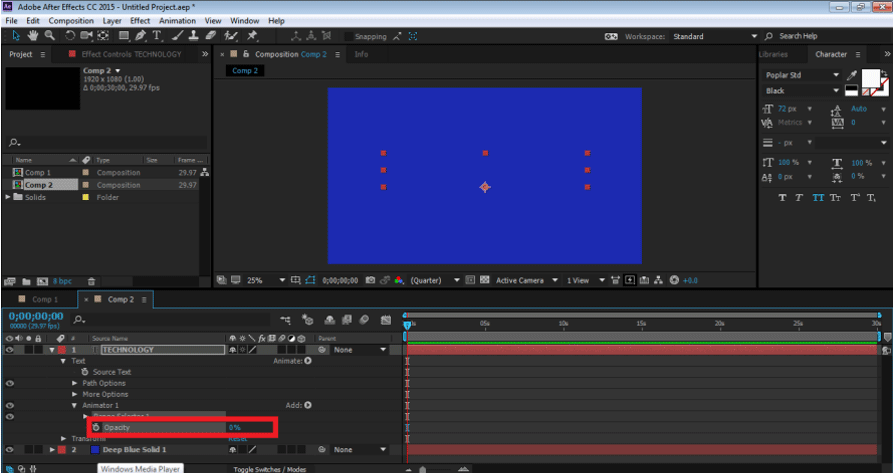
Step 6: This Range Selector is an option that helps the user to animate the text from the letter to the letter. We can select the opacity and animate each letter itself. Now, to animate the TEXT, click on Opacity and bring it down to 0 %
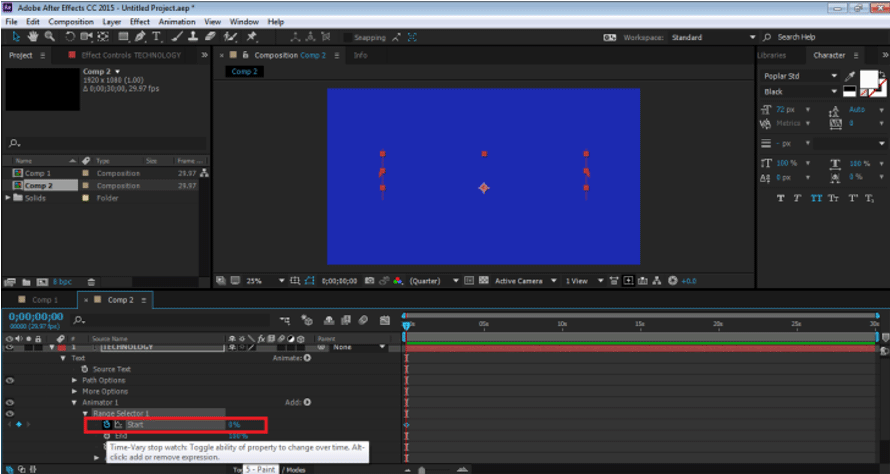
Step 7: After this, click on Range Selector1 ——-Start option. To animate the text using the Opacity Selector, click on the key button of the Start option. Now, bring down the percentage of the Start option to 0 %. This will add a key to the start of the TEXT.
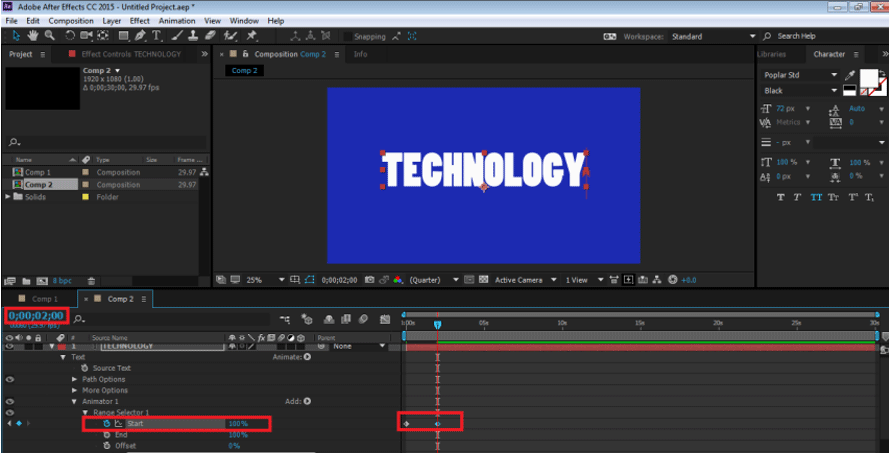
Step 8: Now, In the Timeline, after 2 seconds, increases the percentage of the same to 100%, as shown in the figure.
Step 9: Now, to view the animation, press the spacebar, and you can see the same. We can add any Selector to the TEXT by using the ANIMATE Option from the timeline itself.
Reflection Effect
Step 1: Create a new Project
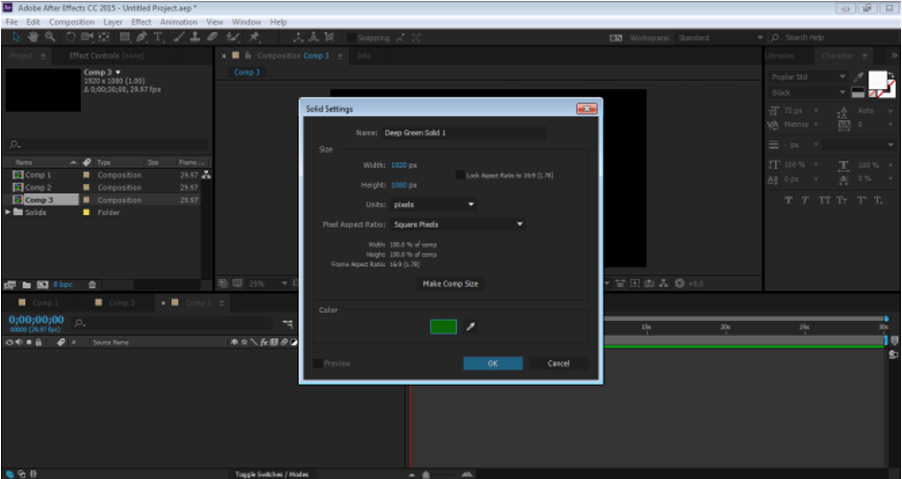
Step 2: Create a new Composition with Green Background
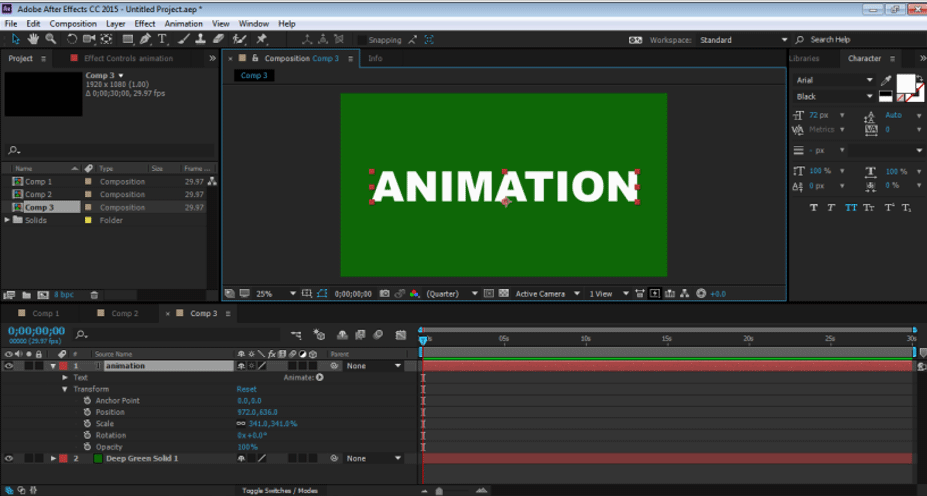
Step 3: Create a new Text layer, “ANIMATION”
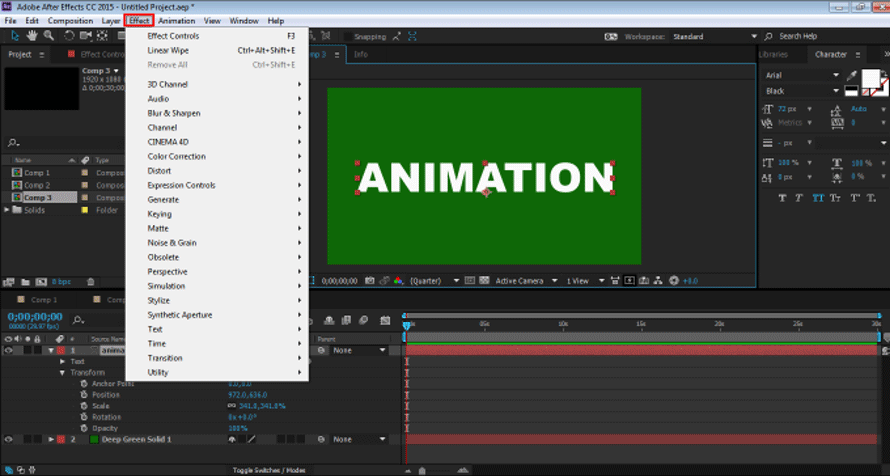
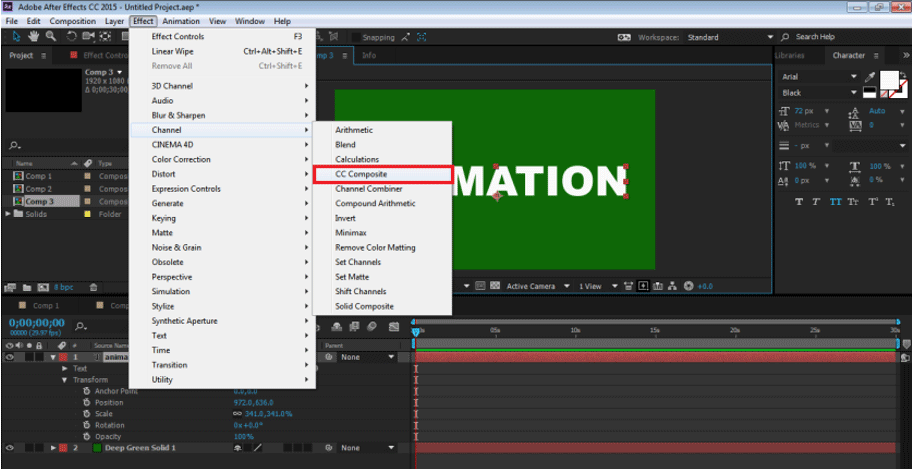
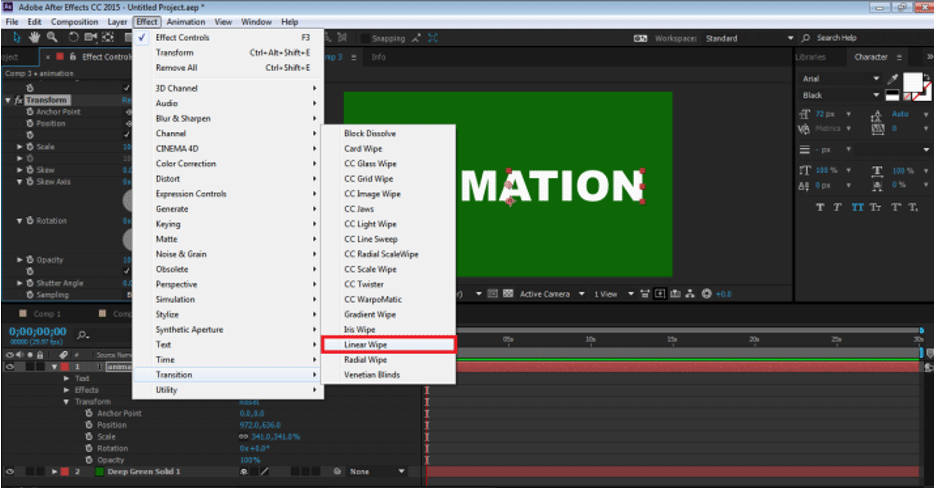
Step 4: Now, to create an Effect of Reflection, we need to add some Effects from the Effects menu.
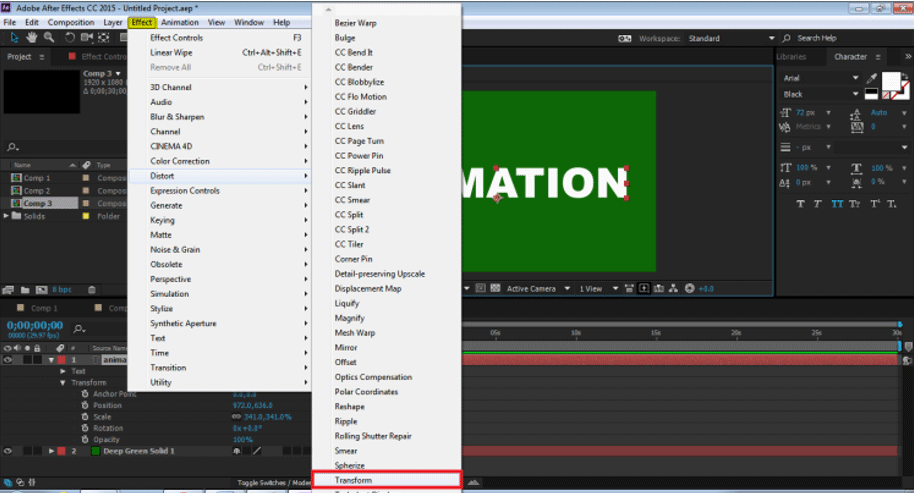
Step 5: Add Transform from the DISTROT Option.
Step 6: Add CC Composite from the CHANNEL Option.
Step 7: Add LINEAR WIPE from the TRANSITION Option.
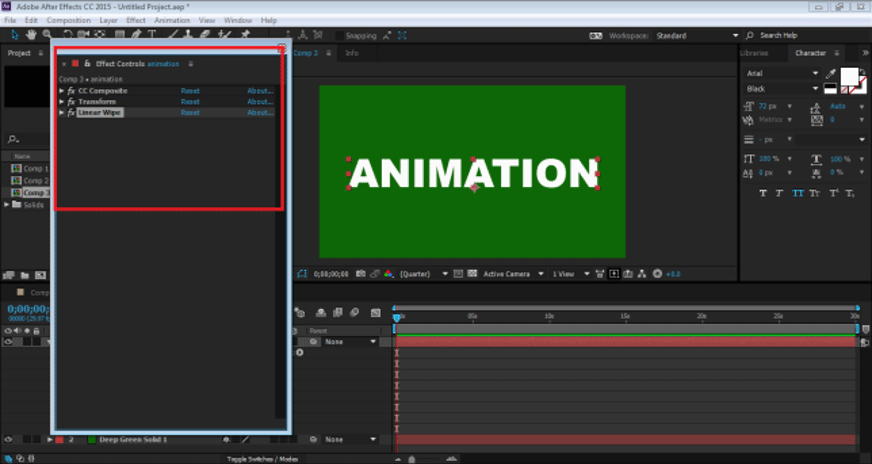
Step 8: Now, we have all three Effects on the Panel.
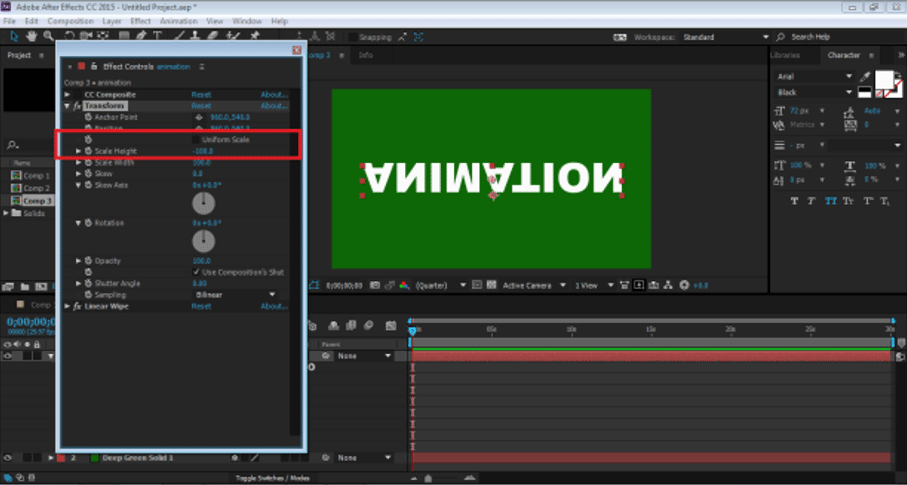
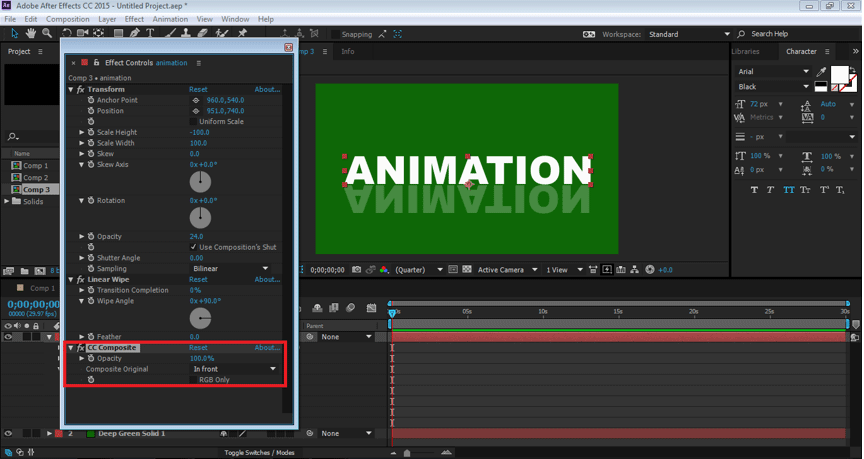
Step 9: We will edit all of them one by one. First, Go to Transform, and uncheck the UNIFORM SCALE and put Height to -100.
Step 10: Next, go to CC Composite, and uncheck RGB ONLY. This will create a copy of the TEXT.
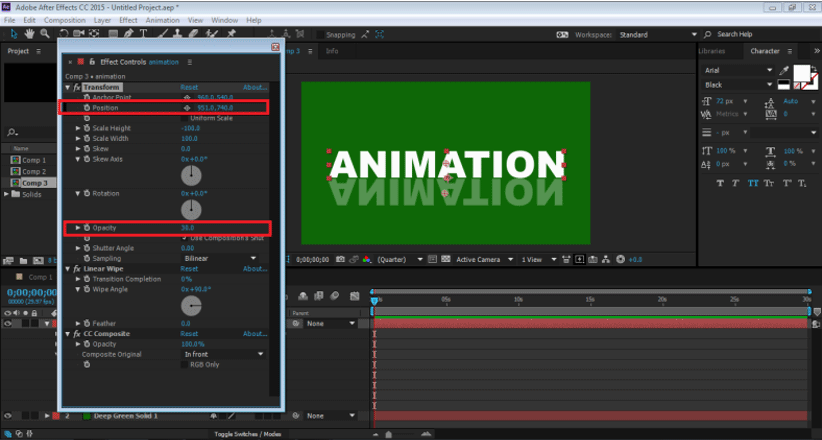
Step 11: Adjust the TEXT using the Position Option, and bring down the opacity to 30 %
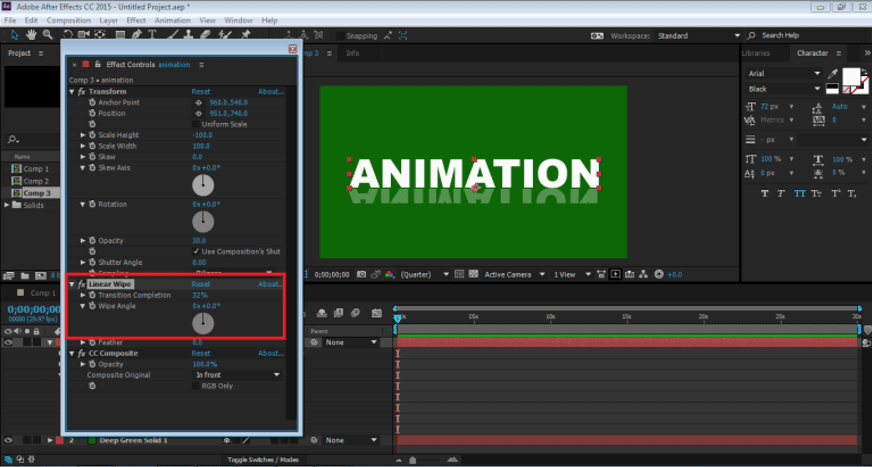
Step 12: Now, go to the LINEAR WIPE OPTION. Put Wipe Angle to 0 degrees and Adjust the Transition Completion as shown in the figure.
Step 13: This is a manually created Reflection Effect. This effect is created on a single layer, and even if the font is changed, the effect remains unchanged. We can also use this effect as a preset.
Conclusion
These are some of the ways a text can be animated, and effects can be added to the same after Effects has other numerous ways to add effects and animation to the object. The program also has a lot of tutorials and practice materials present on the web for learning different techniques and skills of the software. Although, After Effects is a useful and vast program, sometimes it may seem confusing and tricky to beginners. Learning After Effects will definitely help the users in their career paths and future prospectus.
Recommended Articles
This has been a guide to Text Effects in After Effects. Here we discuss the basic concepts and types of effects that are present in the After Effects. You can also go through our other suggested articles to learn more –
