Introduction to TypeScript pick
TypeScript, a superset of JavaScript, seamlessly integrates static typing, enhancing code organization, error detection, and maintainability. It empowers developers to craft safer, more predictable code while preserving JavaScript’s flexibility. Through meticulous type-checking, TypeScript identifies and mitigates potential pitfalls like typos and coercions, ensuring robustness. The Pick utility further enriches TypeScript, enabling developers to create tailored types by selecting specific properties from existing ones. This versatile tool offers unparalleled control, allowing for precise type sculpting and refining of data structures, APIs, or complex systems. With TypeScript’s Pick utility, developers can bid farewell to unwieldy types, embracing lean, focused solutions that deliver maximum impact.

Table of Contents
Syntax
type PickedType = Pick<OriginalType, 'Key1' | 'Key2' | ...>;- PickedType: The new type that will only include the selected properties.
- OriginalType: The original type from which you want to pick properties.
- ‘Key1’ | ‘Key2’ | …: A union of string literal types representing the keys to be picked from the original type.
- The | operator is used to create a union type, representing the set of keys that should be picked.
Working of pick in TypeScript with Examples
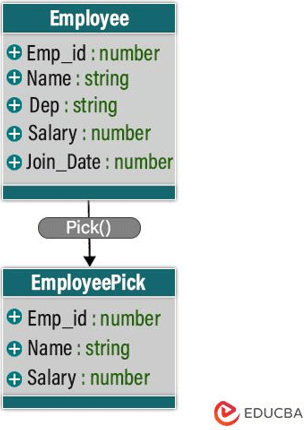
- We start by defining an original type that contains a set of properties:
interface Employee {
    Emp_ID: number;
    Name: string;
    Dep: string;
    Salary: number;
    Join_Date: number;
}- We can now create the pick type:
type SelectedProperties = Pick<Employee, 'Emp_ID' | 'Name' | 'Salary'>;In the above line of code, a new type will only include the ‘name’ and ‘age’ properties from Employee.
Then, the resulting type SelectedProperties will look like this.
type SelectedProperties = {
    Emp_ID: string;
    Name: string;
    Salary: number;
};- We can now use the new type in our code:
const person: SelectedProperties = {
    Emp_ID: 007,
    Name: James,
    Salary: 30000,
};
Here, a person is required to have only the ‘Emp_ID’, ‘Name’, and ‘Salary’ properties, matching the constraints of the SelectedProperties type.
Let’s now take a look at some more examples
Example 1: Courses
Code:
interface CourseInfo {
    course: string;
    courseprice: number;
  }

  interface EDUCBA {
    course1: CourseInfo;
    course2: CourseInfo;
    course3: CourseInfo;
    course4: CourseInfo;
  }

  function showType(args: Pick<EDUCBA, "course1" | "course2" | "course3" | "course4">) {
    console.log(args);
  }

  showType({
    course1: {
      course: "Finance",
      courseprice: 26500,
    },
    course2: {
      course: "Excel",
      courseprice: 25500,
    },
    course3: {
      course: "React Native",
      courseprice: 24500,
    },
    course4: {
      course: "TypeScript",
      courseprice: 22500,
    },
  });
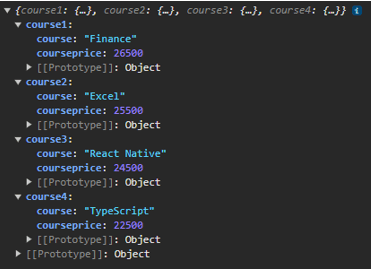
Output:
Explanation:
- The CourseInfo interface defines the properties for each course: course and course price.
- The EDUCBA interface defines CourseInfo for each course (e.g., course1, course2).
- showType is a function that takes an argument of type Pick<EDUCBA, “course1” | “course2” | “course3” | “course4”>. This means it accepts an object with only the specified courses (course1, course2, course3, course4).
- Lastly, the showType function is called with an object containing information about four courses. Each course is represented as an object with properties course, courseprice.
Example 2: Course Price
Code:
interface EnrollmentInfo {
    PersonName: string;
    CourseName: string;
    EnrollmentID: number;
    PricePaid: number;
  }

  interface Enrolled {
    enrollment1: EnrollmentInfo;
    enrollment2: EnrollmentInfo;
    enrollment3: EnrollmentInfo;
    enrollment4: EnrollmentInfo;
  }

  function showType(args: Pick<Enrolled, "enrollment1" | "enrollment2" | "enrollment3" | "enrollment4">) {
    console.log(args);
  }

  showType({
    enrollment1: {
      PersonName: "Alice Smith",
      CourseName: "Finance",
      EnrollmentID: 220987,
      PricePaid: 25000,
    },
    enrollment2: {
      PersonName: "Bob Johnson",
      CourseName: "Machine Learning",
      EnrollmentID: 231780,
      PricePaid: 24000,
    },
    enrollment3: {
      PersonName: "Charlie Brown",
      CourseName: "Economics",
      EnrollmentID: 282213,
      PricePaid: 23000,
    },
    enrollment4: {
      PersonName: "Diana Miller",
      CourseName: "Market Research",
      EnrollmentID: 214002,
      PricePaid: 22000,
    },
  });
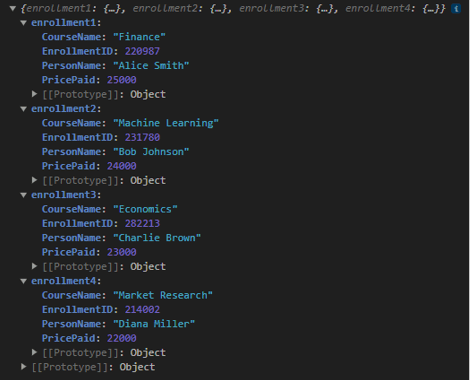
Output:
Example 3: Marks
Code:
interface ExamResult {
    Name: string;
    MarksScored: number;
    Subject: string;
  }

  interface Individual {
    result1: ExamResult;
    result2: ExamResult;
    result3: ExamResult;
  }

  function showType(args: Pick<Individual, "result1" | "result2" | "result3">) {
    console.log(args);
  }

  showType({
    result1: {
      Name: "Alice",
      MarksScored: 85,
      Subject: "Mathematics",
    },
    result2: {
      Name: "Bob",
      MarksScored: 92,
      Subject: "Physics",
    },
    result3: {
      Name: "Charlie",
      MarksScored: 88,
      Subject: "Chemistry",
    },
  });
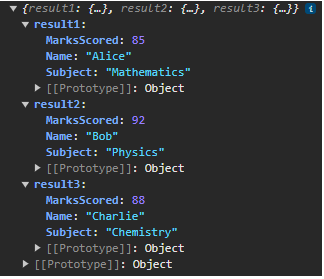
Output:
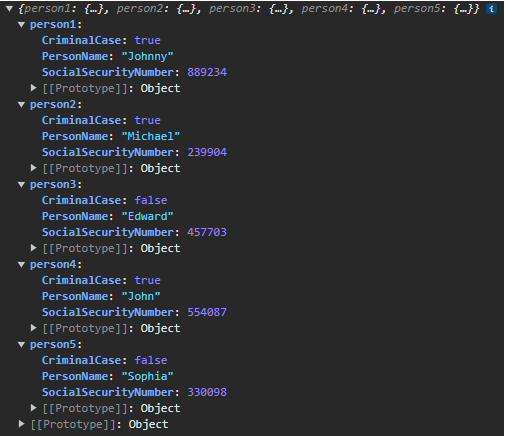
Example 4: Person Information
Code:
interface PersonInfo {
    SocialSecurityNumber: number;
    PersonName: string;
    CriminalCase: boolean;
  }

  interface Information {
    person1: PersonInfo;
    person2: PersonInfo;
    person3: PersonInfo;
    person4: PersonInfo;
    person5: PersonInfo;
  }

  function showType(args: Pick<Information, "person1" | "person2" | "person3" | "person4" | "person5">) {
    console.log(args);
  }

  showType({
    person1: {
      PersonName: "Johnny",
      SocialSecurityNumber: 889234,
      CriminalCase: true,
    },
    person2: {
      PersonName: "Michael",
      SocialSecurityNumber: 239904,
      CriminalCase: true,
    },
    person3: {
      PersonName: "Edward",
      SocialSecurityNumber: 457703,
      CriminalCase: false,
    },
    person4: {
      PersonName: "John",
      SocialSecurityNumber: 554087,
      CriminalCase: true,
    },
    person5: {
      PersonName: "Sophia",
      SocialSecurityNumber: 330098,
      CriminalCase: false,
    },
  });
Output:
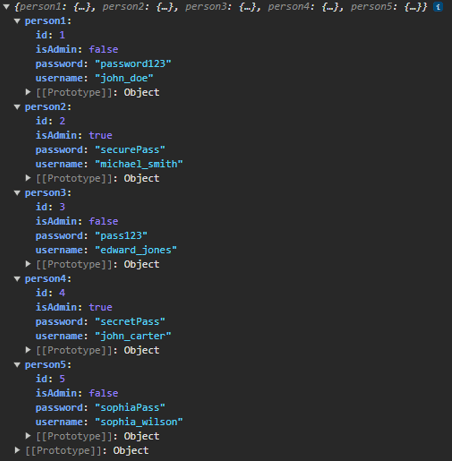
Example 5: Authentication Service
Code:
interface PersonInfo {
    id: number;
    username: string;
    password: string;
    firstName: string;
    lastName: string;
    isAdmin: boolean;
    Address: string;
  }

  interface AuthenticationInfo {
    person1: Pick<PersonInfo, "id" | "username">;
    person2: Pick<PersonInfo, "id" | "username">;
    person3: Pick<PersonInfo, "id" | "username">;
    person4: Pick<PersonInfo, "id" | "username">;
    person5: Pick<PersonInfo, "id" | "username">;
  }

  function authenticateUsers(authInfo: AuthenticationInfo) {
    console.log(authInfo);
  }

  authenticateUsers({
    person1: { id: 1, username: "john_doe", password: "password123", isAdmin: false },
    person2: { id: 2, username: "michael_smith", password: "securePass", isAdmin: true },
    person3: { id: 3, username: "edward_jones", password: "pass123", isAdmin: false },
    person4: { id: 4, username: "john_carter", password: "secretPass", isAdmin: true },
    person5: { id: 5, username: "sophia_wilson", password: "sophiaPass", isAdmin: false },
});Output:
Object type transformation
Object type transformation in TypeScript refers to the process of generating a type of object from another type, often with the goal of meeting specific requirements or constraints. TypeScript provides various mechanisms and utility types to perform these transformations. TypeScript developers can achieve object type transformation using various mechanisms, such as utility types (Pick, Partial), mapped types, and custom functions.
1. Partial VS Pick in TypeScript
The Partial utility type in TypeScript is used to make all properties of a given type optional. It allows you to create a new type with the same properties as the original type but with each property marked as optional.
Meanwhile, the Pick utility type is used to create a new type by selecting only specific properties from an existing type. It lets you specify a subset of properties you want to include in the new type.
Example of Partial:
interface Example {
    name: string;
    age: number;
    address: string;
}

const partialExample: Partial = { name: 'John' };
// Resulting type: { name?: string; age?: number; address?: string; }
2. Omit utility type in TypeScript
The Omit utility type in TypeScript creates a new type by excluding specific properties from an existing type. It is the counterpart to the Pick type, where Pick is used to select properties, and Omit is used to exclude them. This can be particularly useful when you want to define a type similar to an existing one but without specific properties.
Example for Omit:
interface UserProfile {
    id: number;
    username: string;
    email: string;
    password: string;
}

// Create a public profile type without the 'password' property
type PublicProfile = Omit<UserProfile, 'password'>;
The real-world use cases for Pick
1. Data Filtering for API Responses: When fetching data from an API, you might receive more information than you need. Pick helps filter the relevant data.
Example:
interface ApiProduct {
    id: number;
    name: string;
    description: string;
    price: number;
    category: string;
    manufacturer: string;
    stockQuantity: number;
    imageUrl: string;
    // ... other properties
  }

  // Selecting only necessary properties for display
  type DisplayProduct = Pick<ApiProduct, 'id' | 'name' | 'price'>;
2. Database Operations: In a database scenario, when working with entities, you might need to select or update specific fields.
Example:
interface DatabaseRecord {
    id: number;
    firstName: string;
    lastName: string;
    age: number;
    PhoneNumber: number;
    Email: string;
    DOB: number;
    Address: string;
    // ... other properties
  }

  // Selecting only necessary fields for a query
  type QueryFields = Pick<DatabaseRecord, 'id' | 'firstName'>;

  // Updating only specific fields in a record
  type UpdateFields = Pick<DatabaseRecord, 'firstName' | 'age'>;
Benefits of using TypeScript Pick
- Code Maintainability: By using Pick, you can create types that represent specific views or subsets of data. This can enhance code maintainability by making your types more explicit and focused on the particular use case.
- Readability: Pick can improve your code’s readability by clearly indicating which properties are relevant in a given context. This can make the code more understandable for other developers.
- Enhanced Type Safety: TypeScript introduces static typing, allowing developers to catch potential type-related errors during development rather than at runtime.
- Optimized Performance (for large objects): When dealing with large objects, selecting only the necessary properties can improve performance, particularly in operations such as network requests and database queries. You can achieve faster response times and reduced resource usage by sending or retrieving only what is required.
Conclusion
The TypeScript’s “Pick” utility is about properties you need to use Extract. Developers seeking a more precise and controlled way to define types in their applications find it a valuable tool. By allowing the creation of new types with selected properties from existing types, Pick enhances code clarity, promotes better collaboration, and contributes to the overall robustness of TypeScript projects.
Frequently Asked Questions (FAQ’s)
Q1. Can I use Pick with multiple types?
Answer: Yes, you can use Pick with multiple types. If you need to create a new type by picking properties from several existing types, you can use union types or intersection types to combine them before applying Pick.
Q2. Does Pick modify the original type?
Answer: No, Pick doesn’t modify the original type. It creates a new type that includes only the selected properties, leaving the original type unchanged.
Q3. What happens if I include a non-existent property in Pick?
Answer: If you try to include a property that does not exist in the original type, TypeScript will raise a compilation error.
Q4. Does Pick work with array elements?
Answer: No, Pick is designed for working with object types, not arrays. If you need to manipulate array elements, you would typically map over the array and apply Pick to each element individually.
Recommended Articles
We hope this EDUCBA information on “TypeScript Pick” benefited you. You can view EDUCBA’s recommended articles for more information:
