Introduction to Ubuntu in IP
The IP command in Ubuntu is a powerful and versatile tool used for network management and configuration. It replaces the older ifconfig command, offering more advanced features and greater control over network interfaces, routes, and tunnels. The ip command is part of the iproute2 package, which includes various utilities for network configuration. Understanding the IP command is essential for system administrators and users who must manage network settings, troubleshoot connectivity issues, and automate network-related tasks.
Table of Contents
Installation
- Most modern Ubuntu distributions come with the ip command pre-installed as part of the iproute2 package. To verify its presence, you can open a terminal and type:
“ip -V”
- If the command is installed, it will display the version information. If not, you will receive an error indicating the command has not been found.
Installing iproute2 Package
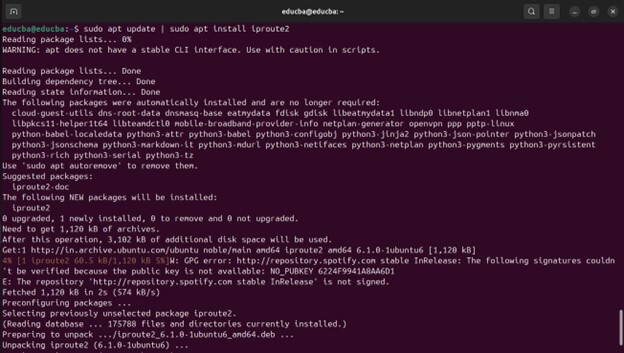
- If the ip command is not installed, you can install the iproute2 package. Use the following command to install the package:
“sudo apt update | sudo apt install iproute2”
Common Operations
Displaying Network Interfaces
To list all network interfaces on your system, you can use the below command:
“ip link show”
- lo: The loopback interface is used for internal communication within the host.
- enp2s0: A typical Ethernet interface shows details such as its status (UP), MTU, and MAC address.
You can specify the interface name with the ip addr command to get more detailed information about a specific network interface. For example, to display detailed information about the eth0 interface, you would use:
“ip addr show dev eth0”
- inet 192.168.1.122/24: The IPv4 address assigned to the interface.
- inet6 fe80::1e1b:dff:fed5:b444/64: The IPv6 link-local address.
- state UP: Indicates that the interface is active.
Configuring Network Interfaces
Assigning IP addresses
- To configure IP address for a network interface, you use the ip addr add This command allows you to assign a new IP address and associated subnet mask to a specified network interface. Below is an example:
“sudo ip addr add 192.168.1.10/24 dev enp2s0”
- You can assign multiple IP addresses to the single interface if needed:
Removing IP Addresses
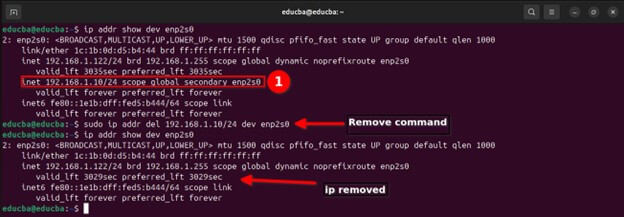
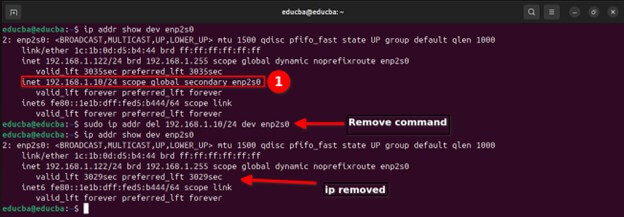
- If you need to remove an IP address from the network interface, you can use the ip addr del You need to specify the IP address and the interface from which you should remove it. Here’s an example:
“sudo ip addr del 192.168.1.10/24 dev enp2s0”
Changing MTU (Maximum Transmission Unit)
The MTU (Maximum Transmission Unit) defines the largest size of packets that we can transmit over a network interface. Adjusting the MTU size can be necessary for optimizing network performance or resolving connectivity issues.
- Change the MTU size for a network interface. You use the ip link set command. For example, to set the MTU of the eth0 interface to 1400 bytes, you would use:
“sudo ip link set dev enp2s0 mtu 1400”
Managing Routes
Displaying Routing Table
- The routing table is a set of rules determining where data packets traveling over an IP network will be directed. To view the current routing table, you can use the ip route show command:
“ip route show”
- Default via 192.168.1.1 dev enp2s0: This indicates the default gateway used if no other route matches the destination IP.
- 168.1.0/24 dev enp2s0: This route directs packets destined for the 192.168.1.0/24 network through the enp2s0 interface.
Adding a Route
You use the IP route add command to add a new route to the routing table. This command is helpful in defining custom routes that are not covered by the default route or other existing routes.
“sudo ip route add 10.1.1.0/24 via 192.168.1.1 dev enp2s0”
- You can also add a default route if one does not already exist:
“sudo ip route add default via 192.168.1.1 dev enp2s0”
Deleting a Route
If you need to remove a route from the routing table, you use the ip route del command. It can be necessary when reconfiguring network settings or troubleshooting connectivity issues.
“sudo ip route del 10.1.1.0/24”
- Similarly, to delete a default route, you could use:
“sudo ip route del default”
Managing Links
Bringing interfaces up and down
Managing the state of network interfaces is a crucial task for network administration. You may need to bring interfaces up or down for various reasons, such as configuring network settings, troubleshooting issues, or performing maintenance.
- To bring an interface up, use the IP link set command, then the interface name and the up keyword. For example, to bring the eth0 interface up, you would use:
“sudo ip link set dev enp2s0 up”
- Conversely, you use the same command with the down keyword to bring an interface down. For example, to bring the eth0 interface down, you would use:
“sudo ip link set dev enp2s0 down”
Changing interface states
You may need to change other interface states, such as enabling or disabling promiscuous mode, often used for network monitoring and packet capturing.
- To enable promiscuous mode on the eth0 interface, use the following command:
“sudo ip link set dev enp2s0 promisc on”
- To disable promiscuous mode, use:
“sudo ip link set dev enp2s0 promisc off”
Advanced Operations
VLAN Configuration
Virtual LANs (VLANs) segment network traffic for improved security and efficiency. They allow you to create isolated network segments within a physical network. The IP command allows you to create and manage VLAN interfaces effectively.
Creating VLAN interfaces
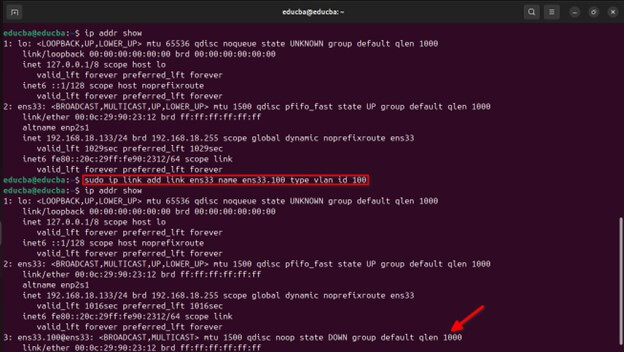
- To create a VLAN interface, use the ip link add command followed by the appropriate parameters. The syntax generally specifies the parent interface (the physical interface) and the VLAN ID.
“sudo ip link add link ens33 name ens33.100 type vlan id 100”
- name ens33.100: Names the new VLAN interface 100.
- type vlan id 100: Specifies that this is a VLAN interface with ID 100.
After creating the VLAN interface, you need to bring it up to make it operational:
“sudo ip link set dev ens33.100 up”
You can assign IP address to the VLAN interface as you would with any other interface
“sudo ip addr add 192.168.100.1/24 dev ens33.100”
Deleting VLAN interfaces
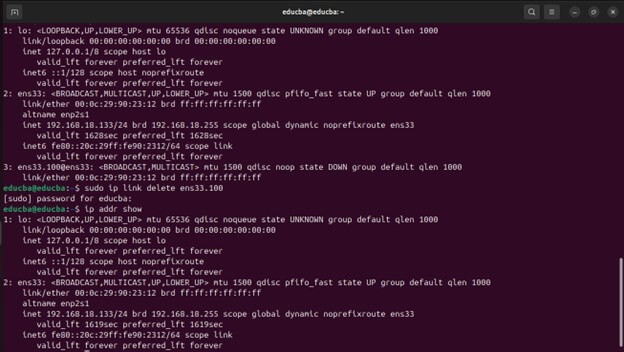
To remove a VLAN interface, use the ip link delete command followed by its name.
“sudo ip link delete ens33.100”
Network Namespace
These are a feature of the Linux kernel that allows you to create separate network stacks, each with its interfaces, routing tables, and firewall rules. This isolation is sound for containers, virtualized environments, and security applications.
Creating network namespaces
- Create a network namespace, and use the ip netns add command followed by the name of the namespace. For example, to create a namespace called ns1, you would use:
“sudo ip netns add ns1”
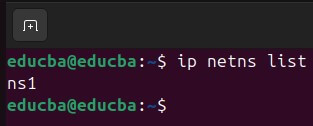
- You can verify its creation by listing all namespaces:
“ip netns list”
Assigning interfaces to namespaces
Once you have created a network namespace, you can assign network interfaces. Typically, you use virtual Ethernet (veth) pairs to connect the namespace to the main network namespace or other namespaces.
- Create a veth Pair:
“sudo ip link add veth0 type veth peer name veth1”
- This command creates a pair of connected virtual Ethernet devices: veth0 and veth1.
- Move One End of the veth Pair to the Namespace:
“sudo ip link set veth1 netns ns1”
Configure the Interfaces
- In the default namespace:
“sudo ip addr add 192.168.1.1/24 dev veth0”
“sudo ip link set veth0 up”
- In the ns1 namespace:
“sudo ip netns exec ns1 ip addr add 192.168.1.2/24 dev veth1”
“sudo ip netns exec ns1 ip link set veth1 up”
“sudo ip netns exec ns1 ip link set lo up”
Verify the Configuration:
- In the default namespace:
“ip addr show veth0”
- In the ns1 namespace:
“sudo ip netns exec ns1 ip addr show veth1”
- These commands display the configuration of the veth0 and veth1
Deleting namespaces
- To delete a network namespace, use the ip netns delete command followed by the name of the namespace. For example, to delete the ns1 namespace, you would use:
“sudo ip netns delete ns1”
Troubleshooting Common issues and solutions
- Network Interface Not Found:
- Ensure the interface name is correct and the system detects the network card.
- Use ip link show to list all interfaces.
- Permission Denied:
- Most ip commands require root privileges. Use sudo before commands.
- Network Namespace Not Created:
- Verify the namespace creation with ip netns list.
- Check for any typos or incorrect commands in your script.
- Interfaces Not Communicating:
- Ensure interfaces are up with ip link set dev <interface> up.
- Check IP addresses and netmask configurations.
Diagnostic Commands and Tools
- Check Interface Status:
- ip link show
- ethtool <interface>
- Display IP Addresses:
- ip addr show
- Show Routing Table:
- ip route show
- Test Connectivity:
- ping <destination>
- traceroute <destination>
- Analyze Traffic:
- tcpdump -i <interface>
- Verify Network Namespace:
- ip netns exec <namespace> <command>
Conclusion
The IP command in Ubuntu provides powerful tools for managing and configuring network interfaces, routes, and namespaces. Mastering its use allows for efficient network administration, including VLAN creation, interface bonding, and network namespace management. Automation through scripting ensures consistency and saves time, while troubleshooting tools help diagnose and resolve network issues effectively. By leveraging these capabilities, administrators can maintain robust and flexible network environments.
Frequently Asked Questions (FAQs)
Q1. What is the difference between ip and ifconfig?
Answer: ifconfig is an older command used for network configuration. While it may still function on some Ubuntu systems, it’s considered deprecated and lacks the features and functionality of IP. IP is the recommended and more powerful command for network management in Ubuntu. It offers various functionalities, including managing routes, VLANs, and bonding interfaces.
Q2. How can I assign a static IP address to an interface?
Answer: Use the following command structure, replacing placeholders with your desired configuration:
ip addr add <IP address>/<subnet mask> dev <interface name>
Q3. Security Considerations when using IP?
Answer: Modifying network configuration directly: The IP command grants robust control over network interfaces. Use caution when making changes, as misconfigurations can disrupt network connectivity or introduce security vulnerabilities.
Q4. What are some alternatives to IP for basic network configuration?
Answer: Graphical tools: Ubuntu offers graphical tools like the Network Manager for basic network configuration tasks like setting up static IP addresses or connecting to Wi-Fi networks. These tools provide user-friendly interfaces and are suitable for non-technical users.

