Updated March 28, 2023

Introduction to Vue.js v-model
V-model in vue.js is defined to make a two-way binding process to speed up the development of web application by bundled with Vue.js. This v-model directive helps to bind a value to the component data also triggers the event whenever a user presses a key or paste option. By this DOM is modified without making a DOM work explicitly and helps to bind data to form fields as well. Using this v-model under custom components helps to control consolidated data updating.
Syntax:
v-model could be given as with the HTML elements like:
<input v-model =" yahoo">To translate it uses:
<input: value="yahoo" @input=" x => yahoo = x. target. Value" />How does v-model work in Vue.js?
The v-model directive can pick up the changes and store this changed value in the data properties of the components. v-model has full control over the value when it is emitted back to the parent. They are formally added up with the user input to handle the user inputs. And so, therefore, the job of the component acts hereby storing the same value the user entered.
v-model comes with modifiers options too namely .trim, .number, and .lazy.
1. trim
It is used to remove white space.
<template>
<input v-model.trim="place" placeholder="place"/>
</template>
2. number
It takes a number as a value in the input field.
<template>
<input v-model.number=" dob" placeholder="dob"/>
</template>
3. lazy
It helps in updating by default while keypress.
<template>
<input v-model.lazy="name" placeholder="name"/>
</template>
v-model Working Process
To go with the first approach is to create a local state in Vue like this.
Data ()
{
Return  {
Yahoo: ' '
}
}
The next step is to bind the input.
<input
type="yahoo"
:value="yahoo"
@input="action"
/>
Vue makes it simple for the above code to look like.
<input type ="yahoo" v-model ="yahoo"/>Examples of Vue.js v-model
Let’s see a few examples of Vue with the v-model directive. In all the below examples we have taken <input> element to show the text entry on the web page.
Example #1
Html Code:
<html>
<head>
<title>Hello </title>
<script src="https://cdn.jsdelivr.net/npm/vue/dist/vue.js"></script>
</head>
<body>
<div id="app">
<h2>Welcome</h2>
<div>
Greeting Message:
<input type="text" v-model="message"></input>
<p>The message is: {{ message }}</p>
</div>
</div>
<script src="index.js"></script>
</body>
</html>
Js Code:
import Vue from 'vue'
import App from './App.vue'
new Vue({
el: "#app",
data: {
message: "hi"
}
});
Explanation:
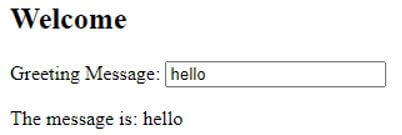
- In the above code, we have used the <p> tag to take the value of the text message.
- We have used the v-model directive to the <input> tag and binds the message and sends the signal to a .js file to set up a two-way binding with the property field message: “hello”. So, whatever we type it gets updated in the underlying data model and gets updated in the view.
Output:
Example #2
Html Code:
<script src="https://unpkg.com/vue"></script>
<template id="custom-select">
<span>
<select class="form-control" @change="change">
<option value="">Choose</option>
<option v-for="(option, index) in options"
:key="index" :value="option.code"
:selected="selectedOption(option)">
{{ option.name }}
</option>
</select>
</span>
</template>
<div id="app">
<div>
<span class="title">America</span>
<custom-select v-model="flight.America.country" :options="options">
</custom-select>
<br>
<span class="title">Europe</span>
<custom-select v-model="flight.Europe.country" :options="options">
</custom-select>
<br>
<br>
<span>
<b>Select American country:</b>
<p v-if="flight.America.country">
{{ flight.America.country.name }}
</p>
</span>
<br>
<span>
<b>Select European country:</b>
<p v-if="flight.Europe.country">
{{ flight.Europe.country.name }}
</p>
</span>
</div>
</div>
Js Code:
Vue.component('custom-select', {
props: ['options', 'value'],
template: '#custom-select',
data() {
return {
selected: null
}
},
methods: {
selectedOption(option) {
if (this.value) {
return option.code === this.value.code;
}
return false;
},
change(e) {
const selectedCode = e.target.value;
const option = this.options.find((option) => {
return selectedCode === option.code;
});
this.$emit("input", option);
}
}
})
new Vue({
el: '#app',
data() {
return {
flight: {
America: {
date: "01/03/2019",
country: {
name: "Florida",
code: "FL"
}
},
Europe: {
date: "06/05/2020",
country: {
name: "Norway",
code: "NE"
}
}
},
options: [{
name: "Florida",
code: "FL",
},
{
name: "Washington",
code: "US"
},
{
name: "Sweden",
code: "DE"
},
{
name: "India",
code: "IN"
}
]
}
}
})
CSS Code:
.title {
display: inline-block;
min-width: 90px;
padding: 4px 0;
}
Explanation:
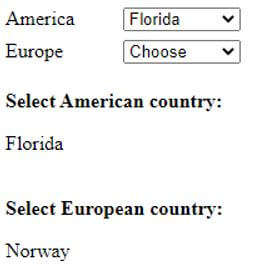
The above code uses a checkbox option to select the countries.
Output:
Example #3
User Input and Data binding – Text and Check box.
Html Code:
<div id="app">
<input type="text" v-model="educba"/>
<input type="checkbox" v-model="isTrue"/>
<p>The Content is {{educba}}</p>
</div>
Js Code:
const app= new Vue({
el: "#app",
data: {
educba : " ",
isTrue :true ,
resou: "Hello"
},
});
Explanation:
A checkbox in the HTML markup form allows the user to select options from a given set of dropped-down multiple options as the Input. With this v-model, it automatically chooses the method to update the items based on the given input type.
Output:
Example #4
User Input with Button – onclick.
Html Code:
<div id="app">
<input type="text" v-model="tutorial"/>
<p>The Content is {{tutorial}}</p>
<button v-on:click="value = false">
Reset
</button>
</div>
Js Code:
const app= new Vue({
el: "#app",
data: {
tutorial : " ",
resou: "Hello"
},
});
Explanation:
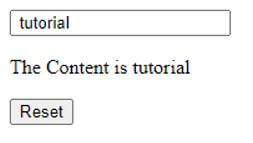
In the above code snippets when a user types the input in the text area, vue reflects the changes in the div element, and at the same time, we can update the value by submitting on Reset button.
Output:
Example #5
Using Drop-down.
Html Code:
<div id="description">
<h2>
Demo on V-model </h2>
<h1>{{value}}</h1>
<div>
<select v-model="value">
<option value="one">one</option>
<option value="two">Two</option>
<option value="three">three</option>
</select>
</div>
<button v-on:click="value = 'Two'">
Reset
</button>
</div>
Js Code:
const app= new Vue({
data: () => ({ value: false })
})
Output:
Example #6
Html Code:
<template>
<div class="slider" :class="{'slider--active': value}">
<input type="checkbox" class="slider-checkbox" :checked="value" @click="handleClick" />
</div>
</template>
<script>
export default {
name: "Slider",
props: {
value: {
type: Boolean,
required: true
}
},
methods: {
handleClick(event) {
this.$emit("input", event.target.checked);
}
}
}
</script>
<style lang="stylus">
.slider {
display: block;
position: relative;
min-height: 2rem;
margin: 0.5rem 0;
&:before,
&:after {
content: '';
border-radius: 3rem;
height: 1.6rem;
display: block;
position: absolute;
top: 0;
}
&:before {
transition: background-color 0.3s ease;
background-color: rgba(0, 0, 0, 0.25);
width: 2.5rem;
left: 0rem;
}
&:after {
background-color: white;
width: 1.8rem;
transition: 0.3s ease;
transform: scale(0.8) translateX(0);
}
}
.slider--active {
&:before {
background-color: green;
}
&:after {
transform: scale(0.8) translateX(1.5rem);
}
}
.slider-checkbox {
margin: 0;
position: absolute;
width: 2.6rem;
height: 1.6rem;
z-index: 1.5;
opacity: 0;
cursor: pointer;
}
</style>
Explanation:
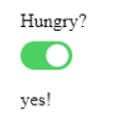
- The above code explains the style part of the Vue component. Here checkbox is our mark-up and their value is set to the name and simultaneously a listener handles the click method.
- We have created a Vue new component and setting their state to Boolean.
Output:
Conclusion
Finally, we have seen how to use v-model in Vue.js and their components and discovered how to manage data. We also saw the basics of two-way binding to build our app development.
Recommended Articles
This is a guide to the Vue.js v-model. Here we discuss the introduction, syntax, and working of the v-model in Vue.js along with different examples and code implementation. You may also have a look at the following articles to learn more –
