Updated June 9, 2023
Introduction to Webpack CSS Loader
Webpack css loader is the third-party package that the community members manage. CSS is the most important thing we need to configure in our webpack project. This is fundamental to all web apps; we can say that all web apps will need the webpack css loader. Configuration of webpack css loader is very tricky; if suppose we want css and css module in our web application, then the configuration is also tricky. A webpack css loader is a CSS file whose animation and class names will be locally scoped by default.
How to Configure Webpack CSS Loader?
- If our application grows fast, it will work difficult for a single CSS file. Increasing the size of the CSS file will become problematic. Trying a selector name to scroll up and down to find a single name in a big file is tedious.
- Webpack css loader goes from the url and imports lookups in the files, which will be treated as a regular import. Therefore, the Webpack css loader will skip external sources of import points for an external resource.
- The matched files are processed through the asset modules while using the field of type of definition of the loader.
- To configure the webpack css loader, we need to install the css loader by using the npm command. We are installing the dependencies by using the npm command as follows.
- In the above example, we can see that we have installed css-loader by using the npm command. Also, we have used –save-dev with the npm command to install the css-loader package, as shown in the above figure.
- After installing css loader now, we are adding the new function at the end of the definition of the part as follows. These files will end with the .css and invoke the specified loaders.
- Loaders will return the new source file by using applied transformation. This can be chained together using UNIX and evaluated from right to left.
- In the below example, we are adding the export.loadCSS in the webpack.parts.js file. We are also adding the rules and modules in webpack.parts.js files. In the example below, we can see that we have added css loader with css loader and the style-loader as follows.
Code:
exports.loadCSS = () => ({
module: {
rules: [
],
},
});
Output:
- After adding the function in the webpack.parts.js file, we also need to connect the fragment of the primary configuration as follows. Therefore, we connect to the initial fragment configuration using webpack.parts.js files.
Code:
const commonConfig = merge ([
...
parts.loadCSS (),
]);
Output:
Then we need to add the style.css files in our project into the src folder. Then finally, we need to add the body of the code to the file.
Code:
body {
color: green;
background-color: white;
}
Output:
This CSS file will create the background color as green. After making the background color in the next step, we import the style.css file. We are importing the file from the javascript file. By default, webpack will put the CSS inside the bundle, which means we need to reference it from the javascript file. We are importing this file into the index.js file.
Code:
import "./styles.css"Output:
The CSS loader will load the CSS from the CSS file and return the CSS with url and import. In the below example, we use the topbanner.svg from the css file. When the CSS loader sees the line, it will tell the webpack to load the file using the appropriate loader.
Code:
.topbanner {
background: url("topbanner.svg")
}
Output:
We also configure the style loader in our project by using webpack. This loader will add the CSS to the DOM so our style will be active and visible. Our project will need this because the CSS will put the bundle.js file; there was no specific file of styles.css to the style-loader.
Custom Webpack CSS Loader Setup
For configuring the setup of a custom webpack css loader to our application, we need to ensure that the next.js file is not already supporting our use case project.
We are using the following features in our project as follows:
- CSS custom modules
- CSS custom imports
- Saas custom imports
- Saas custom modules
To extend our webpack usage, we must define the function extending the config inside into the next.config.js.
We are using the below module in the config.js file as follows:
Code:
module.exports = {
webpack: (config, { dev, buildId, defaultLoaders, isServer, webpack }) => {
return config
},
}
Output:
- In the above example, we are executing the webpack function twice. We execute the same for the client one time, and the second time, we run the same for the server.
- This will allow us to distinguish between the server and client configuration using the isServer property.
- The second argument from the webpack function is an object shown in the following properties below.
- We are using build-id, which was used as a unique identifier between the two builds. Dev will indicate the compilation is done at a development level.
- The isServer value is true; it is used for server-side compilation. We are also using false for the client-side compilation.
- We are using default loaders for the next.js file.
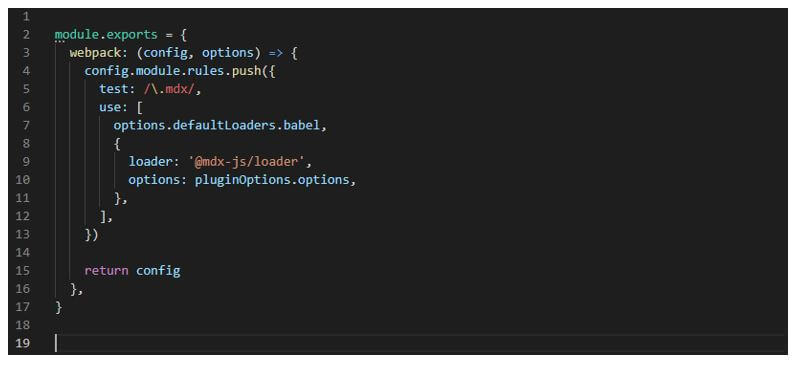
In the below example, we are loading the default loaders internally as follows:
Code:
module.exports = {
webpack : (config, options) => {
config.module.rules.push ( {
test : /\.mdx/,
use : [
options.defaultLoaders.babel,
{
Loader : '@mdx-js/loader',
options : pluginOptions.options,
}, ],
} )
return config
},
}
Output:
Conclusion
Webpack css loader goes from the url and imports lookups in the files, which will be treated as a regular import. Webpack css loader is the third-party package that the community members manage. CSS is the most important thing we need to configure in our webpack project.
Recommended Articles
We hope that this EDUCBA information on “Webpack CSS Loader” was beneficial to you. You can view EDUCBA’s recommended articles for more information.


