Updated February 18, 2023
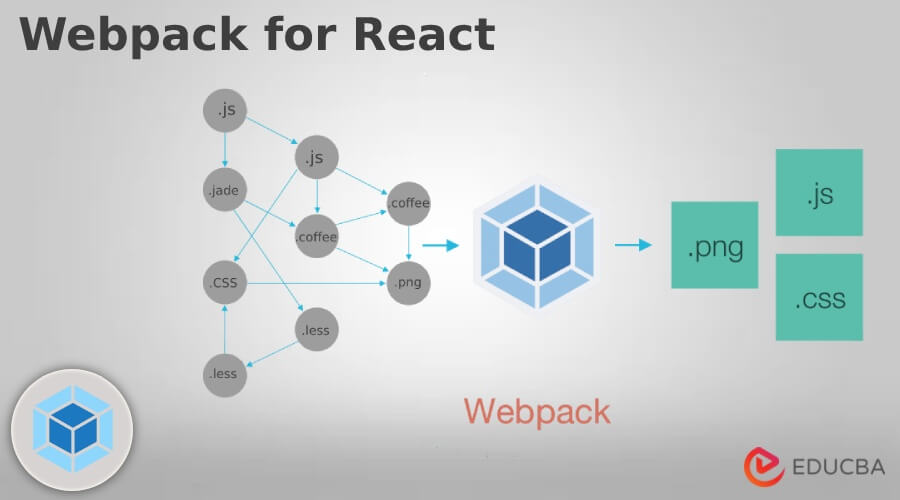
Introduction to Webpack for React
Webpack for React is a module bundling system on top of NodeJS and is a bundler for modernized JavaScript applications. The main purpose of Webpack for React is to bundle JS files for use in browsers. Webpack in React when processes application, internally, and a dependency graph is built from one or more than one entry point that combines each module that are the static assets to serve from.
Key Takeaways
- Even though creating a react application is common, it is important to note how webpack for React works behind the application as creating react application helps in the abstraction of the webpack process.
- The configuration of Webpack for React gives complete control of the development environment which is way much better than initializing react app that prevents custom configurations in a default way.
- Setting up Webpack for React is difficult at the initial stage, as webpack is a relatively open-ended ecosystem.
- The configuration properties follow a naming schema that makes it easier to follow as the user continues to develop a webpack for react.
- As a whole, it helps in getting complete control of each development aspect.
What is Webpack for React?
As we write code, there is a visible gap between JavaScript code and the code browsers execute and understand. Hence, to comprehend the gap, developers depend on various resources and other features that are not supported in modern browsers, here, most JavaScript bundlers are used to fill this gap. And the best module bundler in the Webpack for React, is used for cross browsing and retaining complete control for developers and is open to customization.
Why Use Webpack for React?
There are other alternatives like Browserify, Brunch, and Parsel, But, Webpack is the widely accepted and used module that has proved its merits across global ReactJS development community.
Some of the advantages of using Webpack for React are:
- Enhances the stability of React Application.
- Optimizes development time with a feature called as “Hot Module Replacement”.
- Has absolute control of React Build System.
How to Create and Setup Webpack for React?
Similar to the creation of React app, Webpack React is a command line tool that is used to create a bundle of assets i.e., code and files. This does not run on the Server or the Browser. Webpack takes in all JavaScript files and the other assets while transforming them in single large file, and hence this file can be sent to server or the browser, depending on the rendering style set up for the website.
Typically, Webpack ReactJS is configured with a file labeled as webpack.config.js as here all the required configurations are written.
Step 1: Install NodeJS, VSCode (any editor that supports Webpack file, most probably supports Scripting code).
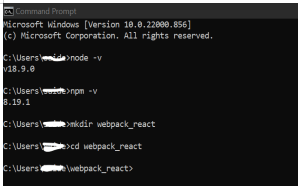
Step 2: Open Command Prompt, and create a directory or a folder with the below command.
Code:
mkdir <directory/ file name>Will create a directory inside C: Drive as shown.
Command:
cd <directory/ file name>Will open the file, required to perform further operations.
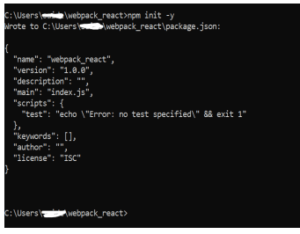
Step 3: Then, need to initialize npm with the below command.
Command:
npm init -yOutput:
It will generate a package.json file with the above script. We can open the folder manually and check if package.json is created or not.
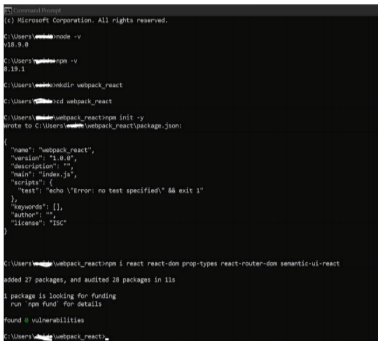
Step 4: Now dependencies need to be added with the below command. Adding dependencies to the code depends upon user requirements or functionality requirements.
Command to install dependencies:
npm i <dependency_name>Output:
Similarly, add a few more dependencies.
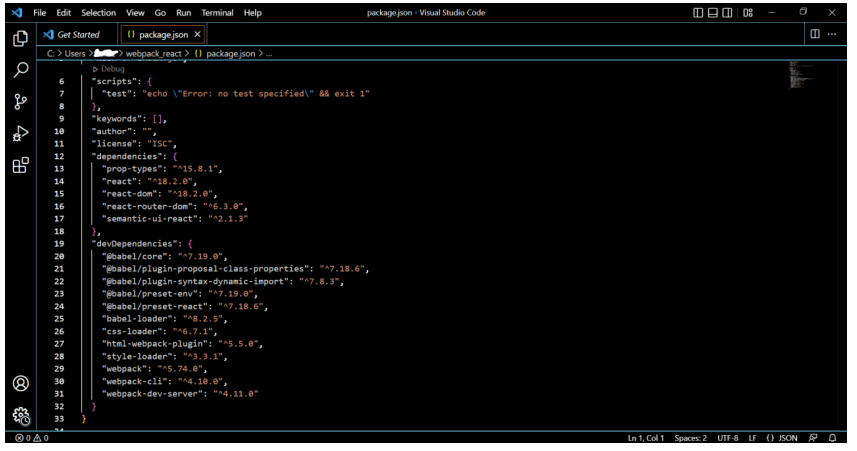
So now let us go check the package.json for the dependencies, here the screenshot shows Visual Studio Code Editor. All the installed dependencies and related dependencies are scripted as below.
Step 5: Now need to set up Babel RC file for Babel configuration. As shown below, click on Add File and name it .babelrc and enter the script in it.
This means telling Babel to use the plugins or the dependencies that are installed. At a later phase, when the user calls babel-loader from Webpack React, the program will know where to look for dependencies.
Step 6: Now create the webpack.config.js file and write the below shown script.
Port numbers can vary based on availability. It is the basic shell script for webpack. Here in line number 7, “mode” defines the webpack configuration to be under “development” or “production”.
Development mode is optimized for developer experience and speed whereas production mode gives defaults that are useful in deploying the application.
Step 7: To get this webpack running, we need to provide an entry point, which is where the React applications bundling process starts from.
There are various versions of Webpack, in Webpack 4, if an entry point is not included, it will consider the entry point to be located at ./src directory.
Output and filename can also be listed as it tells webpack where to write the compiled files and the filename will be replaced with a hash generated by webpack every now and then application changes and gets recompiled.
Also, devtool creates source maps that help in debugging the application. Even though there is various type of source maps, inline-source-map has to be used only for development mode.
Step 8: Also, the module is the type of module the application includes such as Babel and the CSS module. And the rules are applicable to how the user handles each module.
Step 9: We have two rules, first rule is to test files with .js extension using Babel via babel loader that helps to look for JavaScript files.
Step 10: And the next rule is to test the CSS files with .css extension. Two loaders can be used, css-loader and the style-loader to handle css files. The user instructs css loader to use the CSS module, with camel casing and create source maps
Step 11: We also use html webpack plugin that accepts objects with different options. Here let’s specify the HTML plugin that is being used, and the other dependencies for the bundler analyzer.
Step 12: And then configure the development server by specifying localhost and the port. If want to launch the application automatically, need to set historyApiFallback as true and open as true.
Below is the complete script on the screenshot from Step 7, this is how the webpack file in ReactJS is created.
Webpack.config.js file script sample:
Code:
const webpack = require('webpack');
const HtmlWebpackPlugin = require('html-webpack-plugin');
const port = process.env.PORT || 3002;
module.exports = {
mode: 'development',
entry: './src/index.js',
output: {
filename: 'bundle.[hash].js'
},
devtool: 'inline-source-map',
module: {
rules: [
{
test: /\.(js)$/,
exclude: /node_modules/,
use: ['babel-loader']
},
{
test: /\.css$/,
use: [
{
loader: 'style-loader'
},
{
loader: 'css-loader',
options: {
modules: true,
localsConvention: 'camelCase',
sourceMap: true
}
}
]
}
]
},
plugins: [
new HtmlWebpackPlugin({
template: 'public/index.html',
favicon: 'public/favicon.ico'
})
],
devServer: {
host: 'localhost',
port: port,
historyApiFallback: true,
open: true
}
};
Webpack for React Idea
To have a good understanding of Webpack for React, the core idea is to talk about Gulp and Grunt. Inputs to Gulp and Grunt are the filepaths and the matching files can be run through a different kind of process. Both Gulp nor Grunt neither of them understand the structure of the project and if this is compared to Webpack for React, Grunt and Gulp understand how to handle the files and Webpack understands to handle projects.
Have webpack for React, the user gives a single entry point i.e., index,js, or the main.js. Hence webpack for React will try to investigate the application and see how webpack is connected via require, import, or with url values in css, etc. A complete dependency graph is created for all the assets the applications needs and all point to a single file.
Asset is a file, i.e., css, json, jsx,, image, js, etc a node is a dependency graph that is created by webpack for React. Whenever a new node is found, webpack will check the file extension and if the extension matches the user’s configuration, the process will run and is called a loader. Babel is the one that does and can be installed using the below command.
Code:
npm install babel-loaderFAQ
Given below are the FAQs mentioned:
Q1. Webpack for React gives dependency graph. What does it mean?
Answer: One file depends on the other, webpack for react treats as dependency which allows webpack in taking non-code assets i.e., images, and web fonts.
It uses require() on “static assets” on local.
<img src={ require('../../assets/emp_logo.jpg') } />While it is processing the application, starts with a list of modules defined on the command line or the config line, and hence starting from the entry points, webpack for react builds a dependency graph recursively which includes each module and then packages all the modules in smaller bundles as one that is loaded by the browser.
Q2. List out a few plugins that are useful here.
Answer: As the list goes on, here we shall list out a few plugins that are useful.
- DefinePlugin: It allows the user to create global constants that are configured at compile time.
- CommonsChunkPlugin: It creates a separate file that consists of common modules which are shared among multiple entry points.
- HtmlWebpackPlugin: It simplifies the creation of HTML files to serve webpack for React bundles.
- CompressionWebpackPlugin: It prepares the compressed version of assets to serve with content encoding
- ExtractTextWebpackPlugin: It extracts text from bundles or bundles in a separate file.
Conclusion
With this let us conclude the topic “Webpack for React”. We have gone through what webpack for React means and how is it created and how the setup is done step-wise. We have also seen how to use and gone through webpack for react idealogy.
Recommended Articles
This is a guide to Webpack for React. Here we discuss the introduction, why use webpack for react? how to create and set up webpack for react? You may also have a look at the following articles to learn more –
