Updated August 9, 2023
Microsoft Word Features
If you’re migrating to Microsoft Word for your word processing needs, you’re in for a pleasant surprise. Suppose you’ve used Microsoft’s more-rudimentary tools like Notepad or Word pad. In that case, the Word application has several easy-to-use features that make working with text in ms word (apparently boring) text a fun, creative task!
This post covers all the tricks you need while working with pure text. You can format them, reshape them into fancy WordArt, apply eye-catching “effects” like shadows and glows, and “style” them consistently so your Word document looks professionally designed, all while having access to basic text-editing features like copy, paste, find, replace, etc. right at your fingertips.
We suggest you use this guide as a framework for practical exercise. It means that even as you read along on the excellent Word features, you should open up a Word document on your computer or laptop and try it all out. It will help you grasp the finer nuances of Word’s rich text-editing features.
We bet you’re eager to start, so we begin our exciting tryst with Microsoft Word without further ado.
4 Best and Useful Features of Microsoft Word
1. The Basics in Word
In MS Word, every text file is called a “document” and carries the extension “.docx”. Earlier versions (2003 and before) had the .doc extension but with limited text-editing features. (So if you’re working with text in ms word, an older version document, the first thing to do is to save it in the new .docx format.)
You should also explore the “Save As” feature from the File menu, as this exposes you to the wide variety of file formats Text in MS Word supports. Important ones include PDF, HTML, and XML formats to make your Word document compatible with other software applications.
Once you’ve saved your document, you’ll explore basic text-editing features. These can include:
- Select the text for further editing:
Highlight the text with your mouse to “select it”. Alternatively, you can place your cursor at the start of the text and use the (Shift + Right-arrow) keys to select text. The (Shift + Right-arrow + Control) keys will choose one word at a time while using the (Shift + Down-arrow + Control) keys will select text one paragraph at a time.
- Basic editing features:
These include the standard Cut (Control + X), Copy (Control + C), and Paste (Control + V) features common across word-processing tools. Microsoft Word also allows you to copy the look and feel – AKA the “format” of text across your document.
Intrigued?
Here’s how you do it.
- Copy the selected text using the standard command (Control + C). It additionally copies the formatting options of the selected text. In our case, let us assume that our copied text looks like this: Original text.
- Paste the text using the keyboard shortcut (Control + V). Alternatively, you can use the Paste button on the top-left corner of the Home tab.
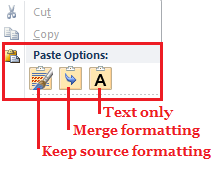
- It will bring up an intelligent tag, asking you which paste option to choose.
- The first paint-brush-logo button (the default option) retains source formatting, so the pasted text looks like this: Original text.
- The second arrow-logo button merges the source format with the destination format and looks like this: Original text.
- The third “A”-logo button copies only plain text and looks like this: Original text.
You can also use the special copy command (Control + Shift + C) to copy only the text format and then use the Format-Painter tool (available in the top-left corner of the Home tab) to paste the format across different blocks of text. To do this, click the Format-Painter button and drag your mouse over the text you want to edit.
Before editing:
- This is the source text. (Copied with Control + Shift + C)
- This is the destination text.
After editing with the Format Painter tool:
- This is the destination text.
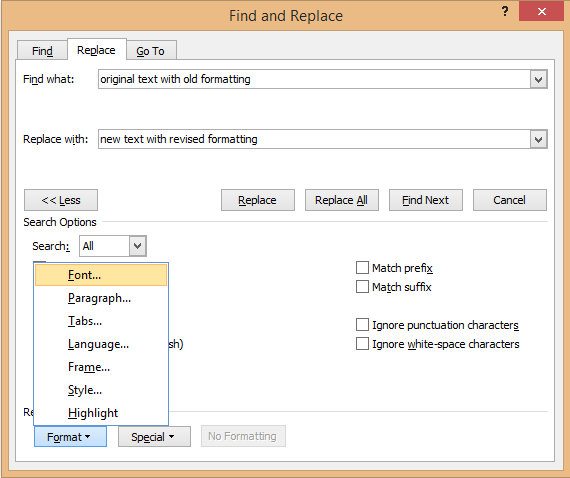
Microsoft Word also comes loaded with other standard editing features like the Find command (Control + F) and the Find-Replace command (Control + H). This multi-dimensional command comes packed with additional options that combine to get you the results other text-editing tools provide quickly. For instance, you can find or replace text based on a case-sensitive search, including wildcards, suffixes, and prefixes, ignoring punctuation and spaces within searches, etc. It’s quite a handful!
As with most Microsoft Word features, this command factors special formatting needs and can be used to replace a text with its format across a document. For instance, you can use this feature to consistently replace the word ‘bold’ with ‘bold’ throughout the document.
2. Formatting Warriors
If you haven’t guessed already, MS Word’s most loved aspect is its wide variety of formatting features. We’ve explored just a few. But to uncover all the gems available, you need to become intimately familiar with the Home Tab View.
The Home tab contains 5 command groups for better formatting: Clipboard, Font, Paragraph, Styles, and Editing.
- Clipboard: This contains the cut-copy-paste commands explained above.
- Paragraph: This contains commands to control the alignment and spacing between lines in a paragraph. Special commands include the Shading command (Alt + H) and the Border command (Alt + B), which allow you to color text cells and border them (as if they were in a table), respectively.
- Styles: This is explained in detail below.
- Editing: This group captures the standard find-replace features explained above.
And this brings us to Word’s most popular command group: Font!
- Font: This is the group you will use most to format your text.
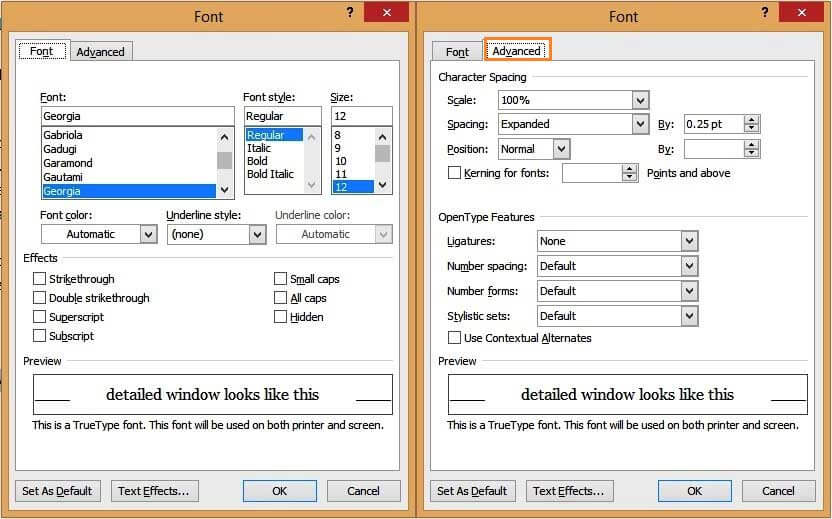
The font menu is your one-stop point for exploring all available font-editing features in Microsoft Word. You can invoke it by right-clicking and choosing the “Font…” option or using the keyboard shortcut (Control + D). And it looks like this:
This menu lets you change the font typeface, size, color, and style simultaneously. Also, note the advanced options, as they control the finer aspects of your text. There are two facets here:
1. Character Spacing
It allows you to control the default size of the text characters and the spacing between them. A tip here is to turn on “Kerning for Fonts,” so your text is more evenly spaced (between characters).
2. Open-type Features
Use this to edit the ligature of your font. (This determines how characters look when combined.) For instance, here’s what happens to the numeric characters with the Georgia font when you set the “number forms” feature to “lining”: they get neatly aligned.
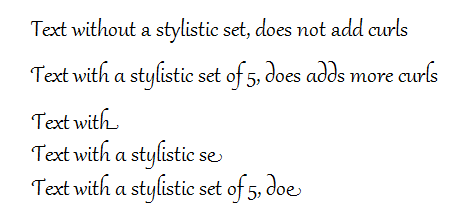
Another feature you can play with is the stylistic sets, which determine how the characters react to each other. Here’s an example of what happens when you use a stylistic set of 5 on the Gabriola font.
As you can see, the look of the text changes as you type along! Fun huh?
Commonly used font shortcuts include.
| # | Keyboard Shortcut | Feature |
| 1 | Control + B | Bold text |
| 2 | Control + I | Italicize text |
| 3 | Control + U | Underline text |
| 4 | Control + (equal sign) | Subscript text |
| 5 | Control + Shift + (plus sign) | Superscript text |
| 6 | Control + Shift + > | Increase text size |
| 7 | Control + Shift + < | Decrease text size |
| 8 | Control + D | It brings up the font menu so that you can change all options at once |
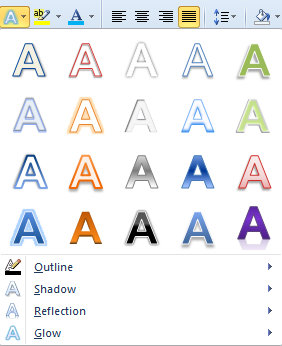
Word’s text formatting features don’t end there. A creative editor can also play with the WordArt command, accessible through the Home tab.
It uses a mixture of 4 text effects: outline, shadow, reflection, and glow to decorate your text with a single mouse click. You can use this feature to highlight text differently in your document. For instance, you can use an outline for headings or a special WordArt for the title of your document, etc.
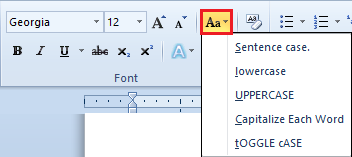
The final command we will explore in the font group is the “Change Case” command. Again, this is accessible through the Home tab and allows you to change the case of blocks of text with a single mouse click.
Frequently used shortcuts in this group include:
| # | Keyboard Shortcut | Feature |
| 1 | Control + Shift + A | Upper case |
| 2 | Control + K | small capitals |
| 3 | Shift + F3 | Toggle between the different case options |
Phew!
As you’re sure to have realized, that’s a LOT of text formatting in ms word features available for use. And if there’s one thing designers consistently find challenging, it’s in maintaining consistency in format across a whole document.
- How do you apply the same format for all significant headings?
- Or ensure that all quotes are in italics?
- Or are sub-titles aligned at the center of the page?
It leads you to the next Word feature: Styles.
3. Styles
I bet the MS Word’s got you curious about “Style”. What does it mean to text-editing software?
Word uses styles to create a predefined “way” of (consistently) formatting fonts and paragraphs across a single Word document. Take a moment now to look at the Styles command group on the Home Tab. It seems a bit like this:
Note: Don’t miss the tiny down arrow (highlighted in red in the picture above); this can list the styles in one column for easier viewing.
Each style is listed here as a “template,” capturing important information on your font characteristics, alignment preferences, and much more. Combine these preferences in a standard style. So each time you want to apply your favorite settings to a slice of text, you don’t have to go through the drill manually; you use a style to capture those settings and effortlessly apply them across the document.
A couple of keynotes here:
- Microsoft Word has some “default” styles, like Normal, Heading, Emphasis, etc. Each is a collection of different preferences (called Style properties), so you can choose the best style that suits your needs.
- You can create your own Style in Microsoft Word, but this stays local to the document in use.
The first style you will see is the “Normal” style. It captures the body text that runs through your document and is the most frequently used style. We must mention that all other styles are built on top of this style. (For instance, if the Normal style captures the font as “Calibri” with size 12 point, the Heading style will capture the same font with a bigger size).
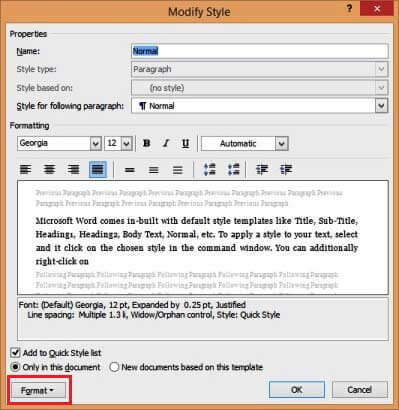
Let’s take a step back here and get you to look at an actual style. Scroll your mouse to the Normal style box in the Home tab, right-click on it, and click “Modify….” You should bring up a screen that looks like this:
Each style has a unique name and captures common text formatting features. The preview screen is especially helpful, so you get a peek before you actually OK the style. Further, the style is summarized (in Word lingo) just below the preview screen so you can skim it for consistency. This window lets you quickly edit the basic font, paragraph, and alignment settings.
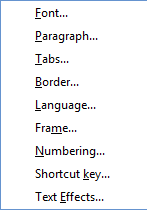
To alter the finer details, you must explore the “Format” command (highlighted in red in the previous picture). This format button is much like when you right-click the text and select the “Format…” option. But here’s a preview of the things you can format with style:
Yes, you can capture common preferences across the font, paragraph, tabs, border, language, frame, numbering, shortcut keys, and text effect Microsoft Word features in 1 power-packed style. Wow!
Let’s play with this right now, so you can apply it to your document.
- Change the name of the style to “MyStyle” and select the “Add to Quick Style List” checkbox below the preview screen. It will create a new style locally accessible in your document.
- Click on the Format button and bring up the settings for Font. You’re familiar with this screen. Change this to your favorite font and size. Make it bold and change the font color.
- Click OK to apply the style.
The new name should appear in the Style window. Each time you highlight text and click on that new style, your favorite settings are applied, pronto! And if, at any point, you want to get back to the normal style, you can use the keyboard shortcut (Control + Shift + N) to do this. Nice! J
The last Microsoft Word feature we explore in this post will give you something extra when you want your text to “pop”: Text effects!f
4. Text Effects
Before the 2010 version, Word had to limit design features. It is where the software was lacking as professionals sought fancy design software to add zing to their pages. But with the introduction of Text Effects in 2010, you have the fanciest text-design features in Word. It would help if you tried this now to know more.
Select some text in your document (not more than 3-5 words, so you note the difference), and bring up the format menu (Control + D). Click on the Text Effects button at the bottom of the window. And voila, let loose your creative (text) design!
Here’s a sneak peek.
We suggest that you take time to explore text effects in thorough detail. You should explore:
- What a simple outline can do for your text.
- How to add a shadow to text.
- Create a surreal feel by adding a reflection to your text.
- Make your text glow (and not just in the dark)!
You will discover some of Word’s fancier “text-editing” features through it!
Signing off…
As this post illustrates, Microsoft Word is much more than a text-editing tool. There is a lot of emphasis on formatting, opening you up to a world of desktop publishing options compatible with Word files.
For instance, you could use Microsoft Word to draft an entire book, including a well-structured page layout design. You could also use it to create an online magazine or a blog. The makers correctly recognize that there’s plenty more you can do when you provide rich formatting features to the text-editing software. And we believe that Word provides this right!
Recommended Articles
Here are some articles that will help you to get more detail about the Microsoft Word Features you are Easy Working with, so go through the link.
