Updated April 3, 2023
Introduction to XML root element
XML root element is defined as a primary element or top-most element in an XML file as XML documents are constructed as an element tree that starts at a root element. This single root element encapsulates further elements together with the default open and close tags’ annotation named @XmlRootElement is used to specify the default root element.
Syntax:
The XML Schema Definition defines as:
<?xml version="1.0" encoding="UTF-8"?>
<root element>
…..// other child elements
</root element>
The Syntax might go wrong if the root element has more than once in the Document. To write a root element we need to follow the above description. The Structure starts with an XML Prolog followed by the format opening of the root node and ends with the closing tag of the root element. We could notice how the root element encloses other child elements in it.
How does the root element work in XML?
Generally, a mark-up language has the first element to be considered as a root element. In HTML <html> is a root element but in XML user-defined any tag element is a root element. Every Document should have a root element by default that is descendants with child elements and sub-child elements. Let’s take a sample code to see how root elements work.
<?xml version="1.0" encoding="UTF-8"?>
<YouTube>
<Channel>Blipi-An educational Tour</Channel>
<from> United States Of America</from>
<Concept>Kids Learning Management</Concept>
<Subscribers>From different countries</Subscriber>
</YouTube>
In the above code, listing <YouTube> element is a root element and <from>, <concept> are child elements to work with. If Suppose a code has
<?xml version="1.0" encoding="UTF-8"?>
<Channel>Blipi-An educational Tour</Channel>
<from> United States Of America</from>
<Concept>Kids Learning Management</Concept>
<Subscribers>From different countries</Subscriber>
This gives out an error because it doesn’t seem to have a root element.
With DTD XML starts like
<?xml version="1.0" encoding="UTF-8"?>
<!DOCTYPE You Tube channel SYSTEM
"http://picasashop.web.in.edu/dtd/employee.dtd">
<YouTube>
<Channel>Blipi-An educational Tour</Channel>
<from> United States Of America</from>
<Concept>Kids Learning Management</Concept>
<Subscribers>From different countries</Subscriber>
</YouTube>
Coming to java Parser To extract a root element we need to include a few packages. Few packages are:
import org.w3c.dom.*;
import javax.xml.parsers.*;
import java.io.*;
Root element is extracted by
Element root = document.getDocumentElement()Considering XMLRootElement annotation in an interface Using JAXB for Binding
@XmlRootElement
class SeaFoods {
@XmlAnyElement
public List<Fish> fish;
}
interface Fish{
void wings();
void eat();
...
}
@XmlRootElement
class Crab implements Fish { ... }
@XmlRootElement
class Prawn  implements Fish { ... }
XML document would look like this
<SeaFoods>
<Crab>hiii </Crab>
<Prawn> hello </Prawn>
</SeaFoods>
Customizing a root element with annotation
package educba
<java-type name="Banking">
<xml-root-element/>
<java-attributes>
<xml-element java-attribute="Branchname"/>
<xml-element java-attribute="PermanentAddress" name="Permanent-address"/>
<xml-element java-attribute="BCode" name="BCode"/>
</java-attributes>
</java-type>
To change a value in the root element
<Model name="sample.cre" version="v2.0" unit="a" count="0" xmlns:xsi="http://www.w3.org/2001/XMLSchema-instance">Android Element – Root element
Taking a new root element
RootElement root = new RootElement(samplename, "feed");
Element entry = root.getChild(samplename, "entry");
entry.getChild(samplename, "id").setEndTextElementListener(
new EndTextElementListener() {
public void end(String element1) {
System.out.println("content: " + element1);
}
});
Examples
Here we have a few examples of the root elements to go with for a valid XML document.
Example #1 – Simple XML code
store.xml
<?xml version="1.0" encoding="UTF-8"?>
<Dmartstore>
<shop List="Grocery">
<Cereals lang="en">Toor Dhal</Cereals>
<Brand>Sree Gold</Brand>
<year>2001</year>
<Quantity>150.00</Quantity>
</shop>
<shop List="Grocery">
<Shampoo lang="en">Loreal</Shampoo>
<Brand>USA</Brand>
<year>2005</year>
<Quantity>250.00</Quantity>
</shop>
<shop List="Grocery">
<Soaps lang="en">Lux</Soaps>
<Brand>India</Brand>
<year>2001</year>
<Quantity>210.00</Quantity>
</shop>
</Dmartstore>
Explanation:
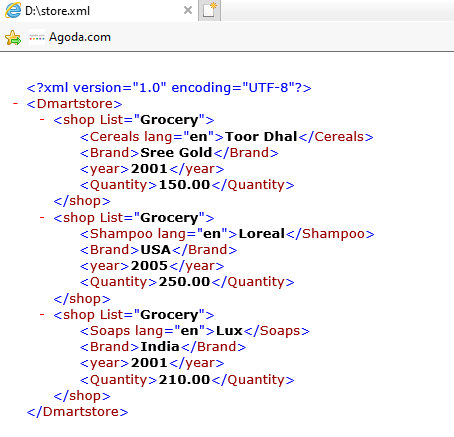
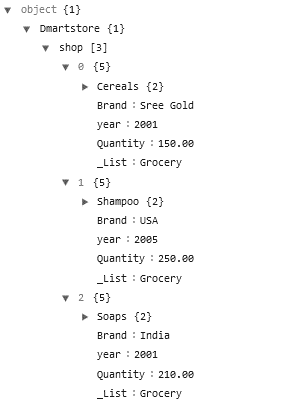
In the above code Dmartstore is a root element along with the nested elements below. When we execute this code, we get the result as
Output:
Example #2 – Fetching a Root element Using java API
employee.xml:
<?xml version = "1.0" ?>
<Stock_db>
<Stocklist>
<StNo> SN345 </StNo>
<St_Name> Wipers </St_Name>
<St_E-mail> John_12@yahoo.com </St_E-mail>
</Stocklist>
<Stocklist>
<StNo> SN542 </StNo>
<St_Name> Glass </St_Name>
<St_E-mail> peeter_12@yahoo.com </St_E-mail>
</Stocklist>
<Stocklist>
<StNo> SN876 </StNo>
<St_Name> Tissue Papers </St_Name>
<St_E-mail> abrahm_18@yahoo.com </St_E-mail>
</Stocklist>
</Stock_db>
XmlExample.java:
import org.w3c.dom.*;
import javax.xml.parsers.*;
import java.io.*;
public class XmlExample{
public static void main(String[] args) {
try{
BufferedReader bufR = new BufferedReader(
new InputStreamReader(System.in));
System.out.print("Load XML File: ");
String st1 = bufR.readLine();
File ff = new File(st1);
if (ff.exists()){
DocumentBuilderFactory Docf =
DocumentBuilderFactory.newInstance();
DocumentBuilder docb = Docf.newDocumentBuilder();
Document dc = docb.parse(st1);
Node nd = dc.getDocumentElement();
String root = nd.getNodeName();
System.out.println("Root Node: " + root);
}
else{
System.out.println("No File Exist!");
}
}
catch(Exception e1){}
}
}
Explanation:
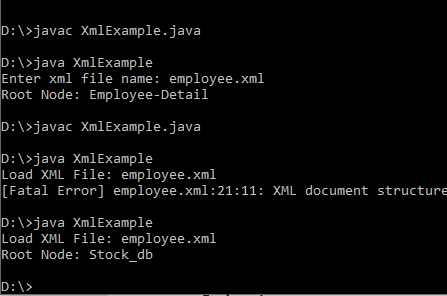
This Code retrieves a root element from XML Files. XML files and Java files should be kept in the same directory. And the file is parsed using parse () function. To display a XML file getnode() method is used. So the output is given as:
Output:
Example #3
<?xml version = "1.0"?>
<Gadgets>
<Type no = "545">
<Mobile> Samsung</firstname>
<Tablet>IPhone</lastname>
<PC>Sony</nickname>
<Manufacturing>China</marks>
</Type>
<Type no = "413">
<Mobile> Nokia</firstname>
<Tablet> MAC</lastname>
<PC> Dell</nickname>
<Manufacturing>India</marks>
</Type>
<Type no = "871">
<Mobile> Redmi</firstname>
<Tablet>Cxxx</lastname>
<PC>Azure</nickname>
<Manufacturing>USA</marks>
</Type>
</Gadgets>
XmlExample.java:
import java.io.File;
import javax.xml.parsers.DocumentBuilderFactory;
import javax.xml.parsers.DocumentBuilder;
import org.w3c.dom.Document;
import org.w3c.dom.NodeList;
import org.w3c.dom.Node;
import org.w3c.dom.Element;
public class XmlExample {
public static void main(String[] args) {
try {
File f = new File("input.txt");
DocumentBuilderFactory dbF = DocumentBuilderFactory.newInstance();
DocumentBuilder dBui = dbF.newDocumentBuilder();
Document d = dBui.parse("employee.xml");
d.getDocumentElement().normalize();
System.out.println(" Display a Root element :" + d.getDocumentElement().getNodeName());
NodeList nl = d.getElementsByTagName("Type");
for (int t = 0; t < nl.getLength(); t++) {
Node nN = nl.item(t);
System.out.println("\nDisplaying an Element :" + nN.getNodeName());
if (nN.getNodeType() == Node.ELEMENT_NODE) {
Element eE = (Element) nN;
System.out.println("Type no : " + eE.getAttribute("no"));
System.out.println("Mobile : " + eE .getElementsByTagName("Mobile").item(0)
.getTextContent());
System.out.println("Tablet : "+ eE.getElementsByTagName("Tablet").item(0)
.getTextContent());
System.out.println("PC : "+ eE.getElementsByTagName("PC").item(0)
.getTextContent());
System.out.println("Manufacturing : "+ eE.getElementsByTagName("Manufacturing")
.item(0)
.getTextContent());
}
}
} catch (Exception e1) {
e1.printStackTrace();
}
}
}
Explanation:
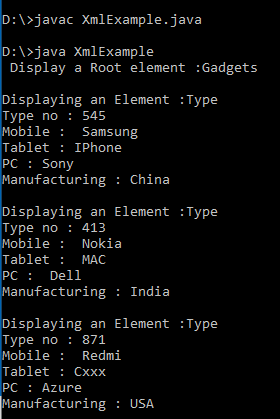
The following code gives the result as below for the input XML file
Output:
Example #4 – Changing name in the root element
import javax.xml.bind.annotation.XmlElement;
import javax.xml.bind.annotation.XmlRootElement;
import javax.xml.bind.annotation.XmlType;
@XmlRootElement(name = "cust")
@XmlType(propOrder = {"cid", "cname", "caddress"})
public class Billing {
private Integer cid;
private String cname;
private Address caddress;
@XmlElement
public Integer getI() {
return cid;
}
public void setI(Integer cid) {
this.cid = cid;
}
@XmlElement
public String getN() {
return cname;
}
public void setN(String cname) {
this.cname = cname;
}
@XmlElement
public Address getA() {
return caddress;
}
public void setA(caddress add) {
this.add = add;
}
}
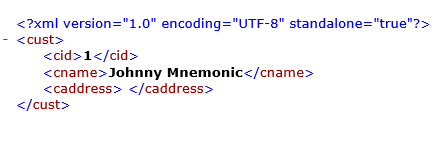
Explanation:
The above code snippet changes class name into an assigned root element cust. Therefore, the output looks like this:
Output:
Conclusion
This article describes how to use XmlRootElement in the java platform. This can be done using the Element Declaration. To handle multiple root elements in XSD @XmlRootElement annotation is used.
Recommended Articles
This is a guide to the XML root element. Here we discuss how to use XmlRootElement in java platform along with the examples and outputs. You may also have a look at the following articles to learn more –

