Updated April 4, 2023

Definition of XPath finder
XPath Finder is one of the most straightforward Chrome extensions for determining the XPath of a WebElement and may quickly install this extension on Chrome and begin searching for XPaths with good compatibility on the device.
Syntax:
The syntax for writing Xpath in a Web page choosen
XPath = //tagname[@Attribute = ‘value’]
Chro path can also be used as a selector to find the path in a chrome browser.
How XPath finder works?
In this post, we’ll take the chance to expose a new type of locating strategy and investigate how Google Chrome locates web items. Examine a section of the page where the HTML code will be displayed is very important to inspect an element. The XPath and Selenium locators were written manually in the old days by automation testers. To find the locator, a tester must first inspect an element and select a locator, then check it for uniqueness throughout the DOM, which takes a long time.
The most powerful method for detecting the locations of elements on a web page is to use XPath. It’s also the ideal locator approach for finding items that are both dynamic and fragile. As a result, every test automation developer must practically learn how to write bespoke XPath expressions. The Chrome browser, on the other hand, includes several add-ons that can assist in identifying the XPath of web items. It’s a little easier to produce XPaths with these ready-to-use Chrome extensions.
Selector Hub:
SelectorsHub is a Chrome addon that makes it simple to locate XPath. It offers a one-of-a-kind relative XPath. SelectorsHub allows us to define our XPath and then test it using shadow DOM, iframe, and SVG elements respectively.
RexPath:
RexPath has become one of the most popular Chrome extensions for placing WebElements using Xpath. In a single click, it presents all available selectors.
TruePath:
This Xpath Finder is a useful tool for locating Xpaths. The Chrome extension is one of the most effective plugins for generating many relative XPaths depending on various attributes, making it one of the most popular Chrome extensions for finding Xpath in Selenium.
Xpath finder- Ruto
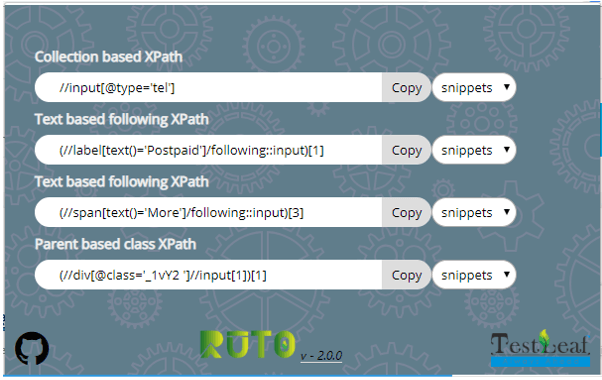
Ruto can help to find selectors from the HTML DOM, such as id, name, and XPath, notably XPath in 20+ distinct patterns. This makes test automation a whole lot easier and saves time in finding an Xpath location as users spent a lot of time locating a Web element. In milliseconds, Ruto can help you identify unique Selenium locators and XPath.
Ruto would be useful for automation testers when building test case scripts. Simply right-click on the element for which we wish to find the locator or XPath and select the ‘add to Ruto’ option. This will attach the element to Ruto, which can be examined by clicking on the extension and selecting from the list of choices available.
What problem will Ruto be able to address for us?
– Create a selector with over 20 XPath patterns
– Parent-child Axes-based Dynamic XPath
– Allows you to paste any XPath into the IDE.
– offers POM and driver commands (Page Object Model snippets based on your inputs)
Ruto can generate the whole code and copy/paste it into the code editor, which is one of its unique features. It will take less than a minute to create an XPath for test automation. Try Ruto to see how fast you can automate your tests. Ruto makes it possible to find XPath in a matter of seconds without having to view the DOM. Testing pros who work as automation engineers are the ones who use it the most (Selenium users). Ruto may be downloaded for free in Chrome, Firefox, Opera, and Edge (chromium version).
Advantage
– Create a selector with over 20 XPath patterns.
– Use element selection to rank XPath patterns.
-Allows users to paste any XPath into the IDE and has good features like Normalize text, collections as well as attribute-based Xpath.
The sample Ruto Finder helps to find the Xpath is shown below:
We’ve gone over a fast overview of XPath, the benefits of utilising Chrome extensions in XPath for locating items on the webpage, and the most often used Chrome extensions for locating XPath, as well as step-by-step detailed tutorials on how to utilise them. As a result, go ahead and use them effectively. Let’s see an example below :
Example
Finding Xpath in Chrome Browser
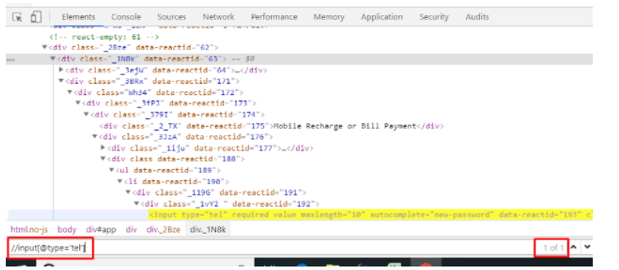
Google Chrome has built-in tools for inspecting pages and components meanwhile far superior to Firebug. In the Chrome browser, we may view an XPath element for the Selenium WebDriver script on a webpage by doing the steps below. The following are the details:
1. Open the URL or domain name in the Chrome browser.
2. Hover the mouse over the relevant web page element (object), right-click on the item we need to find XPath, and select “Inspect Element.”
3. The element panel is now open on the right side of the screen. The HTML feature code is displayed in blue in this frame.
4. Press ctrl+F to perform a DOM search in the window.
5. Every feature in the desired column could be written in XPath.
6.If any components match XPath in the web Chrome, they are labelled in yellow DOM.
Sample Page to see Xpath
It is agreed that finding a high-quality Chrome plugin is difficult. Chrome addons fill in the gaps left by the developer tools. However, just as we can’t use every blade to sharpen the nails, not every plugin will work for us.
Conclusion
Therefore to an end, we have seen few chrome extensions to evaluate the elements to find the Xpath in a Browsers. All the above Plug-ins are worth and the users had to decide which is most suitable. Ruto supports Selenium test automation, efficiently thus anyone working in web automation or Angularjs web application automation will find Ruto very useful for writing test cases that use the locators detected by Ruto as well as the XPath it generates. Thus we had good information on Xpath Finder which doesn’t use DOM.
Recommended Articles
This is a guide to XPath finder. Here we discuss the definition, How XPath finder works? examples with code implementation. You may also have a look at the following articles to learn more –


